
GP - Fotolia
Get started with your first Docker container build
Many admins have a purely theoretical understanding of containers -- despite the technology's seeming ubiquity. This tutorial offers container newbies the opportunity to get hands-on.

Enterprise IT organizations should learn the basics of Docker container build and deployment. What better way than to walk through the process yourself?
Docker and containers are big trends in IT. Containers may not be new, but Docker has made it easy for developers to create microservices-based applications and maintain a consistent environment through production.
Docker container deployment differs from other modern hosting options -- namely VMs -- in interaction with the OS, resource isolation and other areas. Once you understand these basic concepts for containers, follow the simple Docker container build tutorial.
Container operations concepts
Shared kernel. All of the containers on a host share the same OS kernel, either Linux or Windows, and kernel ; VMs each have a different kernel and an OS. This kernel sees each container as a process, like any other application running on the host. All of these container processes compete for CPU from the kernel, and each gets a part of the RAM under the control of this kernel.
Container networking. Each container requires some networking. Firstly, the container needs access so it can consume resources. Often, it also needs network access to provide resources to other things. For example, a web server container must consume a database for its configuration and provide a website for users or other services. At the most basic level, Docker provides a private virtual switch within the host; each container gets an IP address on this private network. Containers receive outbound network address translation to the public network to consume resources, and Docker can also do inbound port address translation to publish container resources. Container teams have multiple options to extend Docker networking with software-defined networking tools and other approaches.
Change root (chroot). Linux enables the user to run a process with a different root directory than others via chroot, a feature that makes it a great platform for containers. Chroot is optional for Linux processes but always used to start containers. The root directory configuration is a crucial part of the isolation between containers on the same host. They do not share a file system; instead, each container has its own file system. Usually, the container file system gets lost and recreated when the system restarts that container. While containers are stateless in this way, there are options to provide persistent storage to containers. Almost every storage vendor has a Docker plugin for persistent volumes. These volumes make the most sense for organizations that run network-attached storage, particularly scale-out NAS, but traditional block storage arrays can carve out logical unit numbers and make them available as Docker volumes.
Namespace. The second layer of isolation is the namespace. This isolation exists between container instances on one host. The namespace for a container helps to protect the shared kernel's and limit the total amount of RAM that one container can consume.
Docker container build tutorial
With these basic concepts, you can accomplish a Docker container build via a Dockerfile. The Dockerfile is, in a text file, the source code that describes how to get an application or service to work inside its container. The Dockerfile describes the steps to install the application. Docker builds a container image from the Dockerfile. It is a binary that contains the file system with the application installed. With a local or centrally managed Docker image, you can run a Docker container, which will start the application.
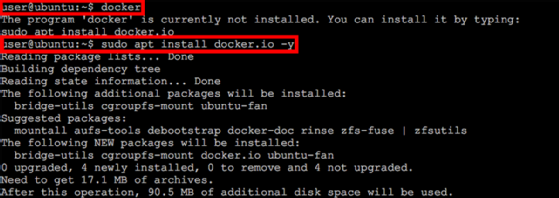
This tutorial uses Linux as the base for the Docker container build and the Docker command line for all operations. Install Ubuntu Linux in a VM, and log on as a regular user who is allowed to sudo, which means to run commands as root. Try to run the docker command, and you'll get a message that it is not installed. The system will display the command to install it (see Figure 1).
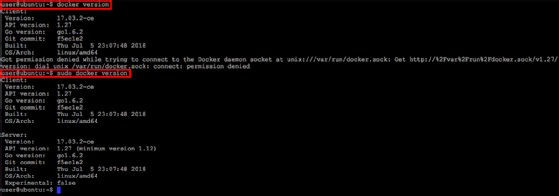
Once the install is complete, run the command docker version to see what you're working with. As a normal user, you only find the version of the Docker utility, not the Docker service. To access the service, elevate privileges by sudo-ing the command: sudo docker version (see Figure 2).
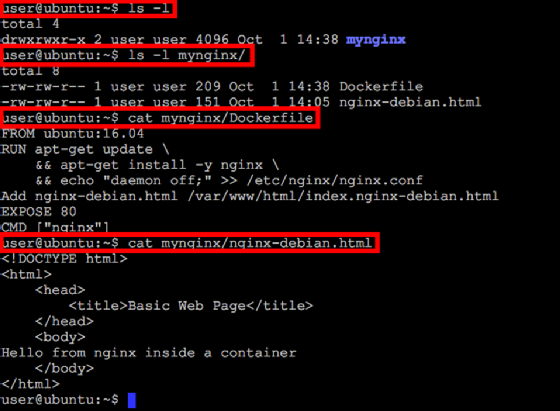
A Dockerfile describes the process to create a Docker image. The following snippet says to use an existing image of Ubuntu 16.04 from the public Docker Hub repository. Then, it runs commands to install the Nginx web server inside the container, adds an HTML file as the web server default and makes the web server available on TCP port 80:
FROM ubuntu:16.04
RUN apt-get update \
&& apt-get install -y nginx \
&& echo "daemon off;" >> /etc/nginx/nginx.conf
Add nginx-debian.html /var/www/html/index.nginx-debian.html
EXPOSE 80
CMD ["nginx"]
This file resides in its own directory for simplicity, along with the file nginx-debian.html, which comprises the HTML webpage (see Figure 3).
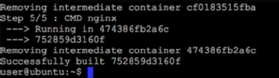
To build the container image, run sudo docker build mynginx/. The process downloads the Ubuntu 16.04 image then starts a container to use that image. Then, the commands in the Dockerfile run. In this tutorial on a Docker container build, the Dockerfile commands are to install Nginx.
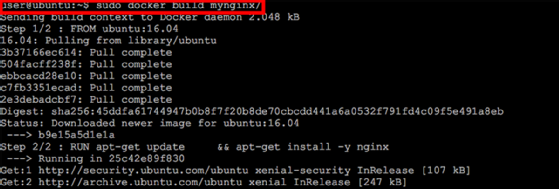
Once the process is complete, the changes merge with the basic Docker image and Docker saves the as a image.
Author's note: Your image ID will be different from mine. Use your image ID in the following commands as you follow along the Docker container build at home.
Run sudo docker image ls to see all of the Docker images downloaded on your machine, including the image ID just created (see Figure 6). Notice that the Ubuntu image from Docker Hub also appears; it won't need to download again if you rebuild the image.

To start a container from the image, use sudo docker run -p 80:80/tcp -d 752859d3160f. The -p 80:80/tcp part of this command makes the web server in the container available to the network outside of the container's host, on TCP port 80. The -d element detaches the container from the command window, so the administrator can continue to execute tasks as the container runs. Use sudo docker ps to check the status of a running container.

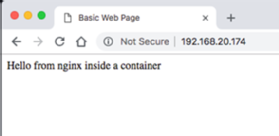
At this point in the Docker container build tutorial, you've reached deployment, with a running container with a web server in it. Now, access whatever simple webpage you copied in using the ADD directive in the Dockerfile. The webpage will be on the IP address of the Docker host, which is the Linux machine where you ran these commands. In this example, the Linux VM has the IP address of 192.168.20.174, and the simple webpage comes up in a web browser, shown in Figure 8.
In this Docker container build tutorial, install Docker onto a Linux machine. To accomplish a container build, start by creating a Dockerfile that describes how to install the application inside a Docker container. Then, create an image that includes that application, and run a container from that image. Through this tutorial, you also should be able to make the application available on the network, beyond the Linux system.
One container on one host is a start but not a production deployment. The rabbit hole of container knowledge is deep, and possibilities arise all the time for how aspects of containers work. Delve into more container deployment topics, such as repositories to hold images with applications, plugins for networking and storage, and Kubernetes and other orchestration tools to run groups of containers.


