
Getty Images/iStockphoto
Guide to Windows storage management using Storage Spaces
Windows Storage Spaces is an alternative approach to traditional storage management that provides increased flexibility and scalability in a straightforward configuration process.

Traditional storage management in Windows file servers often depends on specialized hardware and relatively inflexible configuration options. These requirements don't fit the storage management needs of today's administrators, who expect highly configurable and easily scaled storage.
Windows Storage Spaces offers administrators a software-defined approach with greater flexibility, reliability and scalability. It also provides the following benefits and features:
- Software-defined storage with no specialized hardware, enabling various disk combinations depending on requirements.
- Resiliency options for different use cases.
- Thin provisioning of disks to avoid wasted or overallocated space.
- Native Windows graphical management tools and PowerShell cmdlets.
- Support for mixed drive types, improving flexibility.
- Scalability with support for dynamic resizing.
- Redundancy through disk mirroring and/or data parity.
While parity features sound similar to RAID, Storage Spaces does not require the dedicated hardware and related support that RAID arrays call for. Storage Spaces more closely resembles Linux's Logical Volume Manager in terms of features, flexibility and resiliency.
Simple server deployments might still rely on traditional partitioning, but modern Windows servers will almost certainly benefit from the advantages Storage Spaces offers. This article covers the processes to configure, modify and manage Storage Spaces, as well as best practices for using this Windows feature.
Configure Windows Storage Spaces for storage management
Configuring Storage Spaces is straightforward once you understand the basic process and terminology. You'll begin by combining the capacity of two or more drives, creating a pool of available space. You then create virtual drives from that space. Partition the virtual drives, applying a file system, assigning a drive letter and configuring other settings. Users can then access the space as available storage in File Explorer.
The detailed steps are as follows.
Attach storage devices
Install or attach at least two physical drives. These could be internal, external, USB, Serial Advanced Technology Attachment or Serial-Attached SCSI drives. Back up any data on these disks, as Windows formats them during the configuration process. Note that the drives do not have to be the same type, capacity or speed.
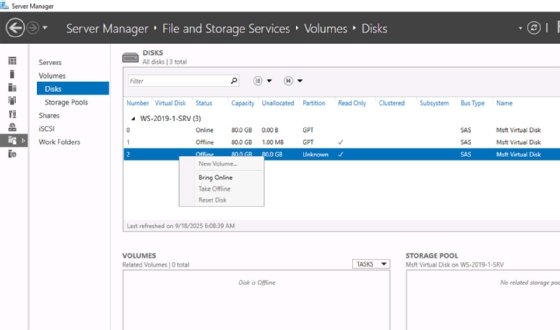
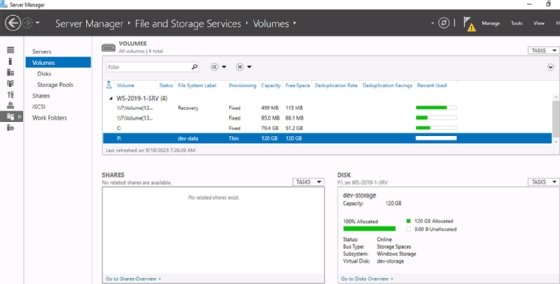
After installing the drives, select Server Manager > File and Storage Services > Volumes > Disks. Right-click to bring each disk online so that Windows can work with it.
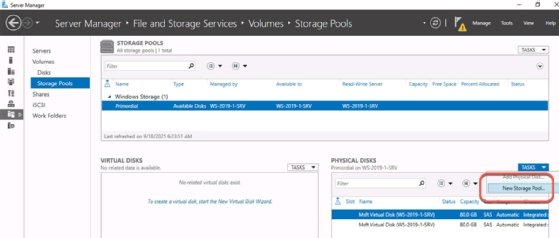
Create a storage pool
Follow these steps to create a storage pool that aggregates space on the attached drives:
- From Server Manager, go to File and Storage Services > Volumes > Storage Pools and open the New Storage Pool Wizard from the Tasks drop-down menu in the Physical Disks pane.
- Once the New Storage Pool Wizard opens, click Next to proceed.
- Enter a name and description for the pool and then click Next.
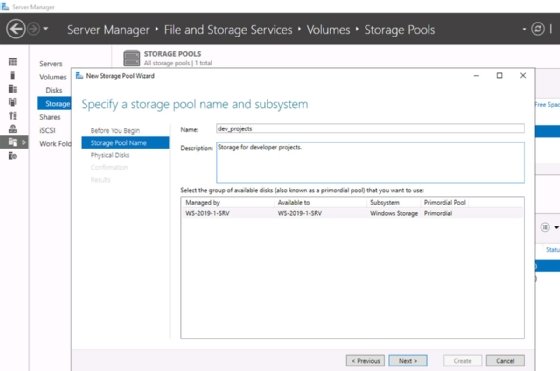
- Select the physical disks you want to include in the pool. You can configure multiple pools, so you don't need to select every available drive. Click Next.
- Confirm that the selections match your requirements and then click Create.
- After Windows creates the pool, close the interface. Note the option labeled "Create a virtual disk when this wizard closes." Check this box to proceed to the next steps automatically.
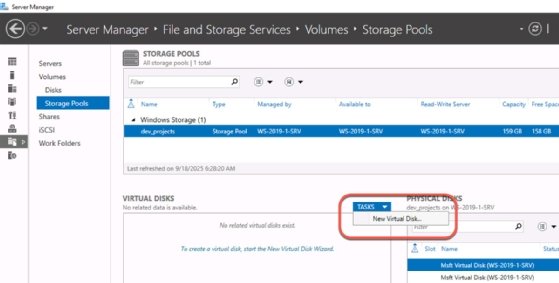
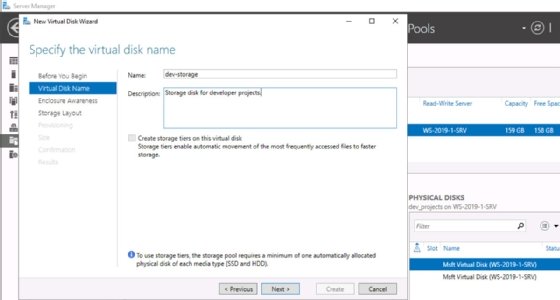
Create a virtual disk
The next task is to carve a virtual disk from the newly created storage pool. You'll use this virtual disk as if it were a physical disk. The following steps outline this process:
- Use the Tasks drop-down menu in the Virtual Disks pane to select New Virtual Disk.
- Select the storage pool from which to create the new virtual disk and click OK.
- The New Virtual Disk Wizard opens. Click Next to proceed.
- Enter a name and description for the virtual disk and then click Next.
- Configure enclosure awareness if your configuration supports it. Click Next.
- Select a storage layout to define resiliency and then click Next. There are three layout options:
- Simple (no resiliency).
- Mirror.
- Parity (similar to RAID 5).
- Select thin or fixed provisioning to allocate space to the virtual disk and then click Next.
- Specify the size of the new virtual disk. It does not have to consume the entire pool, as you can create multiple virtual disks from a single pool. Click Next.
- Confirm that the selections match your requirements and then click Create.
- After Windows creates the virtual disk, you can close the interface. Note the option labeled "Create a volume when this wizard closes." Check this box to proceed to the next steps automatically.
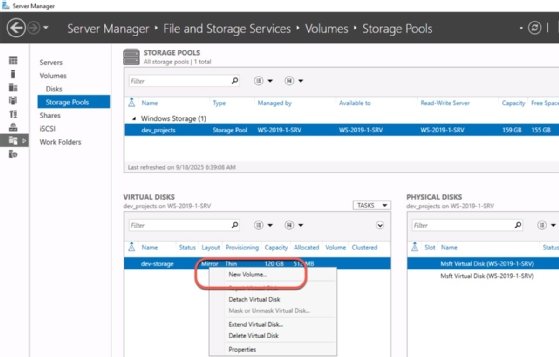
Create a volume
Think of the virtual disk as a physical disk. You must now create a volume on it using the following process, which resembles traditional partitioning:
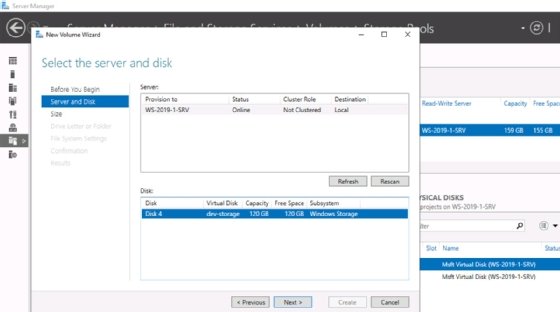
- Right-click the new virtual disk in the Virtual Disks pane and then select New Volume to launch the New Volume Wizard.
- Select the server and virtual disk. Click Next.
- Choose a size for the new volume. It does not need to consume the entire virtual disk. Click Next to proceed.
- Choose a drive letter or folder path for the mount point. Click Next.
- Select the NTFS or ReFS file system and then choose an allocation unit size and volume label. Click Next to proceed.
- Confirm that the selections match your requirements and then click Create.
- Select Close to exit the New Volume Wizard.
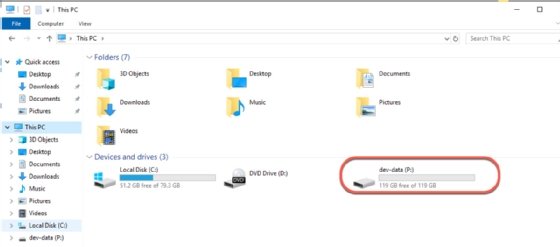
The wizard finishes by formatting and mounting the volume. It now appears as a drive in File Manager. You can create folders to share on the network or handle the volume just as you would a traditional drive.
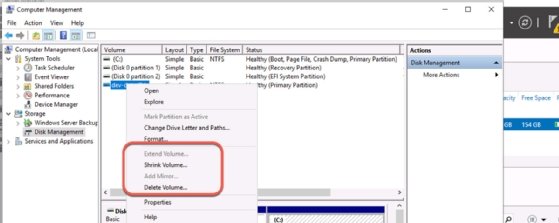
Modify the storage capacity
Adding or removing storage capacity follows a similar procedure to creating a new pool. However, instead of creating new space, you will add it to existing storage. You also have the option to shrink storage. Follow these steps to modify the storage capacity:
- Install or connect a new physical drive.
- Use the Storage Pools menu to add the new drive to the necessary pool.
- Extend the virtual disk to include the new storage space.
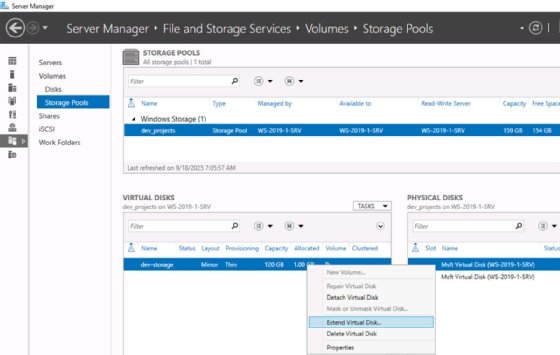
- Extend the volume/partition using the Disk Management interface to utilize the additional capacity.
Note that the drives do not have to be offline to modify capacity. This feature is essential for busy file servers that need more space but must remain available to users.
Manage Storage Spaces
There are several interfaces for managing Storage Spaces, including graphical and command-line options, among others.
The Server Manager interface offers an easy way to manage storage configurations. Access Storage Spaces by going to Server Manager > File and Storage Services > Storage Pools.
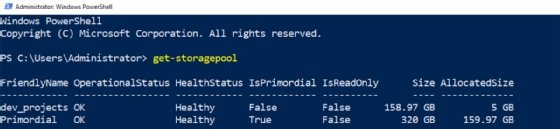
Many PowerShell cmdlets exist for managing storage capacity, including the following:
- Get-PhysicalDisk: List available disks.
- Add-PhysicalDisk: Add available disks to a pool.
- New-StoragePool: Create a storage pool.
- Get-StoragePool: Display storage pool information.
- New-VirtualDisk: Create a virtual disk from a storage pool.
- Get-VirtualDisk: Display virtual disk information.
- Resize-VirtualDisk: Extend the virtual disk onto the newly installed space.
- Resize-Partition: Extend the volume onto the extended virtual disk.
- Optimize-StoragePool: Rebalances the physical disks in a pool to optimize space and performance.
You can create PowerShell scripts to automate storage administration and monitoring.
The storage capacity is ready for standard management. You can now configure additional storage features, including data deduplication, File Server Resource Manager components and Windows Backups.
Monitor Storage Spaces
Windows logs Storage Spaces information in Event Viewer, including warnings and errors pertaining to physical disks, storage pools and virtual disks. The primary log file is the System log, though you also might find information in the Applications and Services Logs under the StorageManagement and StorageSpaces log folders.
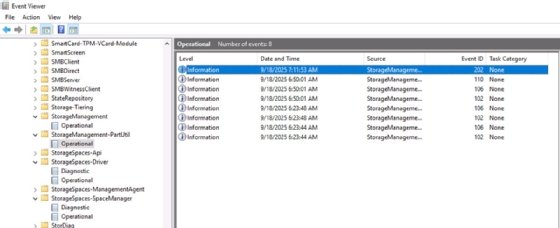
Review these logs if you suspect any issues with Storage Spaces.
Select the Volumes, Disk and Storage Pools nodes in Server Manager to review status and health information for each component of the storage pool.
As mentioned above, PowerShell also includes various monitoring and information-gathering cmdlets.
Storage Spaces best practices
Carefully document your Storage Spaces configurations, including any updates and changes to the capacity and drives.
Monitor Storage Spaces regularly using the Get-StoragePool and Get-VirtualDisk cmdlets for drive health, capacity information and status. Replace disks and add capacity based on this information.
Remember that the resiliency offered by Storage Spaces does not replace regular backups. Storage Spaces should be only one of several data protection layers.
Modern Windows servers benefit from Storage Spaces, so begin the process of migrating your data today.
Damon Garn owns Cogspinner Coaction and provides freelance IT writing and editing services. He has written multiple CompTIA study guides, including the Linux+, Cloud Essentials+ and Server+ guides, and contributes extensively to Informa TechTarget, The New Stack and CompTIA Blogs.