
Getty Images Plus
Try out PowerShell grep equivalents with these examples
Though less well known than grep, PowerShell cmdlets such as Select-String have extensive search capabilities in their own right. Explore use cases for both in this tutorial.

When it comes to searching command-line output or files from the terminal, there's no utility more venerable than grep. In fact, the command is so widely used that programmers even use grep as a verb meaning "to search files and output."
Although not as well known, PowerShell's Select-String cmdlet offers largely the same functionality as grep and is powerful enough to fulfill the most common requirements. Both are incredibly useful tools; to decide which is right for you, learn the basics of how to use both and try out different searches with these side-by-side examples.
Using grep and Select-String on Windows vs. Linux
The biggest difference between grep and Select-String is that the former was originally developed for Unix, while the latter is built into PowerShell.
But don't worry about needing to learn a specific tool for your OS of choice -- grep and Select-String are each available on both Windows and Linux. You can use either tool on either system by running PowerShell on Linux or installing Windows Subsystem for Linux (WSL) on Windows. All Bash screenshots shown in this tutorial are from an Ubuntu WSL instance.
Getting help for grep and Select-String
One of the first steps of using any new tool is learning how to read the help documentation. In this case, both grep and Select-String use standard methods.
For grep, use the --help command.
grep --help
For Select-String, call PowerShell's help system with the following code.
help Select-String
While this article won't walk through the full documentation for PowerShell or grep, knowing how to find these resources can help you troubleshoot problems and answer future questions.
Basic grep and Select-String syntax
Both grep and Select-String can search files and strings natively. And Bash and PowerShell both use piping, so it's even possible to use either to search command output.
Because you can search through output from any other command or command-line executable using these tools, you'll also need to understand the difference between pipes in Bash -- or your Linux shell of choice -- and PowerShell. Namely, Bash passes strings, whereas PowerShell passes objects, meaning that many grep examples can be performed in PowerShell using the Where-Object cmdlet.
Compare string searching with grep vs. PowerShell cmdlets
Next, let's review some examples of different types of searches using grep and PowerShell's Select-String.
Search a string for another string
Suppose you want to find a specific word within another string. The following code and output show an example of how to do so using grep.
echo 'Say that we have a string and we want to find a specific word in that string' | grep 'string'

And here's how to perform the same search with Select-String.
'Say that we have a string and we want to find a specific word in that string' | Select-String 'string'

This example demonstrates a few differences between PowerShell and grep. First, grep highlights all matches by default, whereas Select-String does not. To use the same feature in Select-String, include the -AllMatches parameter.
The previously mentioned differences in how data is piped in each shell are also shown here. Bash requires you to pipe the string by outputting it with echo, whereas PowerShell outputs the plain string to the pipeline by default.
Search a file for a string
Files are just strings or arrays of strings stored on disk. Both PowerShell and grep make searching files as easy as searching strings.
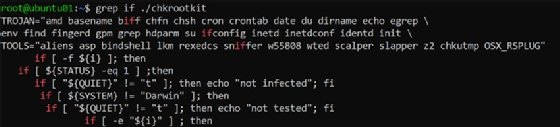
For example, use the following grep command to search a script file for all instances of the string "if".
grep if ./chkrootkit
To perform the same search with Select-String, run the following code.
Select-String 'if' .\chkrootkit
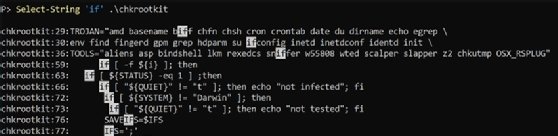
Notice that Select-String adds the line number to each match occurrence by default, whereas grep doesn't. To add line numbers in grep, use the -n parameter.
Search command output for a string
Another use case for both tools is parsing command output to find occurrences of a string. But due to the differences in how Bash and PowerShell handle piping, the PowerShell grep equivalent here isn't always Select-String.
The following Bash example parses the output of the netstat command for a particular IP address using grep.
netstat | grep 172.30.223.184

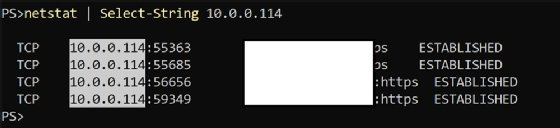
In PowerShell, you can use Select-String to perform the same task.
netstat | Select-String 10.0.0.114
Alternatively, you can achieve the same results with Where-Object, a different PowerShell cmdlet used to filter objects. Because PowerShell sends objects down the pipeline rather than strings, the Where-Object cmdlet is capable of parsing command output.
Get-NetTCPConnection | ?{$_.LocalAddress -eq '10.0.0.114'}

Finally, if you prefer grep's search method, but are using PowerShell, you can pipe cmdlet output to Out-String to search that output as a string.
Get-NetTCPConnection | Out-String -Stream | Select-String '10.0.0.114'

The -Stream parameter in the above example adds a line break to each line, limiting the output to lines containing matches.
Writing regular expressions in grep vs. Select-String
Both grep and PowerShell's Select-String support searches using regular expressions. However, because the two use different engines, their rules for constructing regular expressions differ.
For example, suppose you want to search a string for a phone number. If you're more familiar with PowerShell, you might write a simple regular expression like the following to capture occurrences of phone numbers.
"\d{3}-\d{3}-\d{4}"
However, this expression relies on the \d character class, which won't work in grep unless you use the Perl engine. To do so, add the -P parameter when calling grep.
echo "My phone number is: 123-456-7890, call me" | grep -P "\d{3}-\d{3}-\d{4}"

To use only grep's standard regular expressions rather than the Perl engine, use a custom character class to match on numbers instead.
echo "My phone number is: 123-456-7890, call me" | grep "[0-9]\{3\}-[0-9]\{3\}-[0-9]\{4\}"

The following PowerShell example searches for the same string with the regular expression used in the first grep example.
"My phone number is: 123-456-7890, call me" | Select-String "\d{3}-\d{3}-\d{4}"

These examples demonstrate an important difference between PowerShell and grep when writing regular expressions: Grep can access multiple engines, whereas PowerShell depends solely on the .NET regular expression engine. Consequently, PowerShell is more consistent, but lacks grep's flexibility.
Searching files with grep vs. PowerShell
One of grep's advantages over Select-String when searching files is its ability to search recursively without using any other tools.
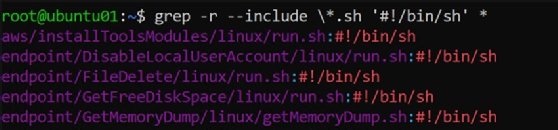
For example, the following grep command recursively searches the Bash scripts folder to find all files containing the string "#!/bin/sh".
grep -r --include \*.sh '#!/bin/sh' *
In PowerShell, the same process has multiple steps. First, use the Get-ChildItem cmdlet to recursively find the files, then pipe that output to the ForEach-Object cmdlet using Select-String.
Get-ChildItem *.sh -Recurse | ForEach-Object { Select-String '#\!\/bin\/sh' -Path $_.FullName }

The patterns used to search for files differ for each tool, again due to the differences between their regular expression engines.
Another difference is that grep doesn't include line numbers by default, whereas Select-String does. As mentioned above, use the -n parameter to add line numbers to grep output.
grep -n -r --include \*.sh '#!/bin/sh' *