
Sergey Nivens - Fotolia
Try out this GitOps tutorial with Flux and Kubernetes
Learn how to implement GitOps with Kubernetes workloads. See the benefits of this approach and follow this Flux tutorial to get started.

IT teams that rely on Kubernetes can use Flux as their GitOps operator. It's a powerful means to support continuous deployment practices in a secure manner.
Flux supports pull-based application deployments and removes the need for IT teams to manage a separate process for deploying to the cluster. And while this emerging technique to managing and deploying apps requires discipline, it's built upon solid software foundations of continuous integration, testing and more.
In this tutorial, we'll show the value of this approach and walk through how to get started. We'll go step by step to teach you how to bootstrap a GitHub repository that supports GitOps on a Kubernetes cluster, and then how to deploy that application.
But before we introduce the Flux-Kubernetes pairing and how it enables GitOps, let's first define GitOps and how it relates to a Kubernetes environment.
GitOps basics
GitOps is a continuous deployment methodology. Git serves as the version control system, which contains the configuration that describes the entire state of the system, as well as an automated process to reach the desired state.
GitOps also decouples the build stage -- the continuous integration (CI) -- of an application from the deployment process. Deployments trigger based on changes to a Git repo, rather than as part of the application CI.
Traditionally, these automated processes perform push-based deployments in the CI stage. For example, a typical push-based GitOps deployment for a Kubernetes cluster would proceed as follows:
- Developers push changes to the application repository.
- The changes trigger the build pipeline, which builds the application.
- The completed build pipeline publishes a new container image with the new application version.
- IT admins update the environment repository -- which stores the Kubernetes configuration manifest -- to use the new container image version. This is also called raising a pull request.
- Once the changes merge, the deployment pipeline deploys the new configuration -- which points to its new container image -- in the existing Kubernetes cluster.
This deployment model has several advantages, including comprehensive documentation for the entire system. Changes are introduced via pull requests, which can be reviewed and tested at will. Git's logs also improve transparency around changes. And in the event a new commit breaks changes, IT admins can use their Git repository to revert to a previous known-working commit.
However, this approach still requires admins to maintain the processes, which can be inefficient and potentially incorrect. Also, user credentials are stored in CI systems, which can create security risks.
GitOps with Kubernetes
Kubernetes exposes powerful declarative APIs. The GitOps process takes advantage of this by shifting how described and desired states converge. For example, an operator could run inside the Kubernetes cluster to pull changes and apply them to reach a desired state.
Look at how workflow changes with the pull-based deployment approach.
- Developers push their changes to the application repository.
- The changes trigger the build pipeline, which builds the application.
- The finished build pipeline publishes a container image with a new application version.
- The environment repository, which stores the Kubernetes configuration manifest, is updated to use the new container image version.
If you compare this to our push-based example, we've removed the fifth and final step, in which a deployment pipeline deploys the new configuration.
This simple switch from push to pull changes how IT teams deploy applications and perform infrastructure operations. Every task that introduces change becomes a pull request in the repository, and the GitOps operator, which sits inside the system, is responsible for seeing that out.
This is different from maintaining a repository with the state of the system and then using a CI/CD tool to push those configs and enact changes.
This combination of declarative Kubernetes APIs and a GitOps deployment model results in two key advantages:
- Operator pattern. With built-in operators to reconcile system state, cluster operators are freed to maintain a process to do this.
- Better security. Since the operator runs inside the cluster, it doesn't expose credentials to a CI process or infrastructure teams.
Introducing Flux
Flux is the GitOps operator for Kubernetes. It's an open source tool initially developed by Weaveworks and later donated to the Cloud Native Computing Foundation. It runs in the cluster it manages, and its function is to watch a remote repository describing the cluster state. It reconciles changes to converge the current cluster state to the desired one.
Flux v1 is currently in maintenance mode, which means no new feature development and only critical updates and bug fixes. For the rest of this tutorial, we will be referring to v2, which is in active development.
Flux keeps the Kubernetes clusters in sync with a version control repository by periodically polling the repository. It applies changes itself, rather than through an operator or CI system. Flux runs inside the Kubernetes cluster it manages, which frees the cluster operators for other tasks.
Flux components
Flux supports several high-level constructs. Some of the most important ones to understand for this tutorial are:
Sources. These are your configuration sources. Git repositories for the Kubernetes cluster and the applications being deployed on top of Kubernetes are examples of sources. Sources don't apply actual changes. Potential sources include:
- GitRepository
- BitBucket
- HelmChart
- HelmRepositories
Reconciliation. This process takes changes defined by sources and ensures the cluster reaches the desired state. Flux won't apply the changes pulled in from the sources until there is an associated Kustomization resource telling it to reconcile to the source.
Kustomization. This tool is used to customize Kubernetes manifests through a Kustomization file. Flux also has custom resources for managing HelmReleases, notifications and more.
Step by step: Getting started with Flux V2 using GitHub repository
To continue in this tutorial, you will need the following:
- a Kubernetes cluster (v1.16 and above);
- a GitHub account and a personal access token (PAT) that has access to create repositories; and
- the sample application found here.
The steps in this piece are similar to what can be found in the official "getting started" guide in the Flux documentation. However, we will diverge in spots -- or add more context about specific steps -- to provide more information to help you learn to use GitOps.
In addition, the sample app already has YAML manifests describing how to deploy it on a cluster using Kustomize. It's possible to run kubectl apply -k ./kustomize against this directory to deploy the app into a cluster. However, we will apply these configurations in a GitOps fashion for the purposes of this tutorial.
Install Flux CLI
Cluster operators need to install the Flux CLI on their development box or jump boxes to bootstrap the cluster to be managed by Flux.
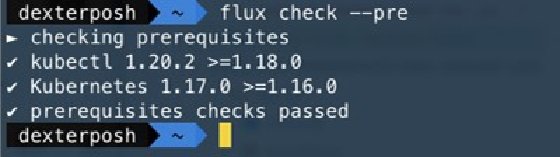
Quickly check that the kubectl and Kubernetes cluster satisfy the prerequisites for installing Flux with this command: $ flux check --pre
Flux needs to install various components to support GitOps on a Kubernetes cluster. The bootstrap option is the easiest way to start since it ensures all the needed components are installed. This process will create a GitHub repo with manifests for the Flux component and configure the cluster to synchronize with the specified path inside the repository.
Run the following commands first with your GitHub user and PAT.
export GITHUB_TOKEN=<your-token>
export GITHUB_USER=<your-username>
Issue these commands to bootstrap the Kubernetes cluster with all the components and a private GitHub repository.
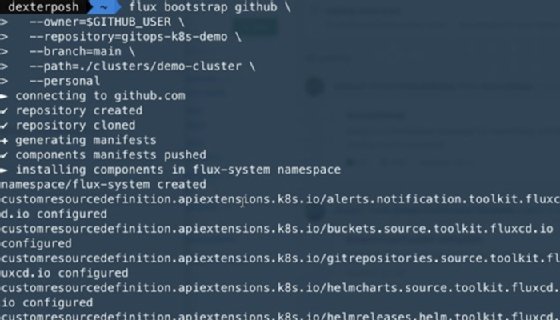
flux bootstrap github \
 --owner=$GITHUB_USER \
 --repository=gitops-Kubernetes-demo \
 --branch=main \
 --path=./clusters/demo-cluster \
 --personal
Figure 2 shows a trimmed output of the above command execution.
To quickly check what's been deployed through this process, use the kubectl command to get all resources in the Flux-system namespace: kubectl get all -n flux-system
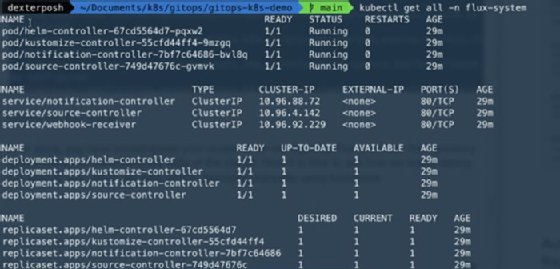
As you can see, bootstrapping Flux creates deployments, services and other resources to run the controllers for different components. If you want to select specific components, use --components and --components-extra flags with the bootstrap command.
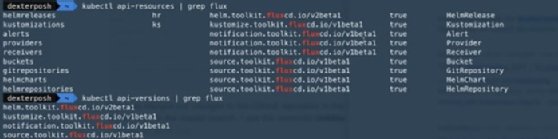
We can also see the custom resources Flux uses to track and synchronize to this GitHub repository. Use the commands in Figure 4 to look at the API groups and the resources Flux introduces as part of its ecosystem to enable GitOps.
Because the cluster was bootstrapped, we can see Flux has already created a GitRepository resource pointing to our GitHub repository and a Kustomization resource for reconciling to the state defined in the repo.

Keep in mind that this GitHub repository and the Kustomization resource sync and reconcile the cluster only; it has nothing to do with an application deployment.
Deploy the application
Next, we'll review how to deploy our sample app -- the same one we said you could deploy manually using the kubectl apply -k command.
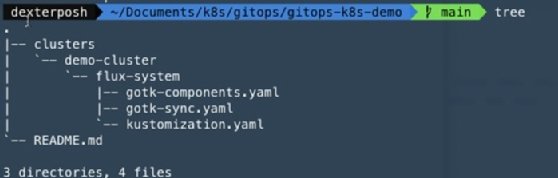
If you clone the repo, you can see the folder structure of it.
The Flux CLI comes with commands that generate the YAML manifests for the sources and the Kustomizations we want to configure for our cluster.
Commit the YAML manifest files describing a source to watch in the specified path: /clusters/demo-cluster
Ideally, you should create a branch and push your changes to the remote branch, creating a pull request, where someone would review these manifest files that you want to merge. However, for this tutorial we are pushing directly to the main branch.
Use the Flux CLI to generate the YAML manifests file for our sample application GitHub repository:
flux create source git podinfo \
 --url=https://github.com/dexterposh/podinfo \
 --branch=main \
 --interval=30s \
 --export > ./clusters/demo-cluster/podinfo-source.yaml
These commands create the following YAML definition file, which describes a Git repository as the source for Flux to watch.
apiVersion: source.toolkit.fluxcd.io/v1beta1
kind: GitRepository
metadata:
 name: podinfo
 namespace: flux-system
spec:
 interval: 30s
 ref:
  branch: main
 url: https://github.com/dexterposh/podinfo
Commit and push the changes, using Git:
git add -A && git commit -m "Add podinfo GitRepository"
git push
Now, we merged our changes to the GitHub repository in the main branch Flux is watching. In the main branch, I see the commitId 030b008 for the latest commit.

Now, let's go to our cluster running Flux. We can see that our GitRepository resource has pulled the latest commitId and synced with the remote GitHub repository. In short, it has pulled in the YAML manifest we added.
You can use kubectl to view the current status of the GitRepository resource:
kubectl get gitrepositories.source.toolkit.fluxcd.io -n flux-system
Or you can use the Flux CLI:
flux get sources git
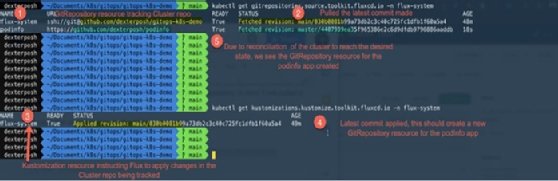
Let's break down what happened in Figure 8.
- The fluxctl command created Kubernetes YAML manifests for the sample application GitRepository.
- Those files were committed into the Kubernetes cluster repository.
- The GitRepository custom resource tracking our cluster repo pulled the latest commit changes.
- The Kustomization custom resource mapped to the cluster repo applied the latest commit changes.
- Following reconciliation in step 4, a GitRepository custom resource was created tracking our application repo.
This is essentially the GitOps operation model. To introduce changes into the Kubernetes cluster, the changes are made in the corresponding Git repository tracking it. Once the changes merge, control is handed over to the Flux, which polls the latest changes and reconciles the state.
At this point, you might be asking why we don't see our deployed application. This absence is because creating a GitRepository source only allows Flux to track and pull the latest changes from a Git repository. To apply the changes, we need another Kustomization resource.
To do that, use the Flux CLI to generate the YAML manifests describing the resource.
flux create kustomization podinfo \
 --source=podinfo \
 --path="./kustomize" \
 --prune=true \
 --validation=client \
 --interval=5m \
 --export > ./clusters/demo-cluster/podinfo-kustomization.yaml
Commit these files again and push to a remote branch.
git add -A && git commit -m "Add podinfo Kustomization"
git push
You will see the commit with ID 18c9ab4 appear in the GitHub repository.

Now let's see the state of our source and Kustomization resources.
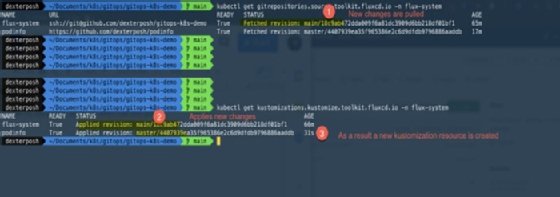
A new Kustomization resource has been created for the application repository. It will take the manifest in the Kustomize folder in the repository and apply them.
You can check the manifests in the repository and see the corresponding resources getting deployed in the cluster.

Now that the cluster is being managed by Flux in a GitOps fashion, here are some important points to remember:
- Changes made to the YAML manifests in the application repository will be synchronized and applied to the cluster. You can suspend the reconciliation by running flux suspend kustomization <name> and resume it with flux resume kustomization <name>.
- Any manual changes made to the application deployment -- for example, you use kubectl edit to modify the sample application deployments -- would be reverted.
- Removing the Kustomization manifest file from the cluster repository will remove the corresponding Kubernetes resources deployed too.
Dig Deeper on Containers and virtualization
-
![]()
Kubecon + CloudNativeCon 2024: Flux CD tool solidified for growth
By: Adrian Bridgwater
-
![]()
GitOps vendor's close echoes wider funding, open-core woes
By: Beth Pariseau
-
![]()
Evaluate the GitOps model for your organization
By: Tom Nolle
-
![]()
GitOps hits stride as CNCF graduates Flux CD and Argo CD
By: Beth Pariseau