
Getty Images/iStockphoto
How to use Nmap to scan a network for documentation
Nmap might be more common for security tasks, but it's also useful for network documentation and inventory. Follow these best practices to make the most of Nmap scan results.

It's common to focus on Nmap from a security perspective, but it's equally important to remember that Nmap is also great for everyday sys admin tasks.
The following are some tasks Nmap supports:
- network inventory;
- device discovery for configuration management; and
- network mapping for troubleshooting.
So, how might you use Nmap if not for security? By inventorying and documenting a network, you enable maintenance of audits and licensing records, accurate and efficient configuration management, and a solid troubleshooting reference.
This article explains some options and tricks for using Nmap for nonsecurity tasks. It begins with a brief overview of basic Nmap use and then expands into outputting results to files and using Zenmap, as well as a few Ansible specifics.
Nmap basics
How to use arp-scan to discover network hosts
I'll begin with a quick reminder of Nmap basics, including some options more specifically suited to inventory and discovery rather than security settings.
Basic scan syntax
Assuming you're using the command-line version -- I cover the GUI tool Zenmap below -- you can scan a single system:
$ nmap 192.168.2.200
Begin a basic subnet scan by typing the nmap command and the subnet:
$ nmap 192.168.2.0/24
Depending on the size of the subnet, this scan could take a while. If you need to scan multiple subnets simultaneously, place a space between each network ID, like this:
$ nmap 192.168.2.0/24 192.168.3.0/24 192.168.4.0/24
Most network inventories won't need a list of discovered ports, so make the scan more efficient by dropping that information:
$ nmap -sn 192.168.2.0/24
Admins can control the time it takes Nmap to scan in many ways. One method is by using timings. By adding the -T1, -T2, -T3, -T4 or -T5 options, you can speed up the scan at the risk of possibly less accurate results. Consider these timings if scanning a large network segment. The -T1 option is the slowest of those listed, and -T5 is the quickest.
Increase the verbosity of the output by using the -v or -vv (very verbose) options. Note that increased verbosity also lengthens scan time.

One element you probably need for documentation and inventory is OS discovery. Use the -O option for this:
$ nmap -O 192.168.2.0/24
The -A option also provides OS identification and can be combined with other options.
In some cases, the above basic options are sufficient for your needs. However, you might need more detail or want to organize the output for better presentation or parsing. Next, I look at outputting Nmap results to other formats.
Use the Nmap results
Now that I've reviewed the basics of using Nmap, how can you begin to work with the results? Nmap output, especially at the command line, is not particularly user-friendly when dealing with many hosts and when you need to create easy-to-understand documentation. First, you need to put the results in a file, and then you need to use that file.
Output to XML
Nmap can write results in XML, which various programs can read and interpret. The XML option is -oX and looks like this:
$ nmap 192.168.1.10 -oX scan.xml
Next, you need to convert the XML file to HTML. Use the following command:
$ xsltproc scan.xml -o scan.html
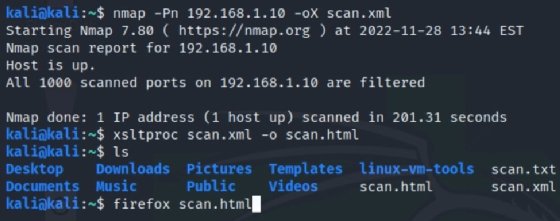
You can then open the HTML file using your browser of choice.
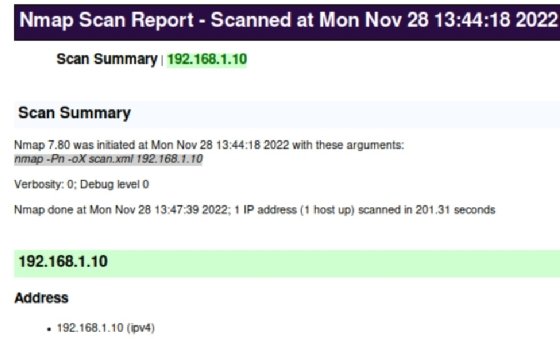
Many programs can input and work with XML. For example, Microsoft Excel and Visual Studio Code can import and display XML data. XML is universal and can be much easier to work with than grepable results. Because the XML results can be beneficial, you might want to do some additional reading at the Nmap site.
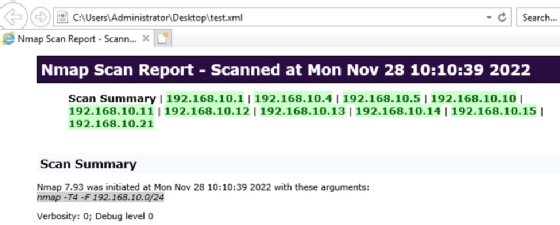
If you use the Nmap GUI front-end Zenmap, you can save the scan results as an XML file and open the file in a browser.
Output to files for grep
Nmap includes several options for outputting results to files. The first relies on the -oG option, which renders results in a format designed to work with the grep pattern matcher. Here's an example:
$ nmap -oG 192.168.1.10 scan.txt
You could then use grep to search for strings such as "up" to filter the results better.

Note the following conventions:
- -oG -- grepable output
- -oX -- XML-only output
- -oA -- standard, grepable and XML output
Organize the output
You can organize the grepable output -- the -oG option from above -- with additional tools, such as awk. Here's an example directly from the Nmap documentation of formatting the Nmap output to organize your results on a Linux system:
$ nmap -p80 -Pn -oG - 10.1.1.0/24 | awk '/open/{print $2 " " $3}'
The result displays just IP addresses and fully qualified domain names.
It takes some effort, but it's possible to generate a CSV file you can open in a spreadsheet program, such as LibreOffice Calc. Browse GitHub to discover various Python programs that accomplish the same task, or search for online XML-to-CSV conversion tools.
Use a Zenmap diagram
Many IT administrators are visual, and reference diagrams are especially useful to them. Visualizing the relationship between network devices can greatly aid the troubleshooting process. Zenmap, the Nmap graphical interface, includes a dynamic mapping feature that provides details and visual references for Nmap results.
Here's a quick scan of a small network using the topology view.
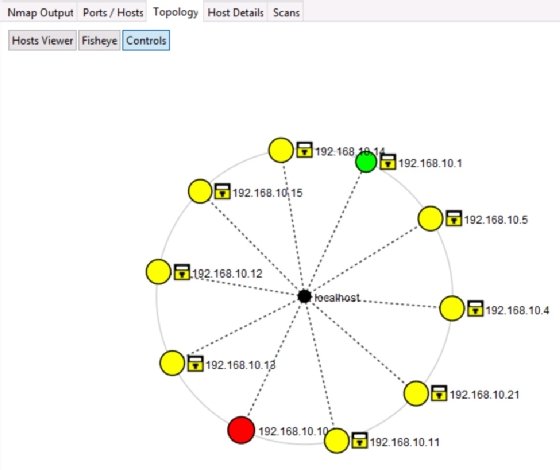
From the topology view, you can save the network diagram in various image formats. Keep in mind the image is no longer dynamic. Still, this is a great feature for adding diagrams to network documentation.
You can also save the entire scan by going to the Scan menu and selecting Save and then Save As. You can open the file in Nmap later, and the visual topology is still interactive.
Inventory/discovery scans for Ansible
Ansible is a relative newcomer to the game compared to tools such as Nmap, but its importance is easily recognized. Ansible is a configuration management tool that provides administrators with a comprehensive option for enforcing desired settings. However, Ansible needs to know about its target nodes to find and configure them. Nmap and Ansible are a natural partnership -- the former to discover hosts and the latter to configure them.
Ansible uses YAML files to manage configurations. An Nmap module and additional guidance are available at the main Ansible site.
By scanning with Nmap and using the results in Ansible to target hosts, administrators can ensure hosts that reside on the network are configured per security standards. Ansible connects over Secure Shell, so one of the easiest ways to combine the two is to scan for port 22 using Nmap.
Wrap-up
Nmap is truly an extraordinary tool, and while many folks emphasize its security orientation, I want to remind sys admins about its usefulness for other IT tasks, including documentation and discovery. It's even more powerful when combined with technologies such as Ansible or when creatively used to generate spreadsheets that are easy for nontech managers to absorb.