
Getty Images/iStockphoto
How to use Nmap to scan ports: A complete tutorial
Nmap is a versatile open source security tool that scans ports to identify vulnerabilities, test firewall rules, inventory networks and troubleshoot connectivity issues.

Ask any security, network or systems administrator about the top tools in their toolbox and Nmap is likely on their list. Short for Network Mapper, the versatile utility does everything from performing port scans and managing security configurations to troubleshooting network connections, documenting network environments and monitoring system uptime.
Nmap offers a wide variety of features, and its additional scripting options take it to an even higher level. It gathers information, guesses OSes, provides performance information, lists system details such as MAC and IP addresses, and more. Because Nmap is open source, its support and capabilities are nearly endless.
One of Nmap's most critical functions to master is port scanning. Let's examine common ports and port scanning use cases before exploring how to use Nmap to perform various types of port scans.
Nmap port scanning 101
Ports are communication endpoints through which data flows. Port numbers range from 0 to 65535:
- Port 0 is a reserved port that is not intended for use in TCP or User Datagram Protocol (UDP) messages.
- Ports 1 to 1023 are well-known ports used as defaults for internet protocols, defined by the Internet Assigned Numbers Authority (IANA).
- Ports 1024 to 49151 are registered with IANA for specific applications and services.
- Ports 49152 to 65535, known as ephemeral, dynamic or private ports, are used for temporary connections on an as-needed basis.
A port scan is a network discovery technique that involves sending a series of messages, known as probes, to a device. Port scanners, such as Nmap, are applications that conduct port scans to identify which ports are open or closed.
Nmap port scan use cases
One of Nmap's most helpful and widely used capabilities is scanning for specific port information. Common Nmap port scan use cases include the following:
- Finding and fixing potential vulnerabilities.
- Testing firewall rules.
- Security auditing.
- Inventorying network devices.
- Discovering new devices on a network.
- Troubleshooting connectivity issues.
- Mapping network topology.
- Identifying network bottlenecks.
- Penetration testing.
- Performing incident response.
- Closing unused ports, i.e., ensuring the server only listens for traffic for the services it offers.
- Scanning cloud infrastructure, including VMs, cloud services and virtual networks.
Note that malicious hackers also conduct port scans for network reconnaissance. Using a port scanner, they can discern which services a device runs and identify vulnerabilities to exploit to initiate an attack.
Port status categories
Nmap port scans return one of the following states per port checked:
- Open. Indicates a service actively listens and runs on this port and accepts connections.
- Closed. Means that while probes are received and the port is reachable, no services currently run on the port.
- Filtered. Nmap received no indication that the probes were received and cannot determine the port's status. This is often due to packet filtering by a firewall.
- Unfiltered. Denotes probes were received, but Nmap cannot determine the state.
- Open/Filtered. The port is open or filtered, but Nmap cannot determine the state.
- Closed/Filtered. The port is closed or filtered, but Nmap cannot determine the state.
How to download and install Nmap
Begin by downloading the appropriate installation utility from the official Nmap site.
- Linux users: Install Nmap using the Red Hat Package Manager linked in the description.
- Mac users: Access the binaries using a disk image file. You can also install Nmap through the Homebrew package manager by typing $ brew install nmap.
- Windows administrators: Download the installer application.
You can also compile Nmap yourself if you need specific modifications or settings. To use a graphical version of Nmap rather than work exclusively at the command line, download and install the Zenmap front end.
The Nmap website includes extensive documentation and a script repository containing many useful and complex configurations for any type of scan.
Nmap port scans: Common ports and techniques
Common port and service examples used in Nmap scans include the following:
- TCP port 22. Secure Shell, commonly used to securely connect to remote Linux, macOS and network devices.
- TCP ports 80 and 443. HTTP and HTTPS, used for internal web services.
- TCP port 123. Network Time Protocol, used to synchronize time services on network nodes.
- TCP port 3389. Remote Desktop Protocol, commonly used for secure remote administration of Windows systems.
- TCP port 1433. Microsoft SQL Server database engine, common for MS SQL databases.
- TCP port 389. Lightweight Directory Access Protocol, common for Microsoft Active Directory environments.
- TCP port 445. Server Message Block (SMB), used for modern Windows file sharing.
- UDP ports 135, 137 and 138 and TCP port 139. Older SMB Windows file sharing protocols.
Networks will have other ports open on some devices for custom or third-party apps, so check your documentation carefully. Try testing these ports on your organization's network, or scan scanme.nmap.org, a host set up by the Nmap Security Scanner Project for testing purposes.
Common Nmap port scan types and techniques include the following:
- TCP SYN scans. Also known as TCP half-open scanning, these scans send SYN (synchronization) packets but never complete the TCP handshake.
- UDP scans. These send UDP packets to target ports and determine port state.
- TCP connect scans. These complete a full TCP three-way handshake with target ports, making it more detectable, but also more reliable.
- SCTP INIT scans. Like TCP SYN scans but for Stream Control Transmission Protocol, these send INIT (initiation) chunks to discover services on SCTP-enabled systems, for example, VoIP and telecom networks.
- Null scans. Send TCP packets with no flags set, which can bypass firewall rules and could reveal closed ports if they respond with RST (reset) packets.
- FIN scans. Transmit packets with only the FIN (finish) flag set. FIN indicates the connection has been terminated, after which a closed port usually responds with an RST, while open and filtered ports don't respond.
- Xmas scans. These set the FIN, PSH (push) and URG (urgent) flags -- lighting up the packet like a Christmas tree -- to trigger responses from closed ports.
- TCP ACK scans. Send TCP packets with only the ACK (acknowledgement) signal, which lets a sender know a packet has been received. Primarily used to map firewall rules and packet filtering settings.
- IP scans. Rather than scanning for ports, these scans determine which IP protocols are supported by the target system.
- FTP bounce scans. Use an FTP server to scan for ports. Most modern FTP servers block this vulnerability.
How to conduct Nmap port scans, step by step
As you learn how to use Nmap, you'll find the utility relies on many options to manage exactly how it scans targets. The primary option for port scanning is -p, followed by one or more port numbers. Open a terminal window and use the following commands to conduct various types of scans.
How to run a default scan
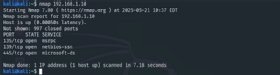
To run a default scan, use the following command with a specified target, such as an IP address or host name:
This will perform a scan -- either a TCP SYN scan for privileged users or a TCP Connect scan for unprivileged users -- of the most common 1,000 TCP ports. Scan results show target information, including IPv4 and IPv6 addresses, reverse DNS name, ports and port states.
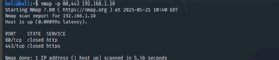
How to scan a specific, single port
Type the following command to scan a single port, such as the older Windows file sharing port 135:
nmap -p 135 192.168.1.10
Substitute the target's hostname if name resolution is available. You can also target web URLs.
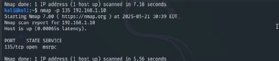
How to scan all ports
To scan all ports -- 1 through 65,535, use the -p- command:
nmap -p- 135 192.168.1.10
This scans all ports, rather than just the top 1,000 ports during a default scan.
How to scan multiple ports manually
You might want to scan multiple ports simultaneously, especially ports related to each other, such as web services or older SMB connections.
nmap -p 80,443 192.168.1.10
nmap -p 137,138,139 192.168.1.10
This approach provides an easier and more comprehensive scan if you know exactly which ports you need results for.
How to scan a range of ports
You can also tell Nmap to scan for a range of ports, such as 1 to 100.
nmap -p 1-100 192.168.1.10

How to scan multiple ports automatically
Nmap meshes easily with automation and efficient processes. For example, it can scan ports you most likely need to view. Begin by using the -F option for a fast scan of the 100 most commonly used ports.
nmap -F 192.168.1.10
Note that Nmap's default scan checks the 1,000 most commonly used ports -- which significantly increases the time required for extensive network scans.
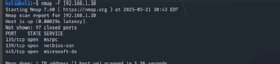
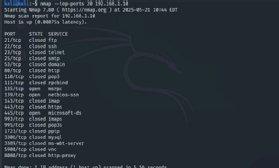
How to scan for the top ports
Use the --top-ports option if you want to find the scan to look for a specific number of the top ports. For example, type the following to scan the 20 most commonly used ports:
nmap --top-ports 20 192.168.1.10
How to exclude ports from a scan
You can script Nmap scans, which is particularly useful if you look for specific ports repeatedly. Scripting lends itself to extremely specific commands and options. Nmap's --exclude-ports flag enables you to prevent it from scanning particular ports. For example, you might generate a script to scan the 100 most common ports using the -F option but also exclude web services ports you're already aware of.
nmap -F --exclude-ports 80,443 192.168.1.10
Setting up exclusions makes for more efficient scans. The examples in this section target a single device, but the precision that exclusions allow can also benefit network-wide scans of entire subnets.
Scanning is an essential part of auditing
Scanning ports with Nmap is essential for network auditing, service management and hardening. The prevalence of infrastructure-as-code automation, orchestrated deployments, and scaling and virtualized devices means you won't always know exactly what's deployed in your environment. Scanning is an excellent way to ensure you're aware of all entry points.
Regular Nmap scans help ensure a network's functionality and security. Learning how to use Nmap gives admins the skills and peace of mind necessary for network and server hardening. It's also essential for mapping a network, troubleshooting and preparing for an audit.
Download Nmap on your favorite OS today and begin learning how it can improve your company's security posture and empower your support team.
Editor's note: It is possible to use Nmap both lawfully and unlawfully. It is up to you to ensure your usage is lawful. Get appropriate permission and approval before performing port scans, and handle the information obtained ethically. If you are unsure whether your usage is lawful, do not proceed until you have confirmed that it is -- for example, by discussing and validating your planned usage with your organization's counsel.
Damon Garn owns Cogspinner Coaction and provides freelance IT writing and editing services. He has written multiple CompTIA study guides, including the Linux+, Cloud Essentials+ and Server+ guides, and contributes extensively to Informa TechTarget, The New Stack and CompTIA Blogs.