
Getty Images
How to build a network-aware CI/CD pipeline with GitLab and Ansible
Automation is becoming a common process for organizations to include in their networks. No matter what type of automation a network uses, their CI/CD pipeline should be network-aware.

Whether organizations transition to automation in an existing network deployed without automation or build a new network project with automation, the CI/CD pipeline should be network-aware.
Within a CI/CD pipeline, network-aware means that live, critical configurations are in check when pushing a new configuration. Understanding how to structure your network automation needs for live network state checks helps ensure that every change you make is validated and reversible. Ansible playbooks, Python or GoLang code can verify the live network state and execute them using tools such as GitLab, Jenkins or GitHub Actions.

For the CI/CD pipeline to be network-aware, network teams must perform the following steps:
- Pre-check. Perform an initial query into the live network. For example, check if a previously configured critical interface is up and running. If you have specific VLAN ranges to include in the pipeline, follow the steps to validate those pre-checks.
- Deploy. Apply a new configuration to the network.
- Post-check. Verify the critical configuration initially checked by the pre-check job remains valid.
- Rollback: If the post-check fails, reconfigure the critical interface. If the post-check succeeds, skip this step.
This tutorial has a manually created critical interface outside the pipeline, ensuring the article focuses on configuring the CI/CD actions only.
Prerequisites
Before building a network-aware CI/CD pipeline, ensure the following are already installed on your machine:
- Multipass. Multipass is a command-line tool that creates an Ubuntu Server VM with Docker preinstalled. Other subtools, such as GitLab and Containerlab, will be installed as containers or Linux programs within the VM.
- Cisco router image. Routers from other vendors are also acceptable.
- VS Code and Remote Secure Shell extension. The Remote SSH extension enables VS Code to access the VM's directories through SSH.
Ensure you have a basic understanding of Linux. Specifically, you must know how to create and change directories, as well as how to create, rename and copy a file. Another critical piece of knowledge is what SSH host keys are, how to generate or delete one and where the Linux OS saves them. Knowing this provides an understanding of how to authenticate into a Linux system using SSH.
Lastly, you must have a basic understanding of Ansible, Docker and a CI/CD pipeline tool like GitLab.
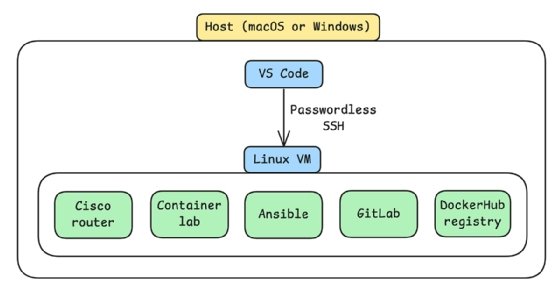
Set up infrastructure architecture
Set up the VM and then configure SSH access to it from VS Code. Then, transfer the router image into the VM and convert it into a container.
Other tools such as Containerlab, Ansible, GitLab and Docker Hub registry will be installed within the VM.
Create the VM
To create the VM, provision a 16 GB RAM, 4 CPU Ubuntu Server VM with Docker preinstalled.
multipass launch --memory 16G --cpus 4 docker
Configure passwordless SSH access from VS Code into the VM
This step ensures VS Code can authenticate into the VM without being prompted for a password. The VM configuration should appear as the following code:
# go into the VM and get its IP address
multipass shell docker
ip address show ens3 # my VM's ip address is 192.168.64.7/24
exit
Meanwhile, the host configuration should appear as the following code:
# macOS - add an ssh config to the host
sudo tee -a ~/.ssh/config <<EOF
Host docker
HostName 192.168.64.7
User ubuntu
EOF
# Windows - add an ssh config to the host
mkdir ~\.ssh
@"
Host docker
HostName 192.168.64.7
User ubuntu
"@ | Out-File -Append -Encoding utf8 ~\.ssh\config
# generate ssh key on host
ssh-keygen -t rsa
# add public ssh key on host to the VM
multipass exec docker -- bash -c "echo `cat ~/.ssh/id_rsa.pub` >> ~/.ssh/authorized_keys"
Finally, connect to the VM from VS Code. Navigate to the left sidebar and select Remote Explorer > Docker. Specifically, click on ➜.

Deploy the router to Containerlab
To deploy the router to Containerlab, first install Containerlab on the VM.
bash -c "$(curl -sL https://get.containerlab.dev)"
Next, prepare the router directory by opening a terminal in VS Code and create the following directories.
mkdir -p ~/network-aware/router
Open a folder within VS Code and select network-aware. Then, download a router to the host machine. This tutorial uses the Cisco IOL L3 image, x86_64_crb_linux-adventerprisek9-ms.bin.
Transfer the image from the host machine to the VM, specifically into the /router directory.
multipass transfer -r ./x86_64_crb_linux-adventerprisek9-ms.bin docker:/home/ubuntu/network-aware/router
Convert the router's VM image to a container image so it can run inside Containerlab. To do this, take the following steps:
# change directory
cd ~/network-aware/router/
# clone a repository containing a tool to convert the image from a VM to a container
git clone https://github.com/hellt/vrnetlab.git
# copy your image to vrnetlab/cisco/iol/ within the repository
cp x86_64_crb_linux-adventerprisek9-ms.bin vrnetlab/cisco/iol/
# rename the image to cisco_iol-15.7.bin
mv vrnetlab/cisco/iol/x86_64_crb_linux-adventerprisek9-ms.bin vrnetlab/cisco/iol/cisco_iol-15.7.bin
# install make and build the container image
sudo apt install make
make -C vrnetlab/cisco/iol/ docker-image
Create a Containerlab topology file and deploy the router.
cat <<EOF > cisco-iol.clab.yaml
name: cisco-iol
topology:
nodes:
R1:
kind: cisco_iol
image: vrnetlab/cisco_iol:15.7
links:
- endpoints: ["R1:Ethernet0/1", "R1:Ethernet0/2"]
EOF
containerlab deploy --topo cisco-iol.clab.yaml
containerlab inspect
Based on the output, the router's management IPv4 address is 172.20.20.2. Delete any old SSH host keys associated with that IP address. Now, SSH into the router. When you SSH into the device using the IP address, it automatically adds the host key to ~/.ssh/known_hosts. This is useful for Ansible. If you are using the Cisco IOL router image, the default password is admin.
ssh-keygen -f ~/.ssh/known_hosts -R 172.20.20.2
ssh [email protected]
Build and push an Ansible image
To execute Ansible playbooks within the CI/CD pipeline, follow the next two steps. First, run a local Docker Hub registry.
docker run -d -p 5000:5000 --name registry registry:2
Then, build an Ansible image for use in the pipeline and push it to your local Docker Hub registry.
mkdir ~/network-aware/ansible-gitlab
cd ~/network-aware/ansible-gitlab/
cat <<'EOF' > Dockerfile
FROM ubuntu:latest
RUN apt update && \
# install ansible
apt install -y software-properties-common && \
add-apt-repository -y --update ppa:ansible/ansible && \
apt install -y ansible && \
# install an alternative ssh implementation
apt install python3-pip -y && \
pip3 install ansible-pylibssh --break-system-packages && \
# install git
apt install git -y && \
apt clean
EOF
docker build -t localhost:5000/ansible:latest .
docker push localhost:5000/ansible:latest
Deploy a GitLab container
The next step is to deploy a GitLab container. To begin, prepare a directory to install GitLab.
mkdir ~/gitlab-docker
echo export GITLAB_HOME=~/gitlab-docker >> ~/.bashrc
source ~/.bashrc
exit
Next, reenter the VM's shell to verify that the new environment variable is set.
multipass shell docker
echo $GITLAB_HOME
Create a GitLab container. It takes about six minutes to boot.
docker run --detach \
--hostname gitlab \
--env GITLAB_OMNIBUS_CONFIG="external_url 'http://gitlab'" \
--publish 443:443 --publish 80:80 \
--name gitlab \
--restart always \
--volume $GITLAB_HOME/config:/etc/gitlab \
--volume $GITLAB_HOME/logs:/var/log/gitlab \
--volume $GITLAB_HOME/data:/var/opt/gitlab \
--shm-size 512m \
gitlab/gitlab-ce:latest
Retrieve the GitLab credentials.
docker exec -it gitlab grep 'Password:' /etc/gitlab/initial_root_password
# username = root
GitLab uses port 80 by default. Access it using the VM's IP address. For this tutorial, the VM's interface name is ens3, and its IP address is 192.168.64.7. This can differ between machines, so the following code might not be exact for everyone.
ip address show ens3
Edit the local machine and the Ubuntu VM's host file. The VM can clone the repository using the external_url defined when creating the GitHub container. The host can successfully create a Linux runner and copy the token through the web browser.
Below are the codes for both macOS and Windows. The macOS command will work on the VM, too.
# macOS
echo "192.168.64.7 gitlab" | sudo tee -a /etc/hosts
# Windows
Add-Content "$env:SystemRoot\System32\drivers\etc\hosts" "`r`n192.168.64.7 gitlab"
Finally, access the GitLab URL using the host's web browser at gitlab.

Configure GitLab
Now it's time to create a repository and set up the CI/CD pipeline. This process involves several steps, including the following.
- Create a GitLab repository.
- Create a Linux runner.
- Configure a Docker executor.
- Configure git credentials and clone the repository.
Create a GitLab repository
GitLab refers to a repository as a project. To create one, navigate to Project > New project > Create blank project. The following are the project parameters.
Project name = containerlab-project
Group = root
Visibility level = public
Create a Linux runner
A runner pulls a GitLab job and executes commands inside an executor. The runner can be the Linux VM, a container or any other suitable environment. The executor can be a shell on the VM, a container or another type of process.
Here, the VM acts as a Linux runner. It's currently running Docker and can access the Ansible Docker image in the local registry. Obtain a runner authentication token by navigating to Settings > CI/CD > Runners > Create project runner on the GitLab UI. Fill in the following options.
Tags = containerlab
Timeout = 600
Operating systems = linux
Register the token on your VM. Install the GitLab Runner CLI first. Replace <token> with the newly created one.
RUNNER_TOKEN=<token>
sudo gitlab-runner register --url http://gitlab --token $RUNNER_TOKEN
When an output appears, fill in the following options when registering the token.
Name = linux
Executor = docker
Docker image = localhost:5000/ansible:latest
Configure a Docker executor
Because the job executes inside a Docker container running Ansible, it's crucial to configure a Docker executor. Using a container is easier when migrating to a production environment, and it's always possible to push a custom Ansible Docker image into the organization's container registry.
Because this tutorial uses a Docker executor, the container must communicate with the GitLab container. To do so, first obtain the GitLab container's IP address.
docker inspect -f '{{range .NetworkSettings.Networks}}{{.IPAddress}}{{end}}' gitlab
Then, edit GitLab's config.toml file. This file contains configuration options that instruct the runner on how to access the GitLab container.
sudo vi /etc/gitlab-runner/config.toml
Add an extra host to the [runners.docker] section so the executor can reach the GitLab instance. Use the host network mode so that new container jobs can also reach the Containerlab container. Replace 172.17.0.2 with the GitLab container's IP address.
[runners.docker]
extra_hosts = ["gitlab:172.17.0.2"]
network_mode = "host"
Finally, save and restart the runner.
sudo gitlab-runner restart
Configure git credentials and clone the repository
The final step to configuring GitLab is to configure git credentials and clone the repository. Set git credentials for GitLab. Replace the email with yours.
git config --global user.email "[email protected]"
git config --global user.name "root"
Next, clone the repository.
cd ~/network-aware/ansible-gitlab
git clone http://gitlab/root/containerlab-project.git
Create a new branch called patch and automatically switch to it using checkout.
cd containerlab-project/
git checkout -b patch
Create a personal token by navigating to Settings > Access token.
Token name = Git
Permission = write_repository
Role = Developer
Set your upstream URL and include the personal token. Replace <token> with yours.
ACCESS_TOKEN=<token>
git remote set-url origin http://root:$ACCESS_TOKEN@gitlab/root/containerlab-project.git
Set up CI/CD pipeline
Setting up a CI/CD pipeline includes configuring pre-check, post-check, deploy and rollback jobs. When creating these jobs, define the pipeline script and Ansible playbooks before pushing them to the repository.
Create a GitLab pipeline variable
The CI/CD pipeline requires a GitLab pipeline variable because the Ansible container needs to know to which device it's attempting to connect and make changes. To get the SSH host key of the router, run the following command on the VM.
ssh-keyscan 172.20.20.2
Copy the host file output, then navigate to Settings > CI/CD > Variable on the GitLab UI.
Paste the output to the CI/CD variable and uncheck Protect variable. Because there isn't a protected branch or git tag, it's fine to uncheck that option.
Key = KNOWN_HOSTS
Value = <your host file output>

Create a GitLab job script
The GitLab job script defines which jobs will execute each of the Ansible playbooks. A few important things to note about the script include:
- The image spins up an Ansible container for each job. This is possible because a Linux runner pulls the job and uses a Docker executor to run it.
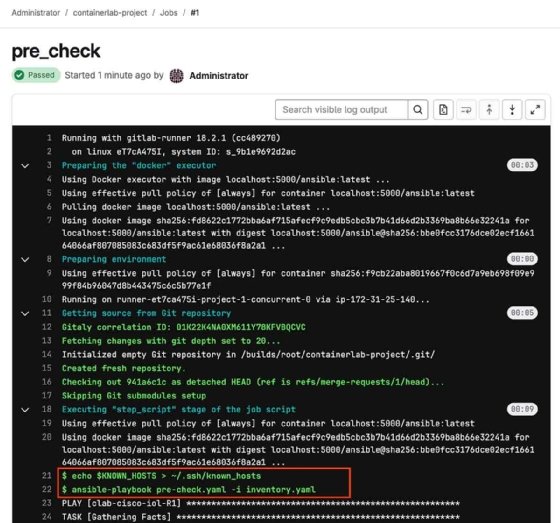
- The Ansible inventory must connect to the router using an SSH host key, which was previously passed to this repository as a CI/CD variable, $KNOWN_HOSTS. The SSH host defined in the key must match the ansible_host defined in the Ansible inventory.
- A before_script retrieves the router's host key from the GitLab variable and saves the output to ~/.ssh/known_hosts so each new job can run successfully.
- Each new job contains a tag titled containerlab. The Linux runner uses this to determine which job it can run.
- All commands within a job run in the directory assigned to the CI_BUILDS_DIR = /builds/<group>/<project> variable by default. It contains the repository files.
- The rule in the pre_check job states that it only runs when someone submits a merge request. This ensures that it knows the network's current state.
- The rule in the deploy, post_check and rollback dictates that the job only runs when the merge request is being merged into main.
- rollback runs if any job fails.
cat <<'EOF' > .gitlab-ci.yml
stages:
- pre_check
- deploy
- post_check
- rollback
image: localhost:5000/ansible:latest
before_script:
- echo $KNOWN_HOSTS > ~/.ssh/known_hosts
pre_check:
stage: pre_check
tags:
- containerlab
script:
- ansible-playbook pre-check.yaml -i inventory.yaml
rules:
- if: $CI_PIPELINE_SOURCE == 'merge_request_event'
deploy:
stage: deploy
tags:
- containerlab
script:
- ansible-playbook deploy.yaml -i inventory.yaml
rules:
- if: $CI_COMMIT_BRANCH == 'main'
post_check:
stage: post_check
tags:
- containerlab
script:
- ansible-playbook pre-check.yaml -i inventory.yaml
rules:
- if: $CI_COMMIT_BRANCH == 'main'
rollback:
stage: rollback
when: on_failure
tags:
- containerlab
script:
- ansible-playbook rollback.yaml -i inventory.yaml
rules:
- if: $CI_COMMIT_BRANCH == 'main'
EOF
Create an Ansible variable
To create an Ansible variable file, use your router's credentials.
mkdir vars
cat <<'EOF' > vars/credentials.yaml
ansible_username: admin
ansible_passwd: admin
ansible_host: 172.20.20.2
EOF
Create an Ansible inventory file with the following code.
cat <<'EOF' > inventory.yaml
local:
hosts:
clab-cisco-iol-R1:
ansible_connection: network_cli
ansible_host: "{{ ansible_host }}"
ansible_user: "{{ ansible_username }}"
ansible_password: "{{ ansible_passwd }}"
ansible_network_os: cisco.ios.ios
ansible_become: true
ansible_become_method: enable
EOF
Create a pre-check and post-check playbook
A pre-check playbook determines if the existing critical interface is up. To do this, it gathers all interfaces, outputs the result and fails if the critical interface is down. It does this by looping through the interface output and checking when the key, value pair and enabled is false and if the interface name is Ethernet0/1. If it matches, it fails because the critical interface is down and outputs an error message.
cat <<'EOF' > pre-check.yaml
- hosts: clab-cisco-iol-R1
vars_files:
- vars/credentials.yaml
tasks:
- name: Gathers all interfaces
cisco.ios.ios_facts:
gather_network_resources:
- interfaces
register: int_status
- name: Print the interface details
ansible.builtin.debug:
var: int_status.ansible_facts.ansible_network_resources.interfaces
- name: Fail if the critical interface is down
loop: "{{ int_status.ansible_facts.ansible_network_resources.interfaces }}"
when: item.enabled == false and item.name == "Ethernet0/1"
ansible.builtin.fail:
msg: "Interface {{ item.name }} is down!"
EOF
The post-check playbook uses the pre-check playbook to see if the critical interface is still up.
Create a deploy playbook
A deploy playbook configures a new interface, Ethernet0/2. It then intentionally injects a failure that shuts down Ethernet0/1, the existing critical interface.
cat <<'EOF' > deploy.yaml
- hosts: clab-cisco-iol-R1
vars_files:
- vars/credentials.yaml
tasks:
- name: set interface IP address and mask
cisco.ios.ios_l3_interfaces:
config:
- ipv4:
- address: 10.1.2.20/24
name: Ethernet0/2
register: int_address
- name: Print the interface IP address
ansible.builtin.debug:
var: int_address
- name: set the interface status up
cisco.ios.ios_interfaces:
config:
- description: critical
enabled: false # shutdown interface
name: Ethernet0/1 # this interface
register: int_status
- name: Print the interface status
ansible.builtin.debug:
var: int_status
EOF
Create a rollback playbook
A rollback playbook brings up the critical interface that the newly deployed change shut down.
cat <<'EOF' > rollback.yaml
- hosts: clab-cisco-iol-R1
vars_files:
- vars/credentials.yaml
tasks:
- name: configure critical interface IP address and mask
cisco.ios.ios_l3_interfaces:
config:
- ipv4:
- address: 10.1.1.10/24
name: Ethernet0/1
register: int_address
- name: print the interface IP address
ansible.builtin.debug:
var: int_address
- name: enable the critical interface status
cisco.ios.ios_interfaces:
config:
- description: critical
enabled: true
name: Ethernet0/1
register: int_status
- name: print the interface status
ansible.builtin.debug:
var: int_status
EOF
Since this pipeline needs a critical interface to be up already to be valid, manually configure one using the Ansible playbook.
When executing a playbook, the router's SSH host key must already be saved in the SSH directory before Ansible can authenticate to it. Log in to the router manually using SSH and add the router's host key to the host.
# install uv
curl -LsSf https://astral.sh/uv/install.sh | sh
source $HOME/.local/bin/env
# initialize uv and activate venv
uv init --bare
uv venv
source .venv/bin/activate
# add libraries
uv add ansible ansible-pylibssh
# configure a critical interface
ansible-playbook rollback.yaml -i inventory.yaml
# SSH into the router again to verify configuration
# password = admin
ssh [email protected]
show ip interface brief
# exit the router and deactivate the venv
exit
deactivate
Another alternative is to install Ansible using apt, and then install Ansible-pylibssh using pip and the --break-system-packages argument. This argument is valid since this is a temporary Ubuntu VM for this lab.
Add a .gitignore file
A .gitignore file removes the uv-related files when pushing them to GitLab. These files aren't needed in the pipeline.
cat <<'EOF' > .gitignore
# uv environment
.venv/
pyproject.toml
uv.lock
EOF
Push changes to the repository.
Execute the following commands to push changes to the repository.
git add .
git commit -m "configure CI/CD pipeline"
git push --set-upstream origin patch
Observe the jobs on the GitLab Dashboard
To determine if the changes are successful, observe the jobs on the GitLab Dashboard. This tutorial includes an accompanying screenshot with each step. Compare them with what you see on your screen.
To start, after pushing changes to the new branch, navigate to it in your repository and open a merge request.
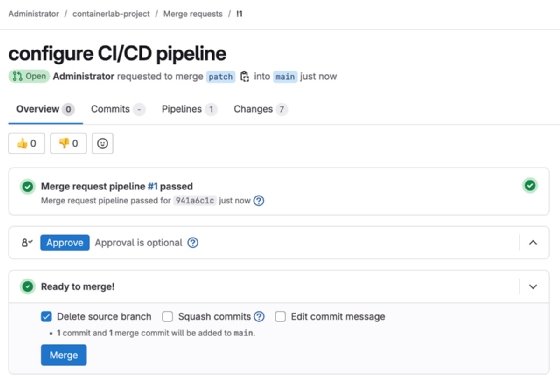
Now, observe the pre_check job. The following image is a sample output. It passed because the critical interface is still up.
Next, complete the merge request. Click on Merge. Doing this automatically triggers the remaining jobs.
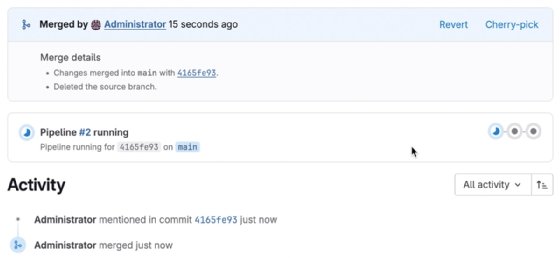
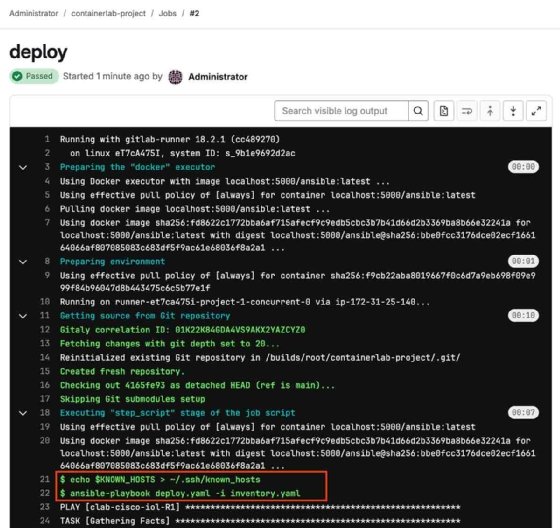
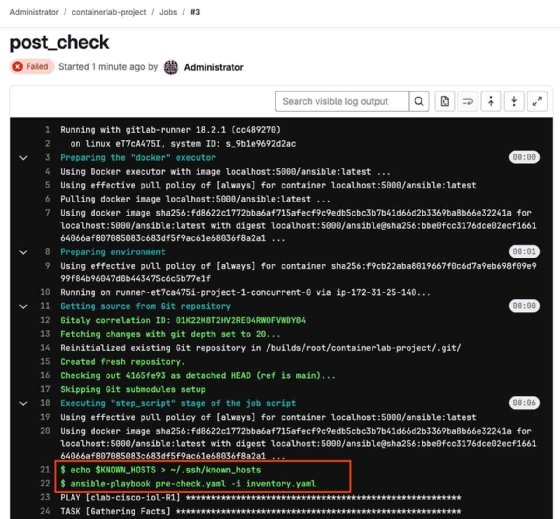
Observe the deploy job. This job configures a non-critical interface. However, it shut down a critical interface in the process. When observing the post_check job, it will fail for this reason
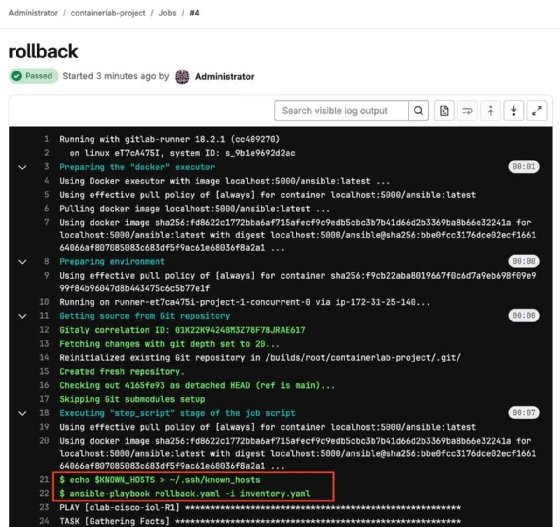
The rollback job rectifies the error made in the critical interface.
Alternative steps
Modifying the deploy.yaml playbook and pushing the changes to GitLab can rectify the initial non-critical interface configuration. When this happens, GitLab will perform other jobs but skip the rollback job.
If the network engineering team hasn't transitioned to Python yet, Ansible can still perform one-off live-state checks within the pipeline. Once the team adopts Python and pyATS, gradually phase pyATS implementation into the pipeline since it's vendor-agnostic.
Not every pipeline needs to check live network state. Instead, perform pre- and post-checks with a snapshot of the device through open-source tools like Batfish and Suzieq.
Charles Uneze is a technical writer who specializes in cloud-native networking, Kubernetes and open source.