VMware snapshot
What is a VMware snapshot?
A VMware snapshot is a copy of a virtual machine (VM) in a VMware environment taken at a specific point in time. Snapshots are useful for restoring a VM to a certain point in the event of a system failure or error. They are not useful for taking VM backups.
A VM snapshot is a point-in-time image of the state and data of a VM. The state refers to whether the VM is powered on, powered off or suspended. A snapshot of the VM can be taken in any of these states. The VM's data includes all its files, components and devices, such as its memory, disks and virtual network interface cards (NICs). When the VM's memory state is captured in a snapshot, the snapshot takes longer to complete and network response might also slow.
To create a backup, a VM can be quiesced -- meaning the VM file system's on-disk data is brought into a state suitable for backups. The operation pauses or alters the state of running processes on the VM. Snapshots alone should not be considered as backup for any virtual disks associated with one or more VMs. Also, running a VM on a snapshot for an extended period might result in system instability and/or data losses.
Snapshots in VMware vSphere
VMware vSphere is a server virtualization and enterprise workload platform for on-premises and cloud apps that provides users with a centralized management platform for their VMs. The solution includes numerous products, including the following:
- VMware ESXi, which is a type 1 hypervisor to manage VM execution.
- VMware vCenter Server, which is a server application to create, start, stop and manage VMs.
- VMware vSphere Client, which is a Windows application to manage a vSphere environment.
- VMware Virtual Machine File System (VMFS), which is vSphere's file system to manage disk resources for VMs.
The VMware snapshot feature is available on standalone ESXi hosts, vCenter Server and in VMware Workstation. In the vSphere environment, the entire state of the VM is captured when the snapshot is taken. As noted earlier, snapshots can be taken when the VM is on, off or suspended. If the VM is in suspended state, however, VMware advises that the snapshot should be taken only after the suspend operation is complete.
When the VMware snapshot is taken, all writable data on the VM becomes read-only. VMware administrators can take multiple VM snapshots to create multiple possible point-in-time restore points. When a VM reverts to a snapshot, its current disk and memory states are deleted, and the snapshot becomes the new parent snapshot for that VM. The snapshot file cannot exceed the size of the original disk file, and it also requires some overhead disk space. Snapshots will grow rapidly with high disk-write activity volume.
As with VM snapshots in general, vSphere snapshots can be used for development and testing. They also provide a useful failsafe mechanism that enables easy system rollbacks during development, testing, patching or configuration changes.

Benefits of creating VMware snapshots
Taking a VM snapshot is useful for VM development and testing where multiple VMs with similar configurations might be required. Snapshots are also beneficial in development and testing environments where code changes are done iteratively, and a safe rollback point is required to undo mistakes.
Furthermore, a snapshot provides a quick failsafe to roll back to a specific VM state without having to create multiple VMs. This makes snapshots particularly useful in environments where repeated rollbacks might be necessary. Example of this include performing upgrades and making changes to VM settings or configurations. In both cases, the snapshot provides a safe restoration point if changes need to be undone.
Quiescing a VM with VMware snapshots
VMware Tools refers to a set of services and modules that simplify the management of guest operating systems (guest OSes) and user interactions in vCenter Server and other VMware products. For example, VMware Tools can be used to customize a guest OS, run scripts to automate guest OS operations, and synchronize the system time of a guest OS with the host OS.
VMware Tools can also help with the creation of snapshots via quiescing the file system in the VM. The operation will pause any operation running on the VM, including processes that might modify the VM disk during a revert operation. To quiesce the VM files, the VM must be powered on and have VMware Tools pre-installed. Also, the user creating the snapshot must have VM snapshot management privileges on that VM.
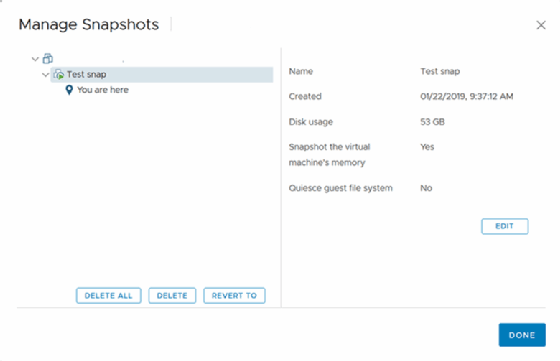
VMware snapshots and snapshot manager in vSphere
The vSphere Web Client can be used to take new snapshots, remove snapshots and revert to the latest snapshot. The snapshot manager feature can be accessed by right-clicking on the VM in the vSphere client and selecting Snapshots from the VM's Actions drop-down menu.
With the snapshot feature it is possible to do the following actions:
- Create new snapshots.
- Delete a particular snapshot or all snapshots.
- Edit the name and description of a snapshot.
- Manage snapshots.
- Revert to any snapshot.
- Consolidate disks.
Instead of right-clicking, the above snapshot operations can also be performed by highlighting the VM name, clicking on the Snapshots tab, and selecting the required task from the All Actions menu.
File formats created with a VMware snapshot
When a VMware snapshot is taken, the following four types of files are created:
- A .vmdk file the guest OS can write to.
- A delta.vmdk file that results from the creation of a delta disk when a snapshot is taken. The delta disk shows the difference between the current state of the VM and its state when the previous snapshot was taken. It consists of a small descriptor file and a file containing raw data.
- A .vmsd file that contains information about the snapshot and the relationships between the snapshots and delta disks for each snapshot.
- A .vmsn file that saves VM memory.
Drawbacks of VMware snapshots
Since snapshots use the same resources as the parent VM, taking too many of them can affect VM performance. VMware does not support application-consistent quiescing for VMs with integrated development environment or Serial Advanced Technology Attachment (SATA) disks. Snapshots for raw disks, raw device mapping (RDM) physical mode disks, and guest OSes with iSCSI initiators are also not allowed.
Snapshots take up a lot of disk space, making them unsuitable for backup and recovery. In addition, snapshot operations for large terabyte-sized disks can take a lot of time and create delays.
In vSphere environments, the size of the VM disk cannot be increased while the VM is running a snapshot during powered on/off status. Also, increasing the disk size or virtual RDM disks when snapshots are available can corrupt snapshots and result in data loss.

Best practices when working with VMware snapshots
VMware recommends deleting snapshots within 24 hours because they take up space as their numbers grow. It is best to keep a single snapshot for less than 72 hours and to limit a snapshot chain to three snapshots, although up to 32 snapshots are supported in a chain. If the chain is to be modified, VMware does not recommend manual modifications as it might compromise the chain and result in data loss.
During the restoration of I/O-intensive VMs with rapid data changes, significant data inconsistencies might occur. For such VMs, it is not advisable to rely on snapshots as a failsafe or backup. For backups, it is best to use a backup software offering in the data center. When using a third-party backup offering, VMware recommends deleting snapshots after a successful backup.
Another good practice is to refrain from using snapshot on production VMs. Snapshots in production environments can result in performance degradation due to CPU overheads and changes in the VM and its guest OS.
Finally, in VMware vSphere environments, the snapshot manager is best for creating, detecting and managing snapshots for individual VMs only. To manage snapshots for multiple VMs, the snapshot manager might not be suitable and third-party snapshot management offerings might be a better choice. However, the snapshots taken by these offerings might not appear in the VMware snapshot manager, so it is important to check for snapshots through the command line.
Learn more about VMware snapshots and how to use them and explore the differences between VM snapshot vs. backup. Check out five things you need to know about snapshots.