Fotolia
Follow a PXE boot tutorial to increase OS configuration automation
PXE boot servers are simple to set up and can aid in IT operations' goals toward high-level efficiency and automation. This tutorial runs through setup and optimal settings.
Automated OS installs are a great first step toward increasing IT operations efficiency. The Preboot Execution Environment offers a variety of configurations and settings that automate provisioning in both physical and virtual environments.
PXE, which is the abbreviation for Preboot Execution Environment, is an Intel extension to Dynamic Host Configuration Protocol that provides a standardized configuration for a server at boot, including a DHCP address and the ability to transfer a remote file and start it, known as Trivial File Transfer Protocol (TFTP). Administrators can thus install servers across a range of system types, without the original OS media on hand and without configuring each new server separately.
This PXE boot tutorial uses a Windows DHCP server in an isolated network with PXE and TFTP servers on the Ubuntu Linux OS. Other examples of Linux install configurations are out there, and admins can customize them to suit given needs.
On the Windows system, modify the DHCP server to add options, which are additional entries passed to the client upon DHCP address assignment.
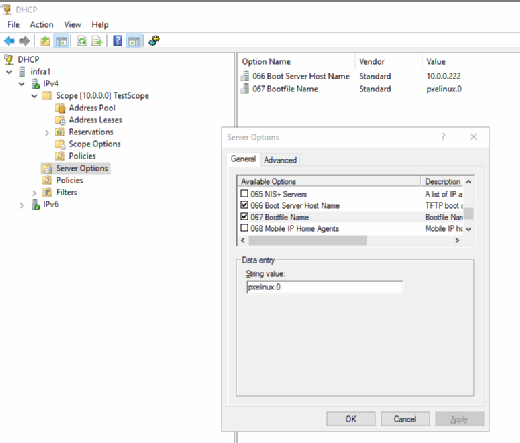
Open Microsoft Server Manager, select Add roles and features -- navigating to the DHCP server options -- and use an Ubuntu TFTP and web server. Once it is installed, set up a normal DHCP scope. Next, right-click on the DHCP server options, and look at the ones available to configure (see Figure 1).

Select 066 Boot Server Host Name, and enter the server's IP or fully qualified domain name in the string value. Also select 067 Bootfile Name. Option 067 looks for the boot file to pick up from the server configured in option 066.
Next, install and configure several items on the Linux OS. Open a Secure Shell (SSH) server, and install the Apache web server and the items required for the TFTP function:
sudo apt-get install apache2 tftpd-hpa inetutils-inetd
Once these items are installed, set the TFTP options. Edit its configuration file:
sudo nano /etc/default/tftpd-hpa
Scroll to the bottom of the file, and add these entries:
RUN_DAEMON="yes"
OPTIONS="-l -s /var/lib/tftpboot"
The inetd.conf file manages the TFTP servers and others. Edit the inetd.conf file:
sudo nano /etc/inetd.conf
Add the following line at the bottom of the file -- do not split this into more than one line:
tftp dgram udp wait root /usr/sbin/in.tftpd /usr/sbin/in.tftpd -s /var/lib/tftpboot
Once these steps in the PXE boot tutorial are complete, start the server, and check that it is functioning. From the Ubuntu shell, start the service, and program it to start upon boot with the following commands:
sudo systemctl enable tftpd-hpa
Use the systemd status command to ensure the service has started properly:
sudo systemctl status tftpd-hpa
If it reports that the server is running, continue on with the PXE boot tutorial.
You should have a CD or ISO file for the Ubuntu OS. Copy the required files to install an Ubuntu server from this media to the directory where the TFTP boot files are.
From the SSH console, mount the CD/ISO file:
sudo mount /dev/cdrom /media
Make the following folder for Ubuntu:
sudo mkdir /var/www/html/ubuntu
And copy the contents of the CD/ISO image:
sudo cp -r /media/* /var/www/html/ubuntu
Copy the files required for booting from the OS image to the directory where the TFTP boot files are found:
sudo cp -r /media/install/netboot/* /var/lib/tftpboot/
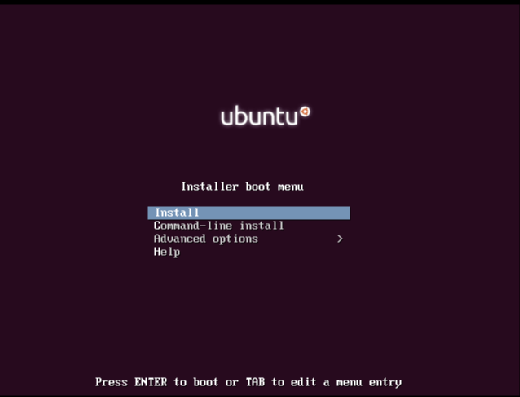
Now, you can test the setup for PXE booting. Start up a new, unconfigured VM or physical host, and select PXE boot from the menu or -- if you are not quick enough -- in the BIOS.

To get use out of the PXE boot server setup, the OS should fully install. Create a kickstart file so that the information about the installation is ready to go. The kickstart file specifies the desired setup for the server, such as partitioning details, packages and passwords. An example kickstart can be found in the Ubuntu installation guide.
The easiest way to customize a kickstart file is to boot up another Ubuntu server with desktop options and install the Kickstart Configurator creation tool. This then must be transferred to the Apache web server's HTML directory -- for this PXE boot tutorial, the /var/www/html file. Consider removing the index.html file from that directory to reveal the files that are available therein.
Lastly, modify the default menu to specify the option to boot from the first disk, as well as boot and install as defined by the kickstart file.
Once the kickstart is uploaded, edit the PXE configuration file:
sudo vi /var/lib/tftpboot/pxelinux.cfg/default
There is a known issue with Ubuntu 16.04 where the installer doesn't complete properly. The code below modifies it to include the live installer option at the end:
LABEL Ubuntu16_LTS
kernel ubuntu-installer/amd64/linux
append ks=http://10.0.0.222/base.cfg vga=normal initrd=ubuntu-installer/amd64/initrd.gz live-installer/net-image=http://10.0.0.222/ubuntu/install/filesystem.squashfs
ramdisk_size=16432 root=/dev/rd/0 rw —
The only items you will need to modify in Ubuntu 16.04 are the HTTP address and the name of the created or uploaded kickstart file.
It is possible to set up several different configurations, each customized to different requirements, with only an alternative configuration file and entry in the boot menu.
Use PXE booting with caution. Administrators can easily overwrite systems when they reboot. Do not allow servers to boot from PXE by default, as it can cause this problem. Also, add these entries to the end of the file:
label Local
localboot 0
This instruction ensures that the system will boot from local media rather than the PXE server. As another precaution against reboot issues, at the start of the file, add these two entries:
Timeout 300
ontimeout Local
These items combined will boot the local disk by default after a timeout of 30 seconds.


