
Alex - stock.adobe.com
Automate firewall rules with Terraform and VMware NSX
In this hands-on tutorial, learn how infrastructure-as-code tools such as Terraform can streamline firewall management with automated, standardized configuration of firewall rules.

IT administrators can automate the configuration of an NSX infrastructure with VMware tools, but there's also an option from a third party: HashiCorp's Terraform tool.
Unlike other methods for automating NSX configuration such as the NSX REST API, VMware PowerCLI or VMware Aria Automation Orchestrator, Terraform takes an infrastructure-as-code (IaC) approach. Using Terraform can simplify NSX infrastructure management -- for example, by configuring the NSX platform's security component with a distributed and gateway firewall using Terraform files.
How do IaC tools such as Terraform work?
Creating a configuration for infrastructure components with a script or API usually involves writing lines of code that define which resources to create. This approach might work perfectly at first, but when you run the script again, it will most likely fail because the requested components already exist.
Take NSX firewall rules as an example: If you remove or change certain rules as an administrator, making the update isn't as simple as just running the configuration script again. Some rules are already there, and some were changed -- but which ones? It's possible to include error checking in code to evaluate the environment before executing, but that's a lot of work to maintain in a dynamic environment.
With IaC, you define the desired state of your infrastructure in a configuration file, which you then process with a tool like Terraform. This initially creates the infrastructure components, such as gateways, segments, policies and firewall rules.
So far, this is nothing new. The difference comes when applying the configuration file after creation. At this stage, Terraform evaluates the environment and matches it with the desired state as defined in the configuration file.
Terraform re-creates or updates any deleted or modified components to match the desired state. Likewise, it removes any added components that don't match the desired state.
In the IaC approach, the configuration file therefore becomes the single source of truth for the IT environment. This means that admins can use the configuration file to restore the environment in a disaster and to deploy the same configuration in multiple environments using the same code.
Benefits of using IaC to automate firewall rules
The example in Figure 1 shows a definition of a security policy to place in the infrastructure category Distributed Firewall.

The rule in this policy allows use of DNS traffic in the entire environment. This is a simple, straightforward example that you can extend in a variety of ways, such as allowing access only to certain DNS servers or from certain sources.
Any errors in IaC affect the health of the overall IT environment, so it's essential to guard and manage configuration files with versioning systems such as GitHub and GitLab. To better distribute these tasks, IT teams can delegate management of various parts of the infrastructure to various administrators depending on their responsibilities.
What does automated firewall management look like in NSX?
To clarify this concept and relate it to NSX, consider the possibility of placing the Layer 3 gateway configuration in separate files managed by the networking team and the firewall rules in another file set managed by the security team. You can further divide responsibilities within each team by placing sets of rules in separate files.
This setup might sound confusing or difficult to manage, but it's not much different from creating policies and rules in the NSX user interface and finding what you're responsible for there. Instead of creating a policy for an application group containing rules, you would now place that definition in a separate file.
Tutorial: Learn how to automate firewall rules in NSX using Terraform
If you're new to Terraform, you can download the software from HashiCorp. No installation is required; Terraform is a command-line utility, named terraform.exe on Windows.
1. Get set up with Terraform
In theory, you could start by using a tool such as Notepad to create files with the .ts extension, which are processed by Terraform. But it's best to use an integrated development environment (IDE) to create and manage files as well as simplify code formatting, syntax checking and code validation.
Several IDEs offer support for Terraform. The examples in this article use Visual Studio Code, a popular free option with a Terraform extension that offers features such as syntax highlighting and code formatting for Terraform files.
With these components in place, it's time to start setting up the Terraform environment.
This tutorial provides the instructions for a basic setup; for more detailed information on the NSX provider, refer to the Terraform documentation.
2. Download the NSX provider and set up variable files
Start by creating a file called providers.tf that instructs Terraform to download and use the NSX provider.
This file also defines the NSX manager address, username and password, which you'll retrieve from variables later. Generally, storing passwords in files is not a good idea -- read on for a more secure solution -- but for now, start with a simple example.
When using Terraform, it's best practice to use variables and place them in separate files: a variables.tf file, which contains the variable definitions, and a terraform.tfvars file, which contains the values for these variables. Figure 3 shows the providers.tf file and the files containing Terraform variables.
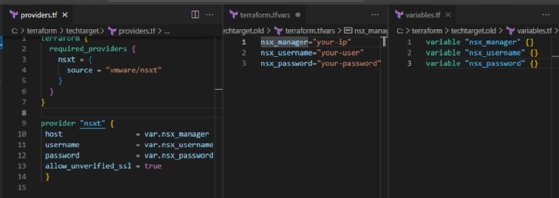
Using this file structure makes it easier to maintain Terraform. The names of the files with the .tf extension are not relevant to Terraform, which concatenates all files from the folder with the .tf extension. However, using descriptive names is clearer for you and your colleagues.
The terraform.tfvars file, in contrast, is required to have this specific name. Alternatively, you can use names with the .auto.tfvars extension. But for this example, a single default terraform.tfvars file will do.
3. Initialize Terraform and define resources
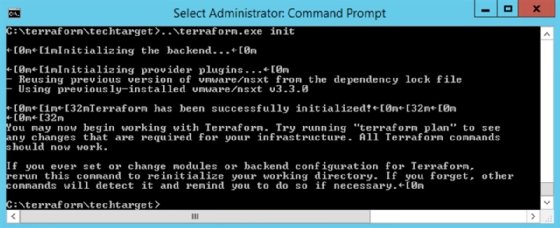
When these files are all in place, it's time to initialize Terraform. Run the terraform init command to download and configure the NSX provider, as shown in Figure 4.
The next step is to create files to define resources. To illustrate, continue with the distributed firewall example. Place the code in a file you name with the .tf extension, and put that file in the folder with the files you created earlier.
4. Create and apply the firewall policy
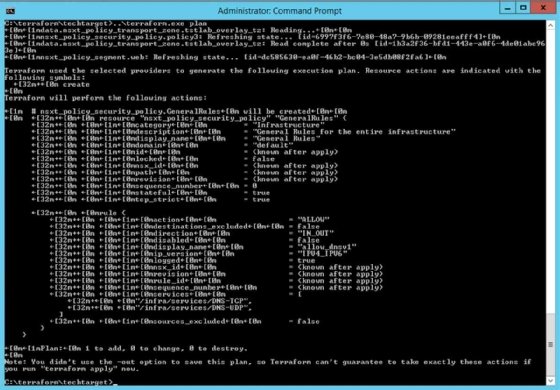
Next, run the command terraform plan to evaluate your files and show what will happen if you run the actual deployment. Figure 5 shows the creation of the firewall policy from the example file.
If the plan matches what you expected, apply the code with the command terraform apply. This creates, modifies or deletes the components in your NSX environment as needed.
Tips for secure and maintainable firewall management with Terraform
It's possible to provide variables at runtime by not placing the values in the .tfvars file and using the -input=true parameter for the terraform apply command. This avoids the problem of storing passwords in files, and also lets you enter a server address when deploying or diversifying among production, test and development environments.
You can also mark Terraform variables with the sensitive flag so that they don't appear in the output. To do so in the above example, change the syntax to the following.
variable "nsx_password" {
  sensitive   = true
}
For easy maintenance, create separate resources in separate files from the outset. You can also store separate parts in their own folders to divide access using the Terraform modules mechanism.