RFsole - Fotolia
Be selective with Kubernetes RBAC permissions
Kubernetes RBAC has some vital best practices that save IT teams frustration and consternation. This brief tutorial takes you through new role creation to permissions management.

Role-based access control is an authorization mechanism used to restrict and control user access to a resource or system based on default or custom-defined roles. Admins can secure IT containerized environments with more granular control using this approach, but they need to follow certain processes so they don't inadvertently create an unwieldy system.
All Kubernetes RBAC role authorization decisions in a cluster are driven by the rbac.authorization.k8s.io API group. As a best practice, always enable RBAC roles in the cluster to ensure projects -- and the organization as a whole -- are more compliant to security best practices.
Kubernetes RBAC best practices to follow in an implementation include the following:
- Enforce least privilege. By default, all access is denied when RBAC is enabled. IT admins define user permissions at a more granular level. Only grant users their necessary permissions; any unnecessary and elevated permissions increase security risk and attack surface. For example, cluster administrator-level permissions should not be extended to all IT staff.
- Continuously adjust the RBAC strategy. RBAC isn't self-sustaining -- IT teams can't set up RBAC rules and roles and walk away. Take a slow approach to RBAC testing and validation. Implement RBAC in phases; understand what works for your enterprise or team if a satisfactory state isn't achievable. Set an interval after which to reevaluate the operational state and analyze the environment continuously for any gaps or areas of improvement as the project or organization grows -- for example, the cleanup, or removal, of old user accounts that should be terminated.
- Reuse roles and don't create too many. Do not create Kubernetes RBAC roles to cater to individual user requirements: This increases risk and attack surface, which defeats the purpose of RBAC permissions. RBAC is not user-based access control -- its job role-based, so roles should be reusable and bind groups of users to the same set of RBAC permissions. RBAC roles reduce administrative effort and improve role assignment efficiency to existing -- and properly vetted -- roles.
Roles, ClusterRoles, RoleBindings, ClusterRoleBindings and Subjects
There are three main components to the Kubernetes RBAC model:
- Role and ClusterRole. These are a set of permissions that define the different types of permissions. Roles set permissions on a namespace level, whereas ClusterRoles define cluster-level permission, or for all namespaces present in the ecosystem.
- RoleBinding and ClusterRoleBinding. These components are a "species" list of subjects and their corresponding role assignments. RoleBindings bind roles; ClusterRoles manage the namespace level; and ClusterRoleBindings bind a ClusterRole to all the namespaces.
- Subjects. Users, groups and service accounts are called subjects in RBAC rules.
Before we can understand how IT admins implement RBAC components in Kubernetes, let's create a user account in a test environment. Although we use an X.509 certificate for this mini tutorial, we could have used a ServiceAccount. But, for the sake of simplicity, we will work with a normal user account.
Create a Kubernetes user account with a certificate
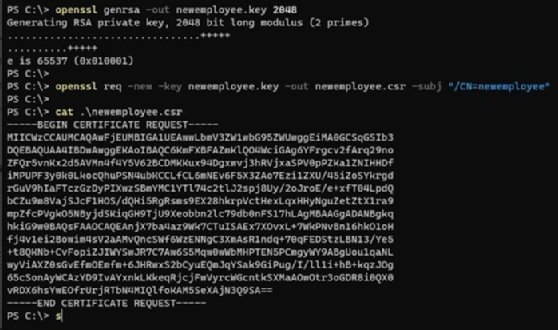
Create a user account, newemployee, and run the following openssl command to create a private key:
openssl genrsa -out newemployee.key 2048
Next, create a Certificate Signing Request (CSR) with the newemployee username we just created:
openssl req -new -key newemployee.key -out newemployee.csr -subj "/CN=newemployee"
Sign the CSR with Kubernetes CA (Certificate Authority); note that, because I'm using Minikube, my cluster certificate and key are under the ~/minikube/ folder. This setup creates a user certificate newemployee.crt, which is valid for 365 days.
openssl x509 -req -in newemployee.csr -CA ~/.minikube/ca.crt -CAkey ~/.minikube/ca.key -CAcreateserial -out newemployee.crt -days 365
Now create users inside the Kubernetes cluster with the certificate:
kubectl config set-credentials newemployee --client-certificate=newemployee.crt --client-key=newemployee.key
We can also validate the new user quickly via the following command:
kubectl config view -o jsonpath='{.users[*].name}'

Now we a have a new user (Subject) in Kubernetes, and can create a Role and assign it to the user (RoleBinding).
Creating a Role and RoleBinding to the user account
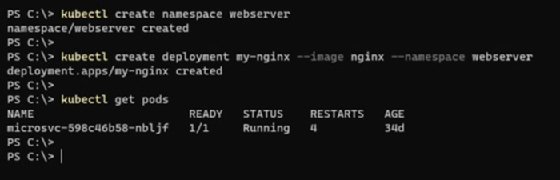
Let's create a new namespace and deploy a simple Nginx server as pods in the new namespace:
kubectl create namespace webserver
kubectl create deployment my-nginx --image nginx --namespace webserver
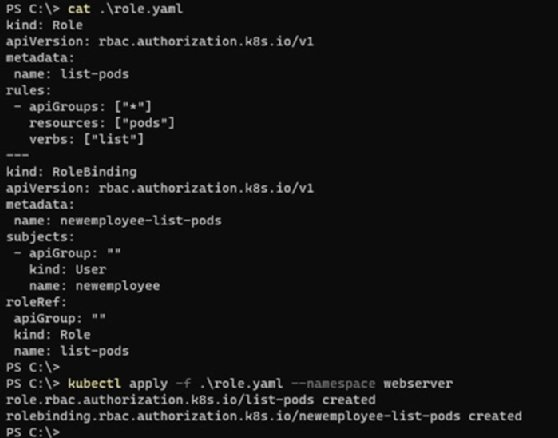
Copy the following YAML configuration and save it to a file named roles.yaml: This file defines a role to only perform the list operation on the Nginx pods. This role binds to the newemployee user created in the above section.
kind: Role
apiVersion: rbac.authorization.k8s.io/v1
metadata:
 name: list-pods
rules:
 - apiGroups: ["*"]
   resources: ["pods"]
   verbs: ["list"]
---
kind: RoleBinding
apiVersion: rbac.authorization.k8s.io/v1
metadata:
 name: newemployee-list-pods
subjects:
 - apiGroup: ""
   kind: User
   name: newemployee
roleRef:
 apiGroup: ""
 kind: Role
 name: list-pods
Save this file. Then apply this configuration to the namespace with the kubectl apply -f .\role.yaml --namespace webserver command.
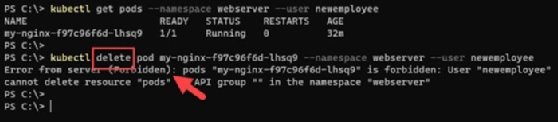
Pass the username to the --user parameter of kubectl get pods command, which lists the pods running within the namespace. The command will fail if we try to perform any other operation, such as delete, which returns a "forbidden" error. As per the RBAC model enforced in this tutorial, the user newemployee is unauthorized to perform a delete operation.
kubectl get pods --namespace webserver --user newemployee
kubectl delete pod <name of your pod> --namespace webserver --user newemployee
Privilege escalation
IT teams will encounter many use cases wherein a user needs escalated privileges. Let's extend this example and grant both list and delete permissions to this user.
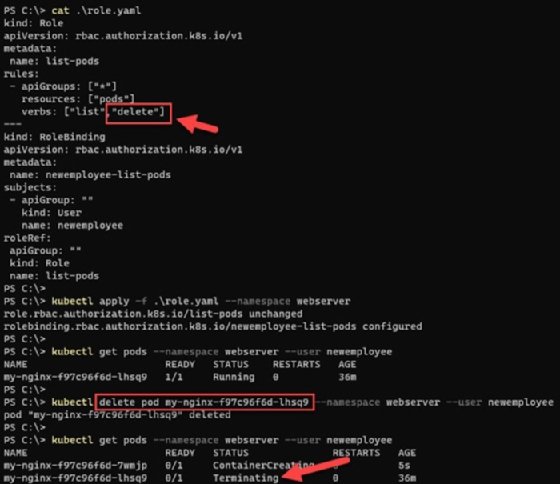
Save the following file as role.yaml -- and note that delete is included in the list of the user's approved operations.
kind: Role
apiVersion: rbac.authorization.k8s.io/v1
metadata:
 name: list-pods
rules:
 - apiGroups: ["*"]
   resources: ["pods"]
   verbs: ["list","delete"]
---
kind: RoleBinding
apiVersion: rbac.authorization.k8s.io/v1
metadata:
 name: newemployee-list-pods
subjects:
 - apiGroup: ""
   kind: User
   name: newemployee
roleRef:
 apiGroup: ""
 kind: Role
 name: list-pods
Reapply this configuration.
kubectl apply -f .\role.yaml --namespace webserver
kubectl delete pod <name of your pod> --namespace webserver --user newemployee
The newemployee user role is now authorized to delete the pods in the namespace.