
Getty Images
How to auto scale Kubernetes pods for microservices
In Kubernetes, autoscaling prevents over provisioning resources for microservices running in a cluster. Follow this tutorial to set up horizontal and vertical scaling.

In Kubernetes, cluster capacity planning is critical to avoid overprovisioned or underprovisioned infrastructure. IT admins need a reliable and cost-effective way to maintain operational clusters and pods in high-load situations and to scale infrastructure automatically to meet resource requirements.
Kubernetes supports three different types of autoscaling:
- Vertical Pod Autoscaler (VPA). Increases or decreases the resource limits on the pod.
- Horizontal Pod Autoscaler (HPA). Increases or decreases the number of pod instances.
- Cluster Autoscaler (CA). Increases or decreases the nodes in the node pool, based on pod scheduling.
This tutorial focuses on the Horizontal and Vertical options, as we will be working on a pod level, not a node level.
Set up a microservice in a Kubernetes cluster
To get started, let's create a REST API to deploy as a microservice in containers on Kubernetes. To take this exercise deeper, you can first create the REST API -- written in Go, as presented below -- which deploys a microservice on Kubernetes. Save the below content in a file named deployment.yml.
apiVersion: apps/v1
kind: Deployment
metadata:
  name: microsvc
spec:
  selector:
    matchLabels:
      run: microsvc
 replicas: 1
 template:
    metadata:
      labels:
        run: microsvc
    spec:
      containers:
      - name: microsvc
        image: "prateeksingh1590/microsvc:1.1"
        ports:
        - containerPort: 8080
        resources:
          requests:
            memory: "64Mi"
            cpu: "125m"
          limits:
            memory: "128Mi"
            cpu: "250m"
---
apiVersion: v1
kind: Service
metadata:
  name: microsvc
  labels:
    run: microsvc
spec:
  ports:
  - port: 8080
  selector:
    run: microsvc
Now, run the following command to deploy the microservice into the Kubernetes cluster:
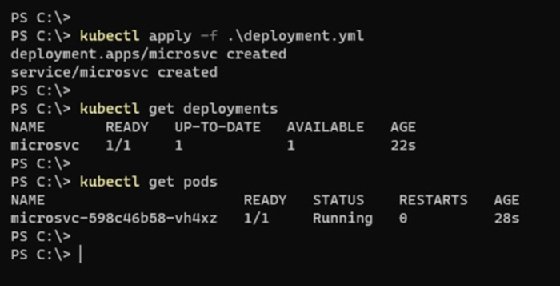
kubectl apply -f .\deployment.yml
Once complete, the new pod will start up in the cluster as shown in Figure 1.
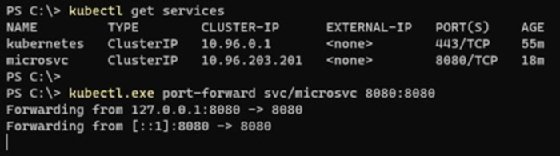
To access the microservice's operational activity, forward the service ports to the localhost, as demonstrated in the following example and in Figure 2.
kubectl get services
kubectl port-forward svc/microsvc 8080:8080
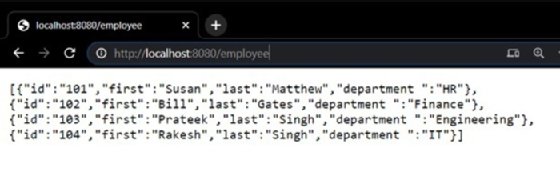
If I try to access the Golang REST API from my browser, it will return the expected results seen in Figure 3.
Now that the application is running as a microservice in a Kubernetes cluster, let's auto scale my application horizontally in response to a sudden increase or decrease in resource demand.
Horizontal Pod Autoscaler
The HPA scales the number of pods in a deployment based on a custom metric or a resource metric of a pod. Kubernetes admins can also use it to set thresholds that trigger autoscaling through changes to the number of pod replicas inside a deployment controller.
For example, if there is a sustained spike in CPU utilization above a designated threshold, the HPA will increase the number of pods in the deployment to manage the new load to maintain smooth application function.
To create an autoscaling CPU deployment, use the following command.
kubectl autoscale deployment php-apache --cpu-percent=50 --min=1 --max=4
This will increase pods to a maximum of four replicas when the microservice deployment observes more than 50% CPU utilization over a sustained period.
To check the HPA status, run the kubectl get hpa command, which will give us the current and target CPU consumption. Initially an ''unknown'' value can appear in the current state, but with time to pull metrics, the server and percentage utilization will start to appear.
For a detailed HPA status, use the describe command to find details such as metrics, events and conditions.
kubectl describe hpa
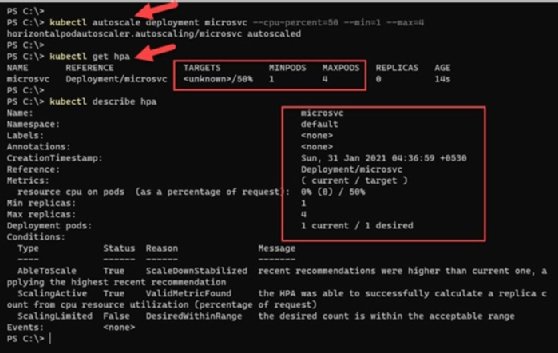
In Figure 4, because the microservice running in a single pod has less than 50% CPU utilization, there is no need to auto scale the pods.
Trigger microservice autoscaling by applying load
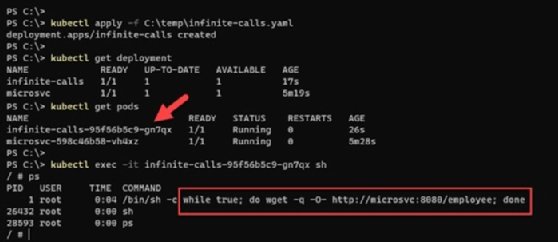
To introduce load on the application, we use a BusyBox image in a container, which will run a shell script to make infinite calls to the REST endpoint created in the previous section. BusyBox is a lightweight image of many common Unix utilities -- like wget -- which we use to put stress on the microservice. This stress increases the resource consumption on the pods.
Save the following YAML configuration to a file named infinite-calls.yaml. At the bottom of the code, the wget command calls the REST API on an infinite while loop.
apiVersion: apps/v1
kind: Deployment
metadata:
  name: infinite-calls
  labels:
    app: infinite-calls
spec:
  replicas: 1
  selector:
    matchLabels:
      app: infinite-calls
  template:
    metadata:
      name: infinite-calls
      labels:
        app: infinite-calls
    spec:
      containers:
      - name: infinite-calls
        image: busybox
        command:
        - /bin/sh
        - -c
        - "while true; do wget -q -O- http://microsvc:8080/employee; done"
Deploy this YAML configuration with the Kubectl apply -f infinite-calls.yml command.
Once the container is active, run a /bin/sh shell on the container using the kubectl exec -it <CONTAINER_NAME> sh command to verify that a process is running and performing web requests to the REST endpoint infinitely. These infinite calls introduce load on the application and result in processor time on the container hosting this web application.
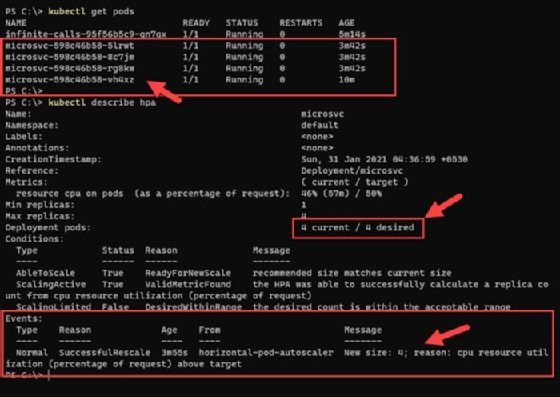
After a few minutes of running under this load, the HPA begins to observe an increase in current CPU utilization and auto scales to manage the incoming load. It creates the maximum number of pods to maintain CPU below that 50% -- that is why the replica count is now four, which is the maximum.
kubectl get hpa -w

To see the detailed events and activity of the HPA, run the following command and observe the highlighted section in Figure 7 for the events and autoscaling triggers.
Kubectl describe hpa
Vertical Pod Autoscaler
The VPA increases and decreases the CPU and memory resource requests of pod containers to better match the allocated cluster resource to actual usage. Container resource limits are based on live metrics from a metric server, rather than manual adjustments to benchmark resource utilization on the pods.
In other words, a VPA frees users from manually setting up resource limits and requests for the containers in their pods to match the current resource requirements.
The VPA can only replace the pods managed by a replication controller, such as deployments, and it requires the Kubernetes metrics server.
A VPA has three main components:
- Recommender. Monitors resource utilization and computes target values. In the recommendation mode, VPA will update the suggested values but will not terminate pods.
- Updater. Terminates the pods that were scaled with new resource limits. Because Kubernetes can't change the resource limits of a running pod, VPA terminates the pods with outdated limits and replaces them with pods with updated resource request and limit values.
- Admission Controller. Intercepts pod creation requests. If the pod is matched by a VPA config with mode not set to "off," the controller rewrites the request by applying recommended resources to the pod specification.
Find more details here about deploying the VPA and the sample manifest YAML files used to deploy it in a local Kubernetes cluster.
Conflicts, caveats and challenges in autoscaling
Kubernetes autoscaling demonstrates flexibility and a powerful use case: It dynamically manages infrastructure scaling in production environments and enhances resource utilization, which reduces overhead.
HPA and VPA are useful, and there is a temptation to use both, but this can lead to potential conflicts. For example, HPA and VPA detect CPU at threshold levels. And while the VPA will try to terminate the resource and create a new one with updated thresholds, HPA will try to create new pods with old specs. This can lead to wrong resource allocations and conflicts.
To prevent such a situation and still use HPA and VPA in parallel, make sure they rely on different metrics to auto scale.