
LuckyStep - stock.adobe.com
How to use Netdiscover to map and troubleshoot networks
Read installation info, basic commands and practical applications for Netdiscover, an ARP-based tool that identifies live hosts, detects unauthorized devices and enhances security.

Network admins, security admins and support technicians need tools that quickly map the network infrastructure to display nodes, network devices and segment boundaries. Delivering continuously updated results, Netdiscover is an excellent and flexible option to uncover live hosts on a network segment.
Let's examine the importance of network mapping and how to use Netdiscover in the process. We'll illustrate how to install Netdiscover and ways to run basic reconnaissance scans on wired and wireless networks.
Why network mapping is important
Network mapping is a critical component of cybersecurity and general operations. It helps admins detect unauthorized devices and identify devices that might not receive updates, be misconfigured or unnecessarily expose vulnerabilities.
Visualizing a network gives admins a way to understand how devices relate to each other and how network traffic flows through them. The goal is to achieve greater optimization and more efficient troubleshooting.
Network mapping also underpins effective incident response and disaster recovery. The maps display the paths between components, enabling admins to build in redundancy or create new connections if the originals fail.
Admins often use Netdiscover in conjunction with other utilities, such as Nmap, Wireshark and NetHogs, to provide a complete picture of the network infrastructure and the data flow within it.
What is Netdiscover?
Netdiscover relies on the Address Resolution Protocol (ARP) and works at Layer 2 of the OSI model to detect live network nodes. It identifies MAC and IP addresses by either actively scanning a segment or passively sniffing packet headers for host information.
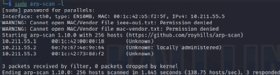
Some administrators use arp-scan for similar purposes. Netdiscover is more flexible, however, offering active and passive modes. Consider using both tools to ensure complete scans.
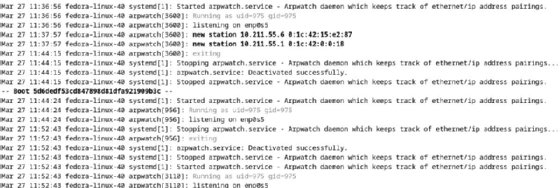
Netdiscover differs significantly from arpwatch, another Layer 2 network reconnaissance utility. Arpwatch records and tracks MAC and IP address relationships, watching for changes. It is a monitoring utility rather than a discovery tool.
How to install Netdiscover
Kali Linux, BlackArch Linux and Parrot Linux include Netdiscover in their standard installations. If you're using a different distribution, install it using a package manager. You can also download Netdiscover from its GitHub site.
On an Ubuntu-like system, type:
apt install netdiscover
On a Red Hat-like distro, type:
dnf install netdiscover
MacOS users can compile Netdiscover for their platform. Windows users can try running it using the Windows Subsystem for Linux.
Note that you might need to add repositories to install Netdiscover on some distributions.
How to use Netdiscover
Like other powerful Linux utilities, Netdiscover has many command options. Refer to the built-in help documentation for all the choices.
To get information about Netdiscover, type:
netdiscover -h
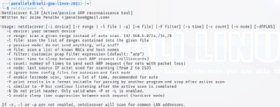
One of Netdiscover's unique features is its ability to run in active or passive mode. Passive mode makes Netdiscover more difficult for intrusion detection systems (IDSes) to notice.
- Active mode. Sends ARP requests to discover hosts, which network monitoring tools might detect. It's particularly useful when mapping a network where not all hosts are active at the time of the scan. As long as these hosts are online, they will respond to the ARP request even if they're not actively sending and receiving other data. This is Netdiscover's default mode.
- Passive mode. Sniffs active traffic to acquire MAC address information instead of querying hosts. Most network monitoring tools won't pick up this kind of scan, but Netdiscover's passive mode won't detect inactive network nodes and is much slower than an active scan. Use the -p flag to specify passive mode.
Netdiscover also identifies a network interface card's (NIC) vendor. Each hardware vendor is assigned a vendor ID that makes up the first half of the NIC's MAC address. Netdiscover can compare results against a database of vendors.
How to map a network with Netdiscover
Netdiscover does not have a GUI, so plan to work in the Linux terminal to conduct your scans. This is typical of many Linux cybersecurity tools.
Note that routers might block ARP broadcasts. For best results, run Netdiscover on each network subnet. Condense the results into a single map or report from the individual results.
The various Netdiscover scans output a similar table of results, including IP address, MAC address, NIC vendor and hostname (if resolvable).
To run a basic scan, type:
netdiscover

Use Ctrl+C to end the scan.
You probably want to focus this scan more effectively. Add the -i <interface-name> option to use a specific interface. You can also specify a target range of IP addresses using -r <IP-range/subnet>. For example, to use interface eth0 to scan the 192.168.2.0/24 subnet, type:
netdiscover -i eth0 -r 192.168.2.0/24
This example runs an active scan on the subnet. Add the -p option for a passive scan, as seen below:
netdiscover -p
Consider fast scan if you're doing basic mapping on your own network -- and therefore don't need to hide from an IDS. This option will also help if you scan a congested network with many hosts.
netdiscover -f
You might want Netdiscover to run passively for long-term monitoring. Begin Netdiscover with a standard active scan and then allow it to run passively after that to maintain information. The option for this configuration is -L. The command is:
netdiscover -L
The initial active scan gathers information quickly. The remaining passive mode keeps the information current over time.
Remember that you can use many of these options in conjunction to fully customize the tool to your needs.
Netdiscover use cases
When learning how to use Netdiscover, you'll find it's for anyone who needs to identify the systems on a network. Examples include the following:
- Admins mapping network environments.
- Security professionals conducting audits and penetration testing.
- Network technicians troubleshooting network incidents.
- Wardriving/walking and reconnaissance.
- Network and security admins checking for rogue devices on wired and wireless networks.
- IT professionals conducting device inventories.
- Network technicians needing to identify NIC vendors.
Plan to use Netdiscover when you need a fast, efficient way of discovering network nodes.
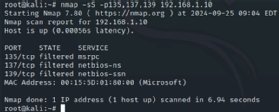
Netdiscover vs. Nmap: What's the difference?
Most administrators use Nmap as their primary network discovery and for good reason: It's powerful, flexible and returns a broad range of results. So, how does Netdiscover differ, and when is the right time to use each?
Nmap operates at OSI Layer 3. It offers far more extensive scan options, including the following:
- Host discovery.
- Port scanning.
- OS identification.
- Vulnerability scanning.
Nmap offers comprehensive scans of nearly any information you need for pen testing, service mapping and host identification.
In some cases, however, Nmap might be more than you need for basic mapping or reconnaissance. In these situations, Netdiscover offers a lightweight option that effectively maps network hosts without the added burden of extraneous information or generating more network traffic than necessary. It's perfect for basic host enumeration on one or more local subnets. You'll find Netdiscover is a great tool to use in tandem with Nmap or when you don't need Nmap's extraordinary capabilities.
The next time you need to find all hosts on a segment or check for unauthorized devices, consider using Netdiscover.
Damon Garn owns Cogspinner Coaction and provides freelance IT writing and editing services. He has written multiple CompTIA study guides, including the Linux+, Cloud Essentials+ and Server+ guides, and contributes extensively to Informa TechTarget, The New Stack and CompTIA Blogs.
Dig Deeper on Network security
-
![]()
EC-Council Ethical Hacker Certification (CEH) braindump and exam dump
By: Cameron McKenzie
-
![]()
How to use arp-scan to discover network hosts
By: Damon Garn
-
![]()
How to use Nmap to scan ports: A complete tutorial
By: Damon Garn
-
![]()
20 tough Certified Ethical Hacker exam question and answers (EC-Council)
By: Cameron McKenzie