
Getty Images
How to use arp-scan to discover network hosts
An arp-scan delivers a fast, focused scan of an organization's local subnet. It is not fancy, but it's an easily controlled method to learn exactly what's connected.

Identifying the devices on your network is a critical security task. After all, you can't secure what you don't know. While plenty of fancy configuration management tools list the nodes on a network, sometimes the simple and straightforward utilities are best.
Arp-scan is a tool that discovers and identifies IPv4 network nodes by using Address Resolution Protocol (ARP) queries to generate a comprehensive list of devices. Its use of ARP sets arp-scan well apart from scanners that rely on ping (ICMP), TCP or User Datagram Protocol (UDP) scans. Many tools operate at OSI Layer 3, such as Nmap. Not all network devices respond to such higher-level scans. Because ARP is a fundamental component of networking, an arp-scan query at OSI Layer 2 will almost certainly succeed.
Arp-scan has a specific limitation. Because ARP is not routable, an arp-scan is limited to the local subnet. This is often exactly what you want: a focused, direct and easily controlled scan. For a broader network scan, consider Nmap, Angry IP Scanner or a similar tool.
Let's look at how to install arp-scan, basic scan options and then evaluate use cases.
How to install arp-scan
Installing arp-scan on your Linux penetration testing box is as simple as calling up your distribution's preferred package manager.
For Ubuntu, Debian and similar distributions, type:
apt install arp-scan
On Fedora, Alpine Linux, Rocky or Red Hat Enterprise Linux distros, type:
dnf install arp-scan
On openSUSE, type:
zypper install arp-scan
On Arch Linux, type :
pacman -S arp-scan
Many security-oriented distributions, such as Kali Linux, include arp-scan by default.
Mac users should install the Homebrew Mac package manager and then type the following command to install arp-scan:
brew install arp-scan
The installation is more challenging for Windows users. You'll need an arp-scan port (check GitHub), the Cygwin Unix-like environment or Windows Subsystem for Linux. After installing arp-scan, run it from the Terminal. It's a command-line application.

How to run an initial scan
Arp-scan works by sending ARP requests to all IP addresses in a specified range. These requests ask the receiving computers to respond to the source device with their IP address. This is an integral part of basic IP networking, so all systems should respond. Arp-scan records each response and displays the results.
The basic arp-scan syntax relies on a user to identify a network interface and the subnet you want to scan.
arp-scan -I <interface-id> <subnet>
For example, to scan subnet 192.168.2.0/24 on interface eth1, type:
arp-scan -I eth1 192.168.2.0/24
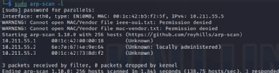
The results include all devices that respond to the ARP query. Arp-scan identifies them by media access control (MAC) and IP address, along with the network interface card manufacturer. The scan should finish quickly, since there's not much to the protocol.
Wireless networks also rely on MAC addresses, so you can specify your system's wireless interface as the source. This is a handy option for finding rogue wireless devices on your network.
Additional arp-scan options
Various arp-scan options can modify the tool's behavior. Combine the following with the standard scan options for greater flexibility:
- -q (quiet mode). Displays only MAC and IP addresses without showing interface manufacturer information.
- -x (plain mode). Hides the default header and footer information, making it easier to import the scan's results into other formats, such as CSV.
- -g. Ignores any duplicate responses.
- -r 3. Specifies the number of retries (three, in this example).
- -R. Randomizes the scan order of specified hosts.
Review the arp-scan man page for additional options. Combine the various options to gather and format the information needed.
The arp-fingerprint command is part of the arp-scan package. Use it to target a single host.
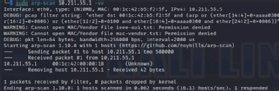
Increase the arp-scan output verbosity by using the -v option. The results display scan passes in progress, packet length details, debug information and more. Use multiple v options for greater detail (such as -vvv).
Arp-scan use cases
Keep in mind that arp-scan does not attempt to hide from intrusion detection systems or other scan prevention tools. Its queries are obvious and noisy. If you prefer a stealthy scan, consider other tools. Netdiscover, for example, might be a good alternative. ARP traffic, however, is a normal part of networking, so other communications could camouflage your scan.
Use arp-scan in any scenario where detecting network nodes is crucial but hiding your actions is not. Consider the following examples:
- Network mapping and reconnaissance. Map networks for security audits or scan for unexpected and unknown devices.
- Ethical hacking. Map networks and identify devices during pen testing or other legitimate security activities.
- Troubleshooting. Identify active network nodes as part of a larger troubleshooting process.
Other network scanners, such as Nmap, work one layer higher in the OSI model than arp-scan. This provides greater functionality, but it also limits some of their usefulness. Since arp-scan operates at OSI Layer 2, it scans only the local segment. It will, however, find nodes other scanners might miss. Combine arp-scan and Nmap scans for best results. An arp-scan's simplicity is its greatest asset.
Damon Garn owns Cogspinner Coaction and provides freelance IT writing and editing services. He has written multiple CompTIA study guides, including the Linux+, Cloud Essentials+ and Server+ guides, and contributes extensively to Informa TechTarget, The New Stack and CompTIA blogs.