
Getty Images/iStockphoto
10 ways to free up disk space in Windows
Windows disk space issues can affect performance and stability. These 10 practical tips help IT admins assess usage, clean up files and proactively manage storage.

Administrators often focus on freeing up storage or disk space to improve PC performance. Historically, this has been an ongoing concern because disk space is both finite and costly. Earlier systems required careful management due to severe storage constraints.
Today, the widespread availability of inexpensive solid-state drives and high-capacity hard drives -- often several terabytes in size -- has largely reduced the need for such drastic storage management practices.
Disk space issues are often blamed on large files, including photos, videos and log files. While these items can contribute to storage constraints, a more complete assessment requires answering the following questions:
- What is the actual size of the file being considered? Some files that appear significant might be relatively small. For example, Windows minidump files can be only a few kilobytes unless a full dump is generated.
- Will deleting this file meaningfully improve available disk space, and what are the potential tradeoffs? Deleting small files might eliminate important diagnostic data and yield only minimal storage benefits.
- Can the file be moved to alternate storage? Options such as a USB drive, Google Drive or Microsoft OneDrive might provide a safer alternative to deletion.
- Which systems are experiencing low disk space errors? Devices generating low-space warnings -- such as those recorded in the System Event log -- should be identified and prioritized to reduce the risk of application failure or system instability.
There are many common-sense approaches to freeing up disk space, but the following are 10 practical tips for Windows admins.
Preparation and initial assessment
These tips focus on gaining an overview of disk usage, determining if a problem exists and performing a proper assessment.
Tip 1: View storage settings
Windows 11 includes built-in tools to determine if disk space is at risk.
From the Windows Start menu, open Settings and navigate to System > Storage. This view displays the space used by installed apps and temporary files (Figure 1).
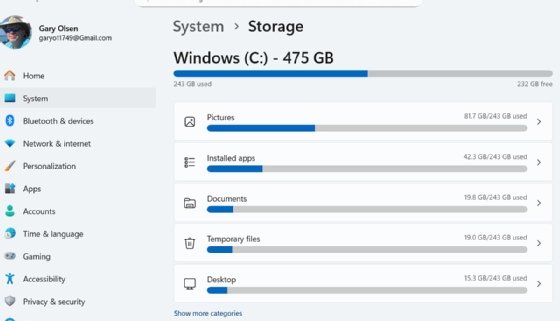
Additional options include the following:
- Storage Sense. This automatically removes temporary files and other unnecessary data.
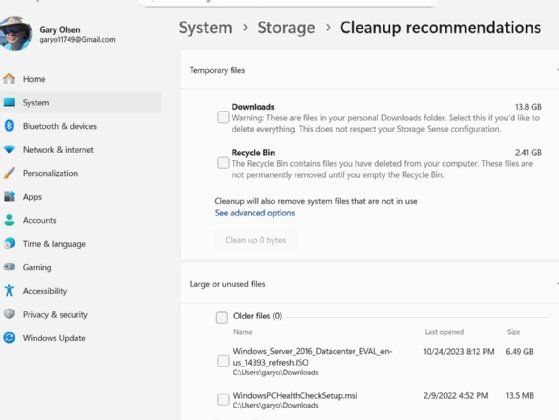
- Cleanup recommendations. This option provides suggestions for freeing up space (Figure 2).
- Advanced storage settings. This offers detailed information about drives and features such as drive optimization.
Configuring these tools within a standard Windows image supports a proactive approach to disk space management.
Another quick method is to open File Explorer. Right-click the C: drive, select Properties and review the used and free space (Figure 3).
For larger environments, admins can use tools such as Microsoft Intune, Microsoft Endpoint Configuration Manager (MECM), Microsoft System Center Operations Manager and Windows Admin Center to monitor disk usage across systems.

Tip 2: Perform periodic disk audits
Low disk space issues must be identified and resolved, but manually examining each PC for critical conditions is impractical. Organizations can benefit from using the tools noted in Tip 1, along with third-party tools such as the following:
- Unified endpoint management tools such as Ivanti, IBM MaaS360 and ManageEngine OpManager.
- Nagios Core, which is open source.
- SolarWinds.
- Zabbix, which is an open source monitoring platform.
Custom PowerShell scripts can also be scheduled to support monitoring and remediation.
These tools monitor disk space, define thresholds and generate alerts with varying severity levels. Some can trigger automatic cleanup before users are affected.
Tip 3: Use Windows Disk Cleanup
Once a low disk space issue is identified, Windows provides a built-in tool called Disk Cleanup. To use it, type Disk Cleanup into the search bar and click on the icon that appears. The dialog box displays Windows-specific files and the disk space they consume (Figure 4). These tools include downloaded program files, temporary internet files and more.
Selecting Clean up system files runs Disk Cleanup with admin privileges and reveals additional items such as system minidump files, Windows Update logs and the Windows.old folder. This folder can consume a significant amount of disk space but enables rollback to a prior version of Windows after an upgrade.
Each file category displays the amount of disk space that can be recovered. Select the files to remove, and click OK.

Tip 4: Clear the Recycle Bin
Deleting files only moves them to the Recycle Bin, where they continue consuming space until they are permanently removed. The Recycle Bin is accessible from the Windows desktop and in Disk Cleanup. Be sure to empty the Recycle Bin after removing large files.
General cleanup
These methods focus on removing unused or unnecessary files.
Tip 5: Move large files to external or cloud storage
Large files can often be moved to internal or external SSDs or to cloud platforms such as Google Drive or Microsoft OneDrive. Common examples include pictures, videos, downloads and log files. This approach is useful for users who generate large volumes of data but do not need it stored locally.
Tip 6: Uninstall apps no longer needed using Control Panel
Unused applications consume disk space and can introduce overhead. Applications can be removed through Control Panel. In managed environments, tools such as Microsoft Intune or ManageEngine can provide centralized app management and policy enforcement.
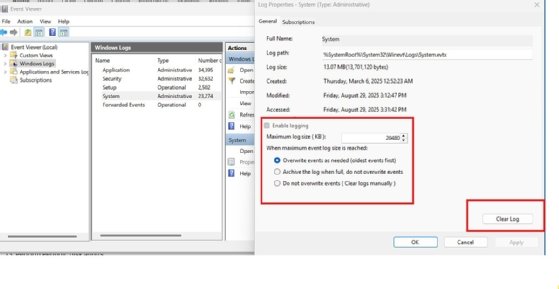
Tip 7: Manage event logs
Without proper management, Windows event logs can become bloated and consume excess disk space.
Open Event Viewer and select Windows Logs (Figure 5). Log size and retention settings can be configured by right-clicking a log and selecting Properties. The default setting -- Overwrite events as needed -- is typically preferred, as it keeps the log running but overwrites old data.
Deleting logs or making them too small could hinder future troubleshooting. Consider keeping the log file small but increasing it temporarily when an issue requires troubleshooting.
In larger environments, admins can use Active Directory Group Policy or endpoint management tools to centrally standardize event log size, retention and configuration settings across systems.
User data and application data
These tips address how user-generated content, profile data and app-specific files can accumulate over time and consume significant disk space.
Tip 8: Clear application and package caches
Many applications store cache and log files locally, consuming significant space over time. Common approaches include the following:
- Define cache size policies by setting limits that balance user needs with disk usage constraints.
- Limit log file size by enabling rotation or overwrite settings or by redirecting logs to alternate storage.
- Automate cleanup using PowerShell scripts or endpoint management tools such as Intune or MECM.
Tip 9: Manage VMs, disks and checkpoints
A single VM can quickly consume large amounts of storage, potentially exhausting available disk capacity.
VMs use virtual disk files (.vhd or .vhdx) that occupy physical storage and can accumulate over time. These files should not be deleted directly through Windows. Instead, they must be removed through the VM platform, such as Hyper-V, to avoid corruption or other issues.
Checkpoint files (.avhdx) are also stored alongside virtual disks and can rapidly grow. These should be managed and removed through VM tools rather than manually at the file system level. For reference, the default Hyper-V virtual disk location is C:\ProgramData\Microsoft\Windows\Hyper-V\Virtual Hard Disks.
A system-wide search for *.vhd or *.vhdx files might be needed to identify all VM-related storage.
Tip 10: Clean up user profiles
User profiles can consume unnecessary disk space, including both user and service accounts. Common targets include Downloads, Documents and Desktop folders located under C:\Users, which can often be redirected to cloud storage such as OneDrive.
User profiles might also become inactive over time due to a device being reassigned or when application-related accounts are not removed after uninstall. To manage unused profiles, admins can use one of the following methods:
- Use Active Directory Group Policy to set a retention policy, particularly on shared systems. Navigate to Computer Configuration > Administrative Templates > System > User Profiles > "Delete user profiles older than a specified number of days on system restart."
- Use third-party utility DelProf2 to identify and remove inactive profiles. Refer to the vendor site for download and usage details.
Low disk space can degrade system and application performance and increase the risk of system instability. Factors such as user cache growth, VMs, application data and system files can all contribute to excessive disk usage.
Admins should use built-in and third-party tools to proactively identify and address risks rather than reacting to failure. Tools such as the storage utility in Windows Settings and Disk Cleanup enable quick identification and remediation of common issues.
Proper backup processes and policies are essential before deleting or moving critical data. With high-capacity storage now widely available, appropriately sizing systems can reduce disk space constraints and administrative overhead.
Gary Olsen has worked in the IT industry since 1983 and holds a Master of Science in computer-aided manufacturing from Brigham Young University. He was on Microsoft's Windows 2000 beta support team for Active Directory from 1998 to 2000 and has written two books on Active Directory and numerous technical articles for magazines and websites.