What is Microsoft SSIS (SQL Server Integration Services)?
Microsoft SQL Server Integration Services (SSIS) is an enterprise platform for setting up data integrations and data transformations.
Built into Microsoft's SQL Server relational database management system (RDBMS), SSIS can be used to manage SQL Server objects and data. It is also useful for executing and managing a variety of data-related tasks, such as cleansing and mining data, running extract, load, transform (ELT) processes from various sources, copying or downloading files, and loading data warehouses.
SSIS can extract, transform and consolidate data from multiple relational databases, as well as sources such as XML data files and flat files, then load the processed information into an enterprise data warehouse or other target systems. It includes a set of tools for developing and testing integration programs, called SQL Server Data Tools, plus a server component for deploying and running the programs. In addition, Microsoft's SQL Server Management Studio software is incorporated into SSIS for managing and monitoring integration routines.
SSIS architecture
The main elements of the SSIS architecture are two engines. These engines help create the separation between data movement and transformation versus package control flow and management in the SSIS service.
The data flow engine is a specialized, high-performance element of the SSIS architecture that takes care of data flow-related tasks. This means it is responsible for extracting, transforming and loading data from disparate sources.
Every data flow task in SSIS contains data flow components. These are the sources, transformations and/or destinations that define how data will move and transform within the data flow engine. These components -- which are additional objects -- can be automatically created and configured by programming the data flow engine. Developers can also create custom objects by programming the engine.
The SSIS run-time engine is responsible for controlling how packages are managed and executed. It implements the control flow and package management infrastructure that SSIS needs to handle execution order, logging, variables and event handling. This infrastructure also allows developers to program the engine to automatically create, configurate and execute packages, and to control the flow of execution. They can also set options for logging, event handlers and variables.
Apart from the data flow engine and run-time engine, the main elements of the SSIS architecture are:
- SSIS Designer.
- SSIS Wizards.
- Custom applications.
- Command-line utilities.
Log providers, data sources, event handlers, enumerators, tasks/custom tasks, and data flow components/custom data flow components are also part of the SSIS architecture.
Key features of SSIS
Microsoft SQL Server Integration Services includes numerous features that simplify data integrations and transformations for enterprises. These include built-in data source connectors. Users can also connect to commonly used data sources -- SQL Server, MySQL, PostgreSQL, Azure Blob Storage, Oracle, Excel, etc. -- with the SQL Server Import and Export Wizard. SSIS also provides numerous built-in tasks and transformations. Developers can also write custom tasks as needed.
The other useful features of SSIS are:
- Hadoop/HDFS connectors and tasks.
- Open Database Connectivity (ODBC) source and destination.
- Azure data source connectors and tasks.
- Basic data profiling tools.
These features are available with both Standard and Enterprise editions of SQL Server.
The SQL Server Enterprise edition also provides many additional features, such as the following:
- Advanced sources and destinations, including Oracle and Teradata source, Attunity destination, SAP BW source and destination, and dimension processing destination.
- Advanced tasks and transformations, including data mining query transformation, fuzzy grouping and fuzzy lookup transformations, etc.
Programming SSIS
The two engines within SSIS, the data flow engine and the run-time engine, can be automated and extended using programming to accommodate the organization's integration requirements. In fact, when they program SSIS, it is these two engines that are programmed. The engines are written in native code but available through the SSIS object model.
When programming the SSIS, developers can extend packages by writing custom data flow components (sources, transformations, destinations). These components become available within SSIS Designer (a graphical tool) and provide custom functionality in a package. The other option is to create, configure and run packages programmatically from other applications.
Developers have the freedom to code extensions to extend the functionality of SSIS and its built-in components. Custom integrations like connection managers, tasks, enumerators, log providers and data flow components can be created for use in multiple packages by using the base classes in the SSIS object model as a starting point.
For creating and using extensions in a single package in an ad hoc (non-reusable) way, developers can write code in the Script task and then configure it as a source, transformation or destination. With this method, SSIS writes the infrastructure code so the user can focus on developing the required custom functionality.
SSIS allows users to create packages dynamically and manipulate them programmatically. By doing so, they can load existing packages either without modification or with some reconfiguration. These packages can be loaded as templates and then reconfigured (e.g., for a different data source) and executed. Users can also create and execute new packages. These packages can include components that are configured object by object and property by property.
Developers can program SSIS in their choice of .NET-compliant languages (e.g., C#). This is because SSIS fully supports the Microsoft .NET Framework, and also because of the SSIS object model. This model includes features that allow developers to easily and flexibly extend and program packages in SSIS.
The .NET software development kit (SDK) includes the Visual Basic and C# compilers plus related development tools. Any code or text editor can be used to program packages, custom tasks and components, and to compile and build SSIS code projects -- including Visual Studio.
When programming SSIS in a .NET-compliant languages, developers must keep in mind that the .NET Framework is installed with SQL Server by default. However, the .NET SDK is not, so they will need to install it on their computer to enable SQL Server documentation in Visual Studio. Developers should also note that SSIS application programming interface (APIs) are not compatible with VBScript and other COM-based scripting languages when programming SSIS and its two engines.
SSIS object model
The SSIS object model is fully managed, and it makes the data flow engine and run-time engine available and programmable. It lets users create and configure packages, including metadata-driven packages, programmatically line by line, and then execute those packages in any managed programming language. They can also code custom tasks and other package objects with the object model. In fact, with the object model, almost every aspect of SSIS packages can be programmed and extended.
Along with the object model, developers can use the graphical SSIS no-code tool (SSIS Designer) to create data transformation and integration solutions without writing any code. Together, the SSIS object model and no-code tools provide a powerful combination to extract and transform data for solving complex business challenges.
Key elements of SSIS
Microsoft SQL Server Integration Services is a complete data integration and data transformation platform for SQL Server and SSIS Integration Runtime in Azure Data Factory.
It includes these elements:
- Built-in tasks.
- Built-in transformations.
- SSIS Designer graphical tool.
- SSIS Database Catalog.
Tasks are control flow elements within SSIS packages (a package can have multiple tasks that are connected and sequenced in the control flow). Each SSIS task defines the units of work that will be performed in a package control flow. SSIS supports multiple task types, including data flow tasks, data preparation tasks, workflow tasks and SQL Server tasks. Developers can write custom tasks in a .NET programming language or a COM-supported programming language.
In SSIS, transformations are the components of a package that aggregate, merge, distribute and modify data. SSIS provides different kinds of transformations that perform a variety of functions. For example, business intelligence (BI) transformations perform BI operations like cleaning or mining data, while row transformations update column values and create new columns. As with tasks, developers can write custom transformations to suit business requirements. These transformations can have synchronous or asynchronous output.
SSIS Designer is a graphical tool with user-friendly tabs, dialog boxes and windows. It enables developers to easily perform and manage a wide range of data-related tasks, such as constructing the control or data flow in a package, adding event handlers to a package, undoing/redoing changes, and viewing package execution progress at runtime -- all without writing any code. The SSIS service doesn't need to be running to create or modify packages in SSIS Designer.
The SSISDB Catalog stores objects like projects, packages, parameters, environments and operational history. It is needed to deploy projects within SSIS. With the SSISDB Catalog, users can do the following:
- Inspect the objects, stored in the SSISDB catalog by querying the views in SSISDB.
- Manage the objects by calling stored procedures in SSISDB.
The SSIDB Catalog can run on-premises. Organizations can also move their on-premises SSIS workloads to Azure. This can reduce operational costs and increase availability and scalability. They can deploy, run and manage SSIS projects and packages in the SSISDB Catalog on Azure SQL Database using familiar tools like SQL Server Management Studio (SSMS).
Latest features in SQL Server 2025 Integration Services
As of July 2025, the latest edition of SQL Server Integration Services is v17.x (Preview). This version includes a new feature, a breaking change and some deprecated and removed changes.
The new feature in SQL Server 2025 (17.x) Preview Integration Services is that ADO.NET connection manager now supports Microsoft SqlClient Data Provider. This connection manager allows packages to access data sources, such as SQL Server, by using a .NET provider. SSIS creates the connection manager and sets its properties (this can be done either programmatically or using SSIS Designer).
The breaking change in SSIS 17.x affects organizations upgrading to SSIS 2025 and using the .NET API Microsoft.SqlServer.Dts.Runtime Namespace. To continue using the Namespace, projects must update the references and rebuild when a package either: includes Execute SQL Task or has certain SSIS tasks that rely on SQL Server Management Objects (SMO).
The following features are deprecated in SQL Server 2025 (17.x) Preview Integration Services:
- SQL Server Management Studio legacy SSIS service.
- Integration Services 32-bit mode (tools will only support 64-bit in current and future versions).
- SqlClient Data Provider (SDS) connection type (Microsoft recommends that users migrate to ADO.NET connection type).
Some features are removed in SQL Server 2025 Preview Integration Services. These include:
- Attunity's Change Data Capture (CDC) components and CDC service for Oracle.
- Microsoft Connector for Oracle.
- Hadoop Hive Task, Hadoop Pig Task and Hadoop File System Task components.
Improvements in previous versions of SSIS
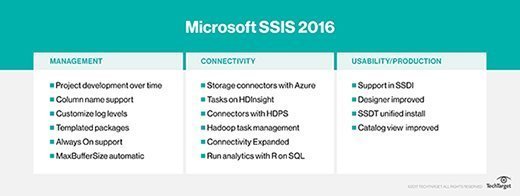
SQL Server 2016
SQL Server 2016 introduced the SSISDB Upgrade Wizard. This tool enables IT pros to upgrade the catalog database when it is older than the current version of SQL Server. It can also be used in some disaster recovery situations that require a restoration from backup. The SSISDB Wizard upgrades the catalog database to match whatever version of SQL Server is being used.
SQL Server 2016 Integration Services enables admins to add an SSIS catalog database to an AlwaysOn Availability Group. It also includes improved package management, where admins can save a container or a control flow task as a reusable template through Integration Services. Also included within SQL Server 2016 was an SSIS Feature Pack for Azure. This allows admins to connect to Azure data sources and to transfer data between the Azure cloud and data sources that are located on premises.
Microsoft released connectors for SSIS in 2016, including the Connector for SAP Business Warehouse for SQL Server 2016, Connector versions 4.0 for Oracle and Teradata, and the Connector for Analytics Platform System Appliance Update 5.
SQL Server 2017
SQL Server 2017 brought new SSIS features, such as Scale Out for SSIS, which makes it easier to run SSIS on multiple machines. Admins can avoid a single point of failure for the entire Scale Out deployment. Also included is an improvement to the failover handling of the executing logs from Scale Out Workers. The execution logs persist to local disk if the Scale Out Worker stops suddenly.
The SSIS catalog also includes a new global property which specifies the default mode to execute SSIS packages. This applies when IT pros call the stored procedure with the runinscaleout parameter set to null.
SSIS history
Microsoft SSIS was introduced with SQL Server 2005 as a replacement for an earlier integration tool called Data Transformation Services (DTS). Before the release of DTS with SQL Server 7.0 in 1998, database administrators either wrote custom data transformation tools or used third-party tools to transfer data.
Microsoft has added a number of features to SSIS over the years, including graphical tools and wizards, which allow users to build and debug packages; workflow functionality, such as file transfer protocol operations; the ability to execute SQL statements; the ability to email messages; data sources and destinations for ETL; transformations for collecting, cleansing, merging and copying data; a management service; the ability to administer package execution and storage; and APIs for SSIS object models. Among the most popular features are the data import/export wizard and packaged data source connectors.
SSIS support
SSIS is version-specific, so users must have the version of SSIS that matches their SQL Server edition. In addition, SSIS isn't supported in SQL Express or Workgroup editions. Users have to buy the Standard, Business Intelligence or Enterprise editions to get the SSIS designer and runtime components as well as basic data profiling tools and prebuilt transformations. Advanced adapters and advanced transformations are only available in the Enterprise edition.
Compare AWS, Microsoft, Google and Oracle clou databases and explore sample databases for SQL Server and how to find them.
Continue Reading About What is Microsoft SSIS (SQL Server Integration Services)?
Dig Deeper on Database management
-
![]()
Braindumps and Exam Dumps for Google's Certified Professional Database Engineer Test
By: Cameron McKenzie
-
![]()
What is PL/SQL (Procedural Language/Structured Query Language)?
By: Rahul Awati
-
![]()
What is a stored procedure?
By: Rahul Awati
-
![]()
Do traditional data stacks have a use versus modern options?
By: Maria Korolov