What is the domain name system (DNS)?
The domain name system (DNS) is a naming database in which internet domain names are located and translated into Internet Protocol (IP) addresses. The DNS maps the name people use to locate a website to the IP address that a computer uses to locate that website.
For example, if someone types example.com into a web browser, a server behind the scenes maps that name to the corresponding IP address 203.0.113.72, which is reserved for use in documentation and examples.
IP addresses are composed of four sets of numbers, or octets, that are separated by periods. The first part of the IP address identifies the network ID of the connecting device or service; the second set of numbers represents the subpart or subnet of the network where the connecting device or service is located; the third set of numbers is the IP address of the host ID of the site to which the requestor wishes to connect; and the last two octets define the specific host that is used for communicating with the requestor.
Web browsing and most other internet activities rely on DNS to quickly provide the information necessary to connect users to remote hosts. DNS mapping is distributed throughout the internet in a hierarchy of authority. Internet service providers (ISPs), enterprises, governments, universities and other organizations typically have their own assigned ranges of IP addresses and an assigned domain name. They also usually run DNS servers to manage mapping those names to those addresses.
DNS naming structure
DNS servers direct internet traffic by referencing the domain names of sites that users request. The domain name is usually contained in a URL. It is made of multiple parts called labels. The domain hierarchy is read from right to left, with each section denoting a subdivision.
The top-level domain (TLD) appears after the period in the domain name. Examples of TLDs include .com, .org and .edu, but there are many others. Some TLDs denote a country code or geographic location, such as .us for the United States or .ca for Canada.
Each label on the left-hand side of the TLD denotes another subdomain of the domain to the right. For example, in the URL www.techtarget.com, techtarget is a subdomain of .com, and www is a subdomain of techtarget.com.
There can be up to 127 levels of subdomains, and each subdomain label can have up to 63 characters. The total domain name can be up to 253 characters. Other rules include not starting or ending labels with hyphens and not having a fully numeric TLD name.
In 1987, the Internet Engineering Task Force (IETF) specified rules about implementing domain names in Request for Comments (RFC) 1035.
Why is DNS important?
Internet operations depend on DNS, which functions like a virtual phone book and is the mapping apparatus that enables users and resources to identify and connect with each other. Internet traffic flows are highly dependent on DNS behind-the-scenes mapping that can automatically connect and direct internet traffic from point to point. Without DNS automatic mapping facilities, internet users and service requesters would have to know and manually enter the IP addresses of the services and sites to which they wish to connect. Additionally, DNS servers apply security verifications that can prevent security attacks and attempts.
How DNS works
DNS servers convert URLs and domain names into IP addresses that computers can understand and use. They translate what a user types into a browser into something the machine can use to find a webpage. This process of translation and lookup is called DNS resolution. Its purpose is to translate a human language-based name, like techtarget.com, into a numerical IP address that TCP/IP requires to locate a website or other internet resource.
There are two types of DNS resolution techniques:
- Recursive resolution. In DNS recursive resolution, the human-readable domain name is translated into a numbered IP address by recursive resolvers. The user workstation, device or IT service sends the human-readable domain name identifier of the requested internet resource to the local network DNS server, which consults its database to find the associated IP address for that identifier. The DNS server uses the IP address to go out to the internet and retrieve the requested website or resource.
- Iterative resolution. In the case of iterative resolution, the initial request that the user workstation, device or IT service sends to its local network DNS server is unsuccessful, likely because the internet resource being requested is on a different network that is governed by its own DNS server. In this case, the initial request is iteratively sent to several different DNS servers on different networks until the DNS server that contains the cross-reference and IP address translation for the requested internet resource is found. The IP address is then used to retrieve the requested resource for the requester.
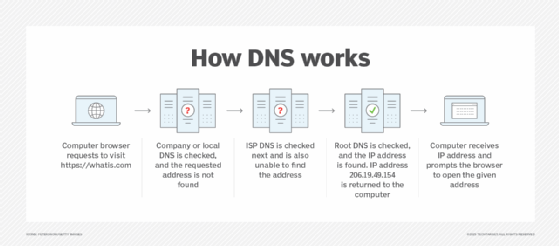
The basic process of DNS resolution follows these steps:
- The user enters a web address or domain name into a browser.
- The browser sends a recursive DNS query message to the network to determine to which IP address or network the domain corresponds.
- The query goes to a recursive DNS server, which is usually managed by the ISP. If the recursive resolver has the address, it returns it to the user, and the webpage loads.
- If the recursive DNS server has no answer, it queries a series of other servers in the following order: DNS root name servers, TLD name servers and authoritative name servers.
- The three server types work together and continue redirecting until they retrieve a DNS record that contains the queried IP address. They send this information to the recursive DNS server, and the webpage the user is looking for loads. DNS root name servers and TLD servers primarily redirect queries and rarely provide the resolution themselves.
- The recursive server stores, or caches, the IP address for the domain name. The next time it receives a request for that domain name, it can respond directly to the user instead of querying other servers.
- If the query reaches the authoritative server and it cannot find the information, it returns an error message.
The entire process of querying the various servers takes a fraction of a second and is usually imperceptible to the user.
DNS servers answer questions from both inside and outside their domains. When a server receives a request from outside the domain for information about a name or address inside the domain, it provides an authoritative answer.
When a server gets a request from within its domain for a name or address outside that domain, it forwards the request to another server, usually one managed by its ISP.
DNS server types
DNS uses different servers to locate the IP addresses of the domain names that users request. The following is a breakdown of how these various DNS servers work together:
- Recursive server. This DNS server is within the same network as the user, so it is the first DNS server that attempts translation of the domain name submitted by the user into an IP address. The user enters www.getthis.com. The request goes out to the recursive server, which searches its cross-reference database of domain names and IP addresses. Unfortunately, the recursive server that is on the user's network cannot find the IP address domain name www.getthis.com.
- Root name server. The recursive server on the user's network then reaches out to the root name server, which is a master index of all the servers with the information being queried. The Internet Corporation for Assigned Names and Numbers, or ICANN, oversees these servers. The root server looks at the TLD of the resource being requested -- for example, .com, .org or .edu.
- TLD server. Based on the TLD name of the resource requested, the root server calls the correct TLD server. For example, www.getthis.com has .com as its TLD name, so the root server routes the user's request to the TLD server that contains an IP number cross-reference database for all .com domains.
- Authoritative server. The authoritative server is the final authority for all internet assets, as it holds the DNS records for the sites and resources that users access. The authoritative server works with recursive servers, root servers and TLD servers to return the full resource or website requested by the user. In the www.getthis.com example, the resource request was first routed to a recursive server, which could not find the website. It was then forwarded to the root server, which contained a master index of DNS names, and then directed the request to a .com domain TLD server. The .com TLD server found the www.getthis.com domain name and its corresponding IP address and then contacted the authoritative server, which contained the domain itself. It was able to fulfill the user request by facilitating the complete delivery of the requested domain content to the user.
Types of DNS queries
Recursive and iterative queries are the two types of queries most often executed when users or IT services request internet resources from DNS. However, the following other types of DNS queries can also occur:
- Nonrecursive queries. These are queries for which the recursive resolver server already knows where to get the answer. The answer is either cached on the recursive server itself, or the recursive server knows to skip the root and TLD servers and go directly to a specific authoritative server. The query is nonrecursive because there is no need -- and, therefore, no request -- for any more queries. Nonrecursive queries resolve in the answer. If a recursive resolver has cached an IP address from a previous session and serves that address upon the next request, that is considered a nonrecursive query.
- Records not found queries. These are cases where the recursive, root level, TLD and authoritative servers have worked together to locate a website or resource requested, but they cannot find it. It is possible that a user might have mistyped a domain name, or the domain name requested does not exist. In these cases, a not found error message is returned to the user.
- DNS not responding queries. These queries occur when DNS servers are either down or cannot be reached. Sometimes, this is a systemic problem that users or IT cannot directly fix, but other times, it is possible to get DNS working again by either trying to access the internet resource requested through an alternate web browser or by rebooting a local router.
Common DNS records
DNS records are the information a query seeks. Depending on the query, client or application, different information is required. There are many DNS record types, each with its own purpose in denoting how a query should be treated. The following are common DNS records:
- A or AAAA record. This stands for address and holds the IP address of a domain. These records only apply to IP addresses that are registered on IP version 4 (IPv4), which most companies are still running. The issue with IPv4 is that it has a finite number of IP addresses that can run on it, but its eventual replacement, IPv6, has the potential to carry limitless IP addresses with stronger security. On IPv6, the address record known as the A record on IPv4 is called the AAAA record and uses the longer IP address format of IPv6 addresses. Most websites only have one A or AAAA record, but some larger sites have several. This helps with load balancing because different A or AAAA records can be used for different users in heavy traffic.
- Name server record. The DNS name server record denotes which authoritative DNS server is responsible for having all the information about a given domain so users can be routed to the website or resource they are requesting. Given the importance of the DNS authoritative name server, it is not uncommon for domains to use both primary and backup name servers to increase reliability. Multiple name server records are created to enable queries to be routed to different DNS authoritative name servers.
- TXT record. TXT records enable administrators to enter text into DNS. The original purpose was to put human-readable notes in DNS, but today, machine-readable notes are often put there. TXT records are used to confirm domain ownership, secure email and prevent email spam.
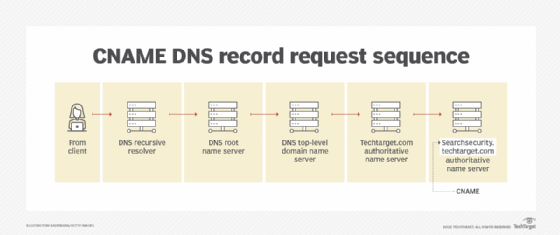
- Canonical name record. CNAME records are used to resolve situations where there might be multiple domain names or aliases for a particular website or internet resource. A CNAME search expands the DNS search to alternate domain names besides the original name the user entered or what was loaded into the A or AAAA record. By using the CNAME records to try out alternative alias names for a requested website or resource, DNS servers enhance their chances of locating the correct name of the website or resource originally requested. An example is if a user keyed in a URL of searchsecurity.techtarget.com. In the event the DNS server could not locate this name and its corresponding IP address for routing, the server queries the CNAME aliases, such as techtarget.com.
How does DNS increase web performance?
Servers can cache the A or AAAA records or IP addresses they receive from DNS queries for a set time. Caching promotes efficiency, enabling servers to respond quickly the next time a request for the same IP address comes in.
For example, if everyone in an office needs to access the same training video on a particular website on the same day, the local DNS server only has to resolve the name once, and then it can serve all the other requests out of its cache. The length of time the record is held -- also known as the time to live (TTL) -- is set by administrators and depends on various factors. Longer time periods decrease the load on servers, and shorter ones ensure the most accurate responses.
DNS caching
DNS caching aims to reduce the time it takes to get an answer to a DNS query. Caching enables DNS to store previous answers to queries closer to clients and get that information to them faster the next time it is queried.
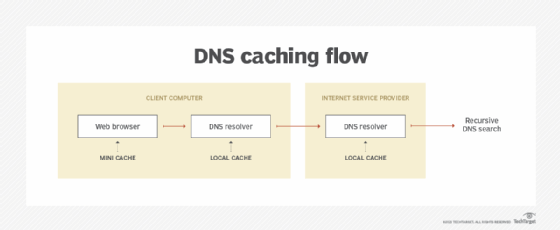
DNS data can be cached in the following places:
- Browser. Most browsers, like Apple Safari, Google Chrome and Mozilla Firefox, cache DNS data by default for a set amount of time. The browser is the first cache that gets checked when a DNS request is made -- before the request leaves the machine for a local DNS resolver server.
- Operating system. Many OSes have built-in DNS resolvers called stub resolvers that cache DNS data and handle queries before sending them to an external server. The OS is usually queried after the browser or other querying application.
- Recursive resolver. The answer to a DNS query can also be cached on the DNS recursive resolver. Resolvers might have some of the records necessary to return a response and be able to skip some steps in the DNS resolution process. For example, if the resolver has A or AAAA records but not the corresponding name server records, it can skip the root server and query the TLD server directly.
DNS security
Several DNS vulnerabilities have been discovered over time. One such vulnerability is DNS cache poisoning. This type of cyberattack distributes data to caching resolvers, posing as an authoritative origin server. The data can then present false information and affect TTL. Application requests can also be redirected to a malicious host network.
An individual with malicious intent can create a dangerous website with a misleading title and try to convince users that the website is real, giving them access to the user's information. By replacing a character in a domain name with a similar-looking character -- such as replacing the number 1 with the letter l, which looks similar -- a user could be fooled into selecting a false link. This is commonly exploited with phishing attacks.
Individuals can use DNS Security Extensions to enhance security. This suite of extensions supports cryptographically signed responses by ensuring the authenticity of DNS data.
Brief history of DNS
In the 1970s, all hostnames and their corresponding numerical addresses were contained in a file called hosts.txt that was maintained by Elizabeth Feinler from the Stanford Research Institute. This was known as the Advanced Research Projects Agency Network, or ARPANET, directory, and Feinler manually assigned numerical addresses to domain names. Adding a new name to the directory required a phone call to her.
By the 1980s, this system had become too inefficient to maintain. In 1983, DNS was created to distribute what was initially one centralized file with every address in it across multiple servers and locations.
In 1986, IETF listed DNS as one of the original internet standards. It published two documents -- RFC 1034 and RFC 1035 – describing the DNS protocol and outlining the types of data it could carry.
Since then, DNS has been consistently updated and expanded to accommodate the increasingly complex internet. Today, companies such as Amazon Web Services, Cloudflare, Google, Microsoft and Rackspace offer their own DNS hosting services.
Explore common network protocols, and learn their main functions and importance.