VMware vSAN
What is VMware vSAN?
VMware vSAN is an enterprise storage virtualization software that supports hyper-converged infrastructure (HCI). VMware vSAN aggregates local and direct-attached data storage devices across a VMware vSphere cluster to create a single data store that all hosts in a vSAN cluster can share. VMware vSAN is integrated into the VMware hypervisor, ESXi.
VMware vSAN pools together direct-attached storage devices across a VMware vSphere cluster to create a distributed, shared data store. Organizations also use the tool to manage compute and storage on one platform. By using policies and rules in vSAN to manage storage, organizations may reduce the cost and complexity associated with traditional storage systems.
VMware's cloud computing tool for virtualization, vSphere, enables users to define the storage requirements for virtual machines (VMs) on a vSAN cluster; vSAN ensures that these policies are administered and maintained. Whenever a requirement or policy needs to change, organizations can implement these policies and rules with the vSphere Client, which handles both cluster administration and storage policies.
VMware vSAN is used with the VMware ESXi hypervisor and can run on industry-standard x86 servers from original equipment manufacturers (OEMs), including Dell EMC, Hewlett Packard Enterprise (HPE), Fujitsu and Lenovo.
VMware vSAN also supports hybrid and all-flash configurations using a two-tier vSAN architecture. Both configurations use a caching tier and a capacity tier.
Key VMware vSAN features and benefits
VMware vSAN includes the following features and benefits, although the feature set varies depending on the license type:
- Storage policy-based management. This feature enables the automated management of storage profiles.
- Checksum and data at rest encryption prevent unauthorized access to data at rest. The vSAN data stores are also encrypted. These data stores use storage from every ESXi host in a cluster and can access all VM files.
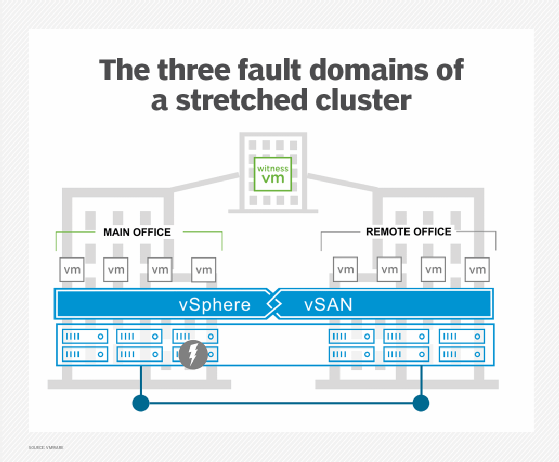
- Stretched clusters. These clusters provide higher security and availability by enabling multiple virtualization host servers in the same setup.
- Services for all-flash configurations. Advanced and Enterprise licenses support deduplication, compression and erasure coding data services for all-flash configurations.
- All vSAN licenses offer support for storage quality of service (QoS), enabling an administrator to limit the number of input/output operations per second (IOPS) that specific VMs can consume.
- Deployable on x86 servers. All industry-standard servers can use vSAN.
- Compute and storage flexibly are provided based on application needs.
Top VMware vSAN use cases
VMware vSAN supports up to 150,000 IOPS per node, automation features, scalability and security. This makes vSAN ideal for the following use cases:
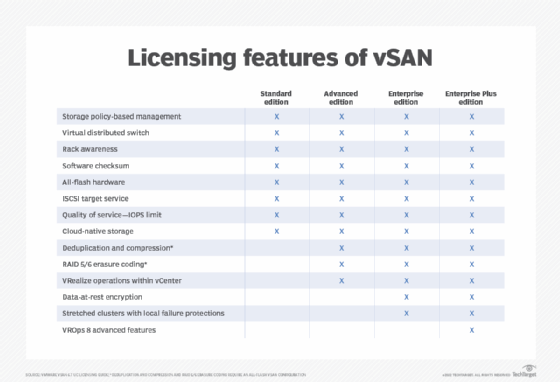
Comparison of vSAN editions
VMware has four licensing options for vSAN: Standard, Advanced, Enterprise and Enterprise Plus. Each of these options provides standard features such as the following:
- storage policy-based management;
- virtual distributed switch;
- rack awareness;
- iSCSI target service;
- QoS-IOPS limit; and
- all-flash support.
The Advanced edition offers the same capabilities as the Standard edition but also adds the following:
- deduplication and compression;
- RAID 5/6 erasure coding; and
- VMware vRealize operations in VMware vCenter.
The Enterprise edition has all the capabilities of the Advanced product but also adds support for the following:
- stretched clusters with local failure protection;
- native data-at-rest encryption; and
- file services.
Likewise, the Enterprise Plus edition has the same features as the Enterprise edition but adds the following:
- VMware vRealize Operations Advanced v8.x features, which use artificial intelligence to optimize systems based on key performance indicators while providing proactive remediation and compliance.
Three licensing options are available for ROBO environments: ROBO Standard, ROBO Advanced and ROBO Enterprise. Three additional licensing options are offered for VDI environments: vSAN for Desktop Standard, Advanced and Enterprise.
Partners and competitors of vSAN
VMware markets vSAN as part of its HCI offering, which also includes vSphere and vCenter. Several hardware vendors, including Fujitsu and Lenovo, sell integrated appliances that come preinstalled with vSAN and offer full support for the integrated appliance. Dell Technologies also sells HCI appliances, including VxRail, that include VMware vSAN software. Other hardware vendors work with VMware to certify their x86 servers.
Main competitors for HCI appliances include Nutanix and HPE SimpliVity. Nutanix can run on various servers and focuses on providing high performance and resilience to enterprise applications and virtual desktops. Both vSAN and HCI offer secure, shared storage for VMs. HPE SimpliVity is an integrated system that combines compute, storage, networking and data center services in a hyperconverged stack. It's designed for organizations that want to refresh their on-premises local storage, or public or hybrid cloud infrastructure.
VMware vSAN vs. SAN
A storage area network (SAN) is a dedicated high-speed network that interconnects shared pools of storage devices to multiple servers. A virtual SAN is a logical partition in a physical SAN. Virtual SANs can make a storage system easier to configure and scale-out.
Virtual SANs can also be created with software-defined storage products such as Microsoft Storage Spaces Direct or Red Hat Ceph Storage.
Learn more about how vSAN compares to SAN.