Learn how to invite external users to Slack workspaces
Bringing external users to Slack offers organizations productivity benefits. Learn how to invite external users to Slack and manage shared channels and workflows.
Team collaboration tools are key to support effective communications and productivity among internal company employees. This software provides a cloud-based persistent workspace that supports multiple modes of communication, as well as task and project management. These tools can also be extended to outside business partners and customers to support external workflows and collaboration.
The book Supercharge Your Slack Productivity by Moshe Markovich and published by Packt Publishing, takes an in-depth look at the software to ensure beginners and expert users make the most of their Slack deployment. It examines the pros and cons of Slack for team collaboration and provides tutorials on Slack capabilities, including app integrations, workflow automation and bot development.
In this excerpt from Chapter 5 of Supercharge Your Slack Productivity, Markovich explains the business case for extending Slack outside the company, the benefits of using Slack Connect and how to invite external users to Slack for shared workspaces and integrated workflows.
Inviting guests to your workspace
The channels in your workspace are a place for you and your team members to collaborate and communicate with one another. But there comes a time when your company will have a want or need to invite others into this space. These guests may be someone who feels like a member of your organization or who serves a direct purpose for your organization but only requires limited access to Slack. Note that guest accounts are only available on paid plans. You can invite guests to your workspace through the domain menu on the upper left-hand side of your toolbar:

Follow these steps to learn how to invite a guest to a workspace:
- On the desktop, click on the workspace name in the upper right-hand corner of your sidebar.
- Select Invite people to (your workspace name) from the pop-up menu.
- Choose between multi- and single-channel guests.
- Enter the email address of your intended guest(s).
- If you want to add multiple guests at once, click Add many at once and copy and paste the email addresses into the textbox. Then select Add invitees.
- Under Invite to channel, choose the proper channels the guests are being invited to. You may set a time limit for the guests to allow them to stay in a channel by selecting Set a time limit and using the drop-down menu to determine a period of time.
- Lastly, click on Invite guests.
While some of these guests may have multiple functions they need to perform, not every member you invite to your workspace will need access to every company channel. The differentiation between these guests is what we call single-channel and multi-channel guests. Let's explore these in detail.
Multi-channel guests versus single-channel guests
Single- and multi-channel guests function in a similar way as any guest you invite to your Slack channel -- the main difference being that the former is added to just one channel of the workspace owner/admin's choosing, and the latter can be added to an unlimited number of channels.
 Click here to learn more about
Supercharge Your Slack
Productivity.
Multi-channel guests only have access to the channels you specify and are billed as regular members. On the other hand, single-channel guests are free, but only have access to members within their designated channel. For instance, they can only direct message other members in channels they are a part of.
Guests, either single or multi-channel, are only available on paid plan options. For every paid, active member of your team, you can add up to five guests.
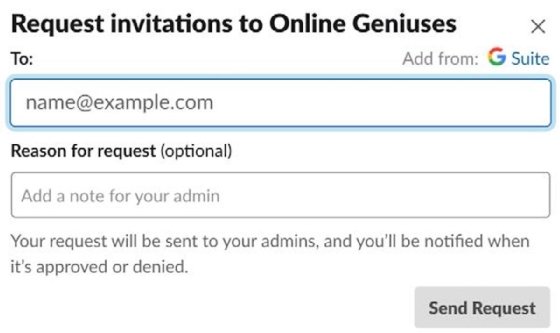
Guests can be invited into a workspace by a workspace owner or admin or they can choose to send a request invitation.
Important note
Guests cannot be added to channels you are not a member of yet; workspace members can invite multi-channel guests to private channels without having workspace invitation permission.
The following screenshot shows what an invitation page looks like:
Workspace owners and admins can also change any current member's status to guest at any time. The process of changing a full member to a guest is as follows:
- On the desktop, click on the workspace name in the upper left-hand corner.
- Select Settings & administration and then Manage members.
- Utilizing the three-dot icon next to a member's name, click the dots and select Change account type.
- Identify whether you wish to make the member a single- or multi-channel guest.
- Enter which channels they can have access to and set a time limit if necessary.
- Finally, make the defining decision to make the member a guest.
If you want to change a guest's role within your channel, follow the same steps to simply change the title/access of that guest.
Paid plans that have access to the guest sharing feature can share a channel with up to 19 other organizations via Slack Connect instead of directly inviting guests to a workspace. Sharing a channel can be an easier way to work with multiple companies without members having to leave their own workspace.
Slack Connect
Guests are a crucial way of bringing outside perspectives/opinions into your workspace, but sometimes the complications of moving from one workspace to another can become confusing for both ends. Slack Connect is a feature within Slack that allows you to collaborate with external partners while remaining in your respective workspaces.
Designed as a substitute for email, Slack Connect works as a secure and productive means to extend channel-based messaging to anyone and everyone you work with inside and outside of your team. This feature allows you to create channels with multiple organizations at a time, changing the way you communicate with your partners by eliminating email threads and replacing them with real-time communication.
Professions that benefit from using Slack Connect
Any type of organization can find its home within Slack. No matter your company's focus, Slack can be used as your team's communication center for both internal and external members. Some specific professions that benefit from using Slack Connect include the following:
- Sales
- Receive quick and direct feedback on proposals to build a mutual plan.
- Allows you to bring in financial and business experts from outside of your company to help close a deal.
- Customer success
- Develop personal connections with customers for direct criticism on the company and product.
- Respond to comments, concerns, and questions with a faster response rate.
- Share important information on product launches.
- Support
- Offer personalized support through a direct line of access.
- Organize customer information and context in a common space for your support team to communicate and resolve matters in a formulated manner.
- Marketing
- Collaborate on campaigns across multiple teams and organizations.
- Work together by sharing ideas and group conceptualizing campaigns.
- Operations
- Communicate real-time updates and issues within the supply chain.
- More easily adjust to changing environments based on customer demand.
- Business development
- Bring in experts from other areas such as marketing or legal to finalize a partnership.
- Correspond at all hours to establish personal connections with partners.
Some companies currently utilizing Slack Connect include Airbnb, Hulu, Wayfair, and TIME.
Sharing a channel with external organizations
There are many benefits of sharing a channel with external organizations. By including your partner organization within your own workspace, you're simplifying work by creating one space with shared information, updates, and files for members from both partner organizations to utilize.
In a shared channel, you can send direct messages to members in an external organization, view their profiles, customize emojis, and utilize apps and workflows, the same as you would in your own company's workspace. When a member from an invited organization messages in your shared channel, their profile photo will appear with their organization's Slack icon in the bottom-right corner of their photo.
With only minor differences from your average channel, sharing a channel accommodates seamless integration for multiple members of one or many organizations to communicate in a singular space familiar to each party. Let's see how to set up a shared channel.
Setting up a shared channel
Shared channels are identified by a diamond icon next to the name of the channel list. In order to share a channel, every participating organization must be utilizing a paid version of one of the Slack plans. As in any of the upgrades from the free plan, sharing a channel opens up a series of new doors for you and your company.
Sharing a channel with an external organization allows that organization access to only that channel within your workspace. Once a channel is shared, you have the ability to send direct messages to members of that organization as long as you yourself share a channel with them. Members from the outside organization can also join the channel on their own or be added by a member already included in the shared channel.
The caveat: #general channels, multi-workspace channels, and org-wide channels cannot be shared.
Here's how to share a channel:
- An organization can follow the steps mentioned earlier to invite a guest but instead invite an organization to its channel. A channel can be shared with up to 19 other organizations.
- Guests that are invited can either accept or decline the invitation.
- If they accept, the request then needs to be approved by one of the owners of the channel. Someone from the shared organization may also need to approve it.
Although the typical way to share a channel is through an invite, you may also allow members to sign up through their email address from an approved domain. Workspace owners on any plan can enable email signup for their members.
Follow these steps to learn how to allow email signups:
- On your desktop, click the domain name in the upper left-hand corner.
- Select Settings & administration followed by Workspace settings.
- Select Joining this workspace and then click Expand.
- Select Allow invitations and approve invitations for any email address from these domains.
- Enter your team's domain(s), then click on Save to save your changes.
Once an invitation is sent either via email signup or a traditional invitation, workspace owners and admins have the ability to monitor pending and accepted invitations as they occur. During this process, they can also choose to revoke any invitations or resend an invitation.
Owners/admins would choose to revoke an invitation to prevent an invited member from utilizing the invitation to join the organization's Slack channels. They can also disable any email notifications they may receive from Slack before they accept. Owners/admins would send a new email invitation if the original invitation expired or was lost in an inbox.
To revoke or resend an invitation, do the following:
- On your desktop, click the domain name in the upper left-hand corner.
- Select Invite people to [workspace name] from the menu.
- Choose See past invites.
- Select the Pending tab at the top of the page.
- Click Resend invitation or Revoke next to the invitation you'd like to manage.
If you choose to revoke an invitation, the invited member's account will then show that it's deactivated. If you wanted to invite the person again after revoking their invitation, you would need to reactive the account from the Manage members page and then select Resend invitation.
In some cases, Slack can limit your ability to send invitations if you have sent a lot of invites but only a few have been accepted. A simple way to avoid this is to create an invite link to share with those you wish to add to the workspace rather than sending them a physical invitation.
Integrating workflows with shared channels
As in your own channels, you can also integrate workflows through Slack Connect with shared channels to allow for the seamless transition of ideas and information across the organizations you're working with. Some examples of the use of these workflows include submitting requests, sending customer feedback, and onboarding new accounts.
To set up a shared workflow, follow these steps:
- To get started, head to https://slack.com/slack-tips/coordinate-needs-across-shared-channels to download the example workflow.
- Import the example into Workflow Builder.
- Once you've imported it, select a channel for the workflow.
- Then, customize the workflow to fit your team's needs and the information you're looking to collect.
- Finally, publish it once completed!
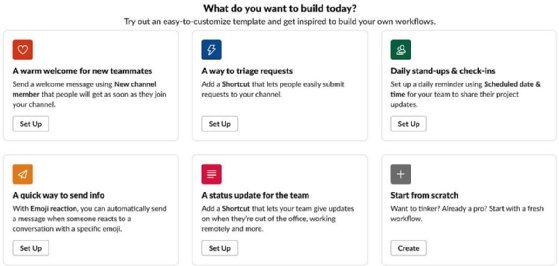
After completing the customization of your workflow, it's time to share your work within the shared channel. The following screenshot shows workflow options for your channel:
To publish your workflow, follow these steps:
- Following the steps mentioned previously, add a step-by-step message that clarifies which channel(s) to direct the action towards -- in this case, your shared channel. The form can be launched by anyone that has access to the shortcut menu.
- When finished, the request will automatically be posted in the directed channel and will notify the team.
- When your team approves the request, you can forward it the partner organization to begin a conversation in a thread or to be simply confirmed by them as well.
This quick and easy process saves you and your team's time. It also avoids an unnecessary chain of messages back and forth across different time zones and organizations to accomplish this singular task.