
Getty Images/iStockphoto
How to create a digital signature in Adobe, Preview or Word
Users can add digital signatures in Adobe Acrobat, macOS Preview or Microsoft Word, but security features, PDF support and trust levels vary by tool.

Users can sign documents in several ways, but not every method offers the same level of trust or works the same way with PDFs. Adobe Acrobat and macOS Preview let users sign PDFs directly, while Microsoft Word is better suited to signature lines and digitally signed Office documents.
For IT, legal and operations teams, the key is to match the signing method to the task: quick e-signing for routine approvals, certificate-based digital signatures for higher-trust workflows, and Office-native signatures when the file is meant to stay in Word or Excel.
Organizations rely on digital signatures and cryptographic certificates to verify the identity of remote signers and detect tampering with signed contracts. Common applications people use to add digital signatures to PDF documents include Adobe Acrobat on Windows or macOS, Preview on macOS, and Microsoft Word on Windows or macOS. However, even users who have experience with these tools might not know how to use all their digital signature capabilities.
The right tool depends on what kind of document you’re signing and how formal the signing workflow needs to be:
- Use Adobe Acrobat when the document is a PDF and the workflow requires certificate-based digital signing or certified copies.
- Use macOS Preview when a Mac user needs a fast built-in way to sign a PDF.
- Use Microsoft Word when the document is staying in Word and needs a signature line or Office digital signature workflow, not when users need the cleanest native PDF-signing experience.
For organizations that need a broader managed e-signature workflow, Adobe Acrobat Sign is a related option.
Electronic signature vs. digital signature: What’s the difference?
Electronic signatures and digital signatures are related, but they are not the same thing.
An electronic signature is the broader category: it can be a typed name, a drawn signature or another digital mark used to approve a document. A digital signature is a more specific, certificate-based method that adds identity verification and tamper evidence.
In practice, that means Adobe Acrobat can support higher-trust digital-signature workflows, while simpler tools may be better suited to basic signing tasks.
How to create a digital signature
Creating a signature usually starts with typing, drawing or capturing it, then placing it in the document. But higher-trust workflows can also require a digital ID or certificate, which adds identity verification and tamper evidence. That distinction matters most in Adobe Acrobat, which supports both simple e-signing and certificate-based digital signing.
Steps to create a digital signature in Adobe Acrobat
Adobe Acrobat offers various PDF management, authentication, signing and certification capabilities. For example, it lets users create PDFs, add digital signatures to them and customize the appearance of the digital signature.
To add a digital signature to a PDF in Acrobat, users take the following steps:
- Open the PDF document in Adobe Acrobat.
- For a simple placed signature in Acrobat, users can open All tools and use Fill & Sign or E-Sign to add a typed, drawn or uploaded signature.

- The screenshots below show that simple signature flow.
- For a certificate-based digital signature, users should open All tools > Use a certificate > Digitally sign, draw the signature field in the PDF, and then sign with the appropriate digital ID or certificate.
- If the workflow requires a certified copy, Acrobat can also certify the document so later edits are restricted. Adobe also lets users certify a PDF and specify which later changes, if any, are allowed.
- To share the signed document, click Get a Shareable Link, Send a Copy or save a local copy.
Steps to create a digital signature in macOS Preview
Preview is a file viewing and editing tool that comes with Apple's macOS. The tool lets users view documents and images in various formats, take screenshots and edit PDFs.
Users can take the following steps to add digital signatures to PDFs in Preview:
- Open the PDF document in macOS Preview.
- Click on the Markup toolbar button, which resembles a pen tip.

- Select the Signature option from the secondary menu.

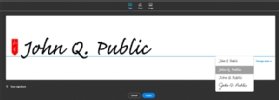
- If users have already created a signature, they can choose it from the list. Otherwise, click Create Signature and click Trackpad, Camera or iPhone.
- If users choose Trackpad, they can use the trackpad or a connected graphics tablet to draw their signature. Click to start. Users can tap any key when they finish. Then, click Done.
- For iPhone, users can sign on the pop-up that appears on their phone. Click Done.
- If users choose Camera, they can sign a piece of paper and hold it up to their computer's camera. Click Done.
- To apply the signature to the document, click on the Signature button in the Markup toolbar, then Create Signature, and select the saved signature.
- Adjust the size and orientation of the signature, if necessary.
- Press Command+S to save the signed PDF.
Steps to create a digital signature in Microsoft Word for Windows
Users typically use Microsoft Word to create, format and collaborate on documents. Word supports signature lines and digital signatures for Office files, but it is not the cleanest native tool for signing a PDF.
When Word opens a PDF, it converts the file into an editable Word document. That can be useful for editing, but it is different from directly signing a PDF in Acrobat or Preview. For documents that will remain in Office formats, Word also supports invisible digital signatures through File > Info > Protect Document > Add a Digital Signature.
- Open the document in Microsoft Word.
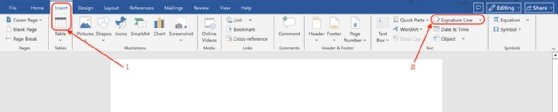
- Click on the Insert tab in the top menu bar. (1 in the image below)
- Choose Signature Line from the Text group (2 in the image below)
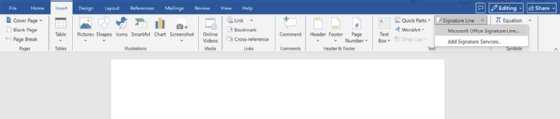
- Select Microsoft Office Signature Line from the Signature Line drop-down menu.
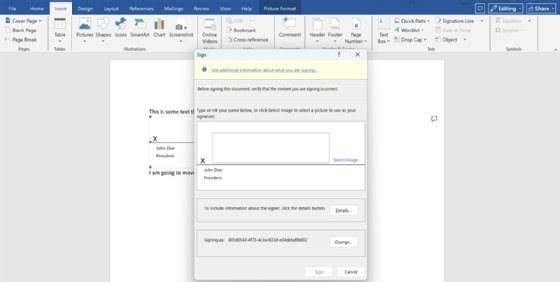
- Fill in the requested information in the Signature Setup pop-up window, such as the signer's name and title.
- Place the signature line in the desired location within the document.
- Save the document to finalize the signature setup.
- To sign the document, users can double-click on the signature line, enter their name and click Sign.
- Save the document again to preserve the signature in the Word file. If needed, export a copy to PDF after the Word signature workflow is complete.
How to retain digital signatures when combining PDFs
Users who manage a lot of digitally signed PDFs, such as legal teams, might want to combine multiple signed PDFs to reduce clutter. However, combining PDFs that have cryptographic certificates can sometimes invalidate existing digital signatures.
Combining signed PDFs into one merged PDF can invalidate existing signatures. A PDF Portfolio is different: it keeps the original files intact inside a single container, which is why it is the safer way to keep signed files together without flattening their individual identity.
Merge documents for signed but not certified documents
Users can merge documents when at least one has a digital signature, but no documents that have been certified. Depending on whether the user is working with Acrobat or Preview, the steps are as follows:
Acrobat:
- Select All Tools, then Combine files.

- Add the files to be merged.
- Click Combine once all the files have been added.
Preview:
- Open all the files to be merged in Preview.
- In each file, select View and then Thumbnails.
- Select and drag thumbnails from each source document to the document that will include them all.
Add the signed documents to a PDF portfolio
To add signed documents to a PDF portfolio while keeping the original signatures valid, follow these steps:
- Open Adobe Acrobat.
- Under the Create tab, click Create PDF Portfolio.
- Follow the prompts to add the PDFs.
Adobe Acrobat and macOS Preview offer straightforward ways to sign PDFs, while Microsoft Word is better suited to signature lines and digitally signed Office documents. For teams that need certificate-based digital signing, document integrity controls or certified copies, Acrobat remains the strongest option.
Editor’s note: This article was updated in March 2026 to reflect current digital-signature workflows and improve the reader experience.
Jordan Jones is a writer versed in enterprise content management, component content management, web content management and video-on-demand technologies.