Windows 7 administrative tools: Creating shortcuts
Windows 7 administrative tools such as the iSCSI Initiator may be under your radar, but you can use them to help customers more easily manage everyday tasks.
Solutions provider takeaway: You may have never used these Windows 7 administrative tools before, but they could help you with everyday tasks. The iSCSI Initiator can be an important tool for data management. Creating shortcuts for the tools will make them more accessible and easier to manage.
|
||||
Using Administrative Tools
Once you go though Control Panel (assuming you haven't pinned these to your Start menu yet), you can see a shortcut to Administrative Tools located in the System and Security group that takes you to the list of shortcuts (see Figure 12.1).
Some of the tools you see in the Administrative Tools section have been covered already in other sections of the book. For example, Performance Monitor was covered in Chapter 11.
For those of you who would like to access these tools with one click from the Start menu, here is a quick way to do just that.
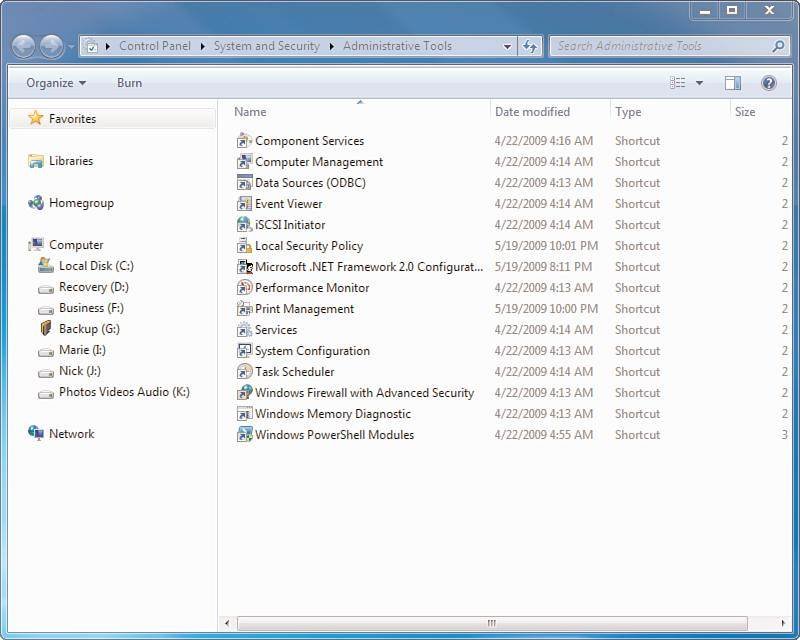
Figure 12.1 The Administrative Tools section.
Creating a Link to the Administrative Tools Section from the Start Menu
The following steps show you how to create a shortcut to the Administrative Tools section on the Start menu (see Figure 12.2).
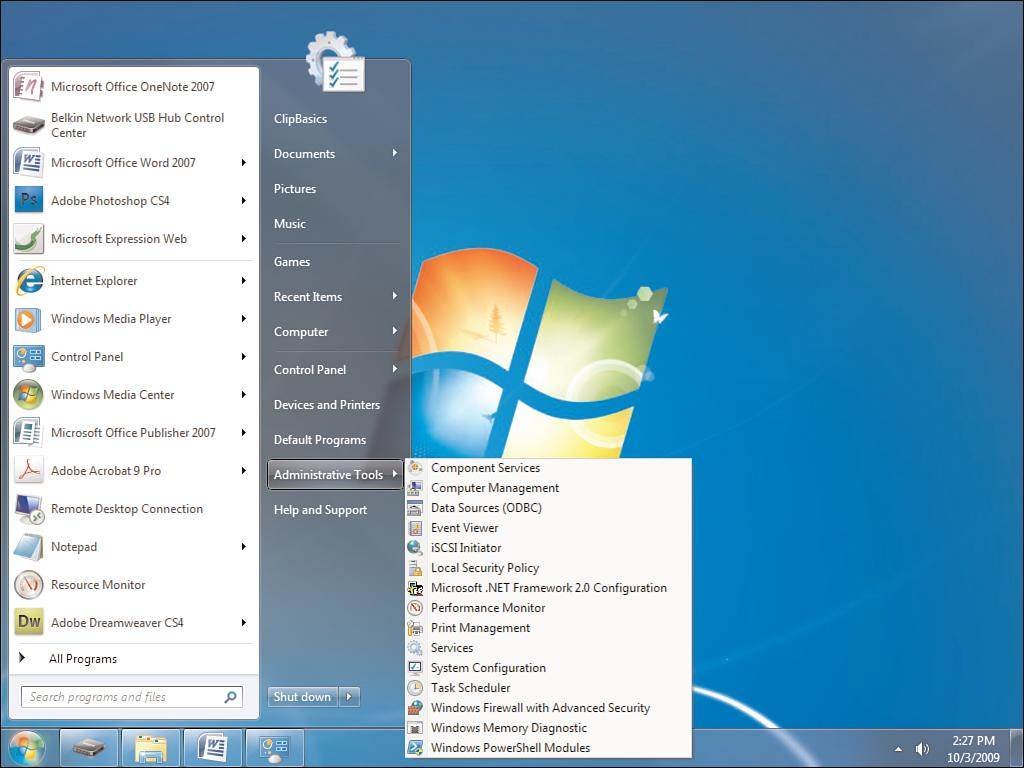
Figure 12.2 Creating a shortcut for Administrative Tools on the Start menu.
- Right-click an empty area of the Taskbar and select Properties. The Taskbar and Start Menu Properties dialog box opens.
- Click the Start Menu tab.
- Click the Customize button. The Customize Start Menu dialog box opens.
- Scroll down to System Administrative Tools and choose Display on the All Programs Menu and the Start Menu.
- Click OK twice.
Now you have access to these tools right from the Start menu. (There are still other ways to access these tools, and these will be shown in the exercises to follow later in the chapter.)
Tools You Might Never Use
There are some tools you might never have a need to work with. Others will be your best friend when it comes to administering your system. Let's first take a look at some of the more obscure tools.
Component Services
This is not a new feature in Windows 7. In fact, it has existed for some time. However, typical users will never (never ever) need to use this feature. It is used to configure and administer your COM (Component Object Model) applications.
Data Sources (ODBC)
This allows you to add, delete, or configure data sources with DSNs (Data Source Names) for the current system and user. Again, not something the everyday user (or even administrator) might ever work with.
iSCSI Initiator
This was an applet in Control Panel in Windows Vista, but it was appropriately moved in Windows 7 to the Administrative Tools section. Internet Small Computer System Interface (iSCSI) uses TCP/IP for its data transfer over a common Ethernet network. But you need iSCSI devices to make it work and the OS needs an initiator to communicate with the iSCSI devices. iSCSI devices are disks, tape drives, CDs and other storage devices that you can connect to. In the relationship with the other device, your computer is the initiator and the device is the target.
In Windows 7 (as in Vista), the initiator is included. However, you can download the initiator from Microsoft for 2000 (SP3), XP, or Server 2003. The shortcut under Administrative Tools lets you configure and control the interaction between your system and the device.
Local Security Policy
Although typically a security policy is something you configure on a network domain, there are times when you might want to create password policies, account lockout policies, and so forth on your Windows 7 standalone systems. This is the place to do that. You might be deploying Windows 7 in a school, a library, or as a kiosk system (or even at home); you can adjust these security settings to ensure they are enforced.
Print Management
Although you might not think of using your computer as a print server, it is a possibility. If you have multiple print devices connected to your Windows 7 machine and you have users in the office printing through that system to your print devices, you might want to work with the Print Management tools to help you to see your printers, printers with jobs, and so forth. You can view how the printers are doing and manage those printers from this console.
Windows PowerShell Modules
Using this shortcut is one of the ways you can open up a PowerShell window that includes all of the available commands from optional modules and snap-ins, including those that aren't added by default. The modules run in a separate session to avoid name conflicts and these modules allow you to organize your scripts and functions independently of one another. The modules also run under the administrator's account.
Another way to open PowerShell with all modules is to right-click the PowerShell icon from the Taskbar (if PowerShell is pinned to the Taskbar) and click Import System Modules.
Working with Computer Management
|
||||
This is one-stop spot for multiple tools. The shell of Computer Management is the Microsoft Management Console (MMC). This is a highly customizable interface that lets you load and unload specific mini-applications (called snap-ins) that help you manage your computer. It's a super console of sorts (see Figure 12.3) where users might find everything they need to monitor system events, manage shared folders, view services, view storage devices and settings, and much more.
Many of the individual components of Computer Management will be discussed later on in the chapter. One feature that is key to Computer Management is Disk Management (see Figure 12.4). With Disk Management you can manage hard disks and their volumes and partitions. There are a wide variety of options at your disposal. For example, you can initialize disks, create volumes, and format volumes with the FAT, FAT32, or NTFS file systems.
Since most configuration changes in Disk Management take place immediately, you can accomplish most disk-related tasks without restarting your computer. One of the most common tasks performed in Disk Management is to create a partition (volume) on a hard disk. In order to accomplish this, you need to be logged in as an administrator and there has to be either unallocated disk space or free space within an extended partition on the hard disk.
If you find that you don't have any unallocated disk space, you can create some in various ways. You can shrink an existing partition, delete a partition, or add an extra hard drive to the system.
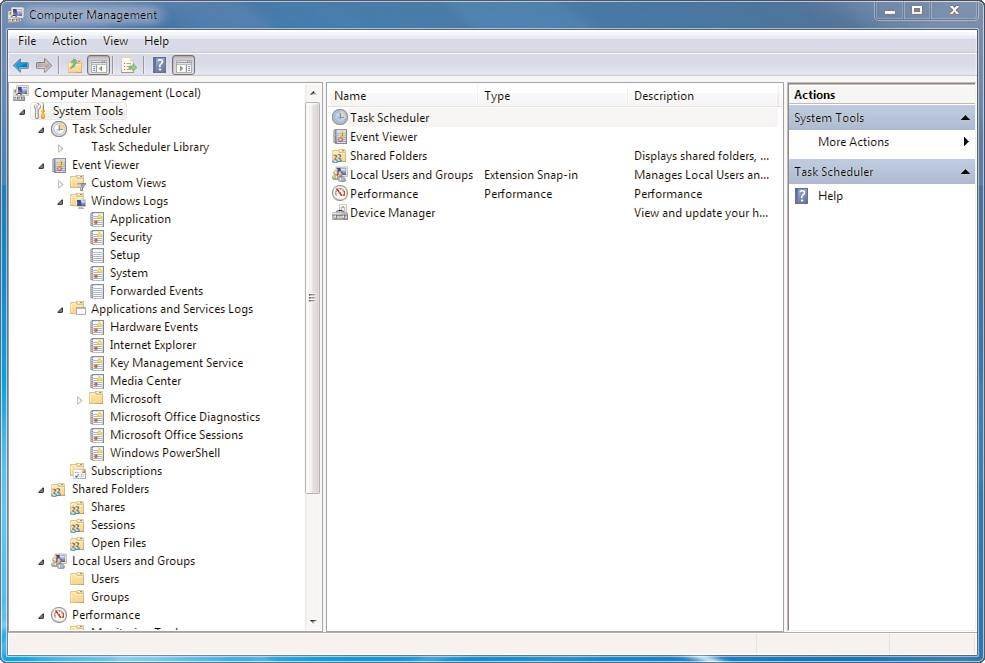
Figure 12.3 Computer Management.
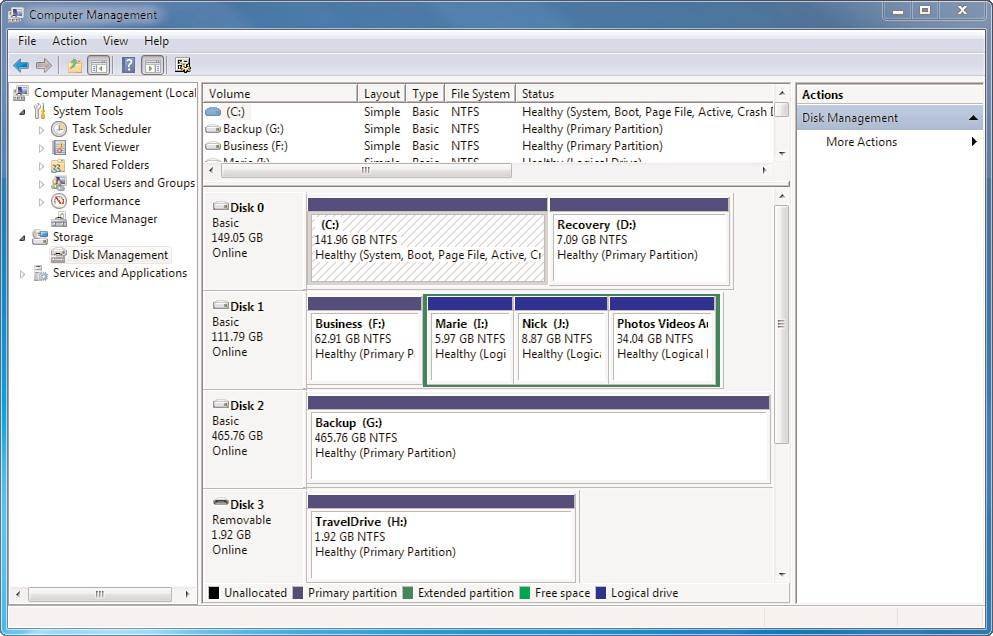
Figure 12.4 Disk Management lets you configure all your disks from one spot.
Creating and Formatting a New Partition
The following steps show you how to create and format a new partition. In this example, you create a new drive letter for you to access.
- Click the Start orb.
- In the search field, type manage.
- Select Computer Management.
- If a UAC window appears, click Yes.
- In the left pane, under Storage, click Disk Management.
- In the main pane, locate the hard disk you would like to create the partition on. Right-click an unallocated region of it and select New Simple Volume. This opens the New Simple Volume Wizard.
- Click Next.
- Accept the maximum default size and click Next.
- A default drive letter is provided for you. Accept this and then click Next. This opens the Format Partition dialog box.
- Verify that you accept the default settings and click Next.
- After reviewing your choices, click Finish.
The first three partitions on a basic disk that is newly created will be formatted as primary partitions. Starting with the fourth, each partition (on the same disk) will be configured as a logical drive within an extended partition. Remember, formatting deletes any data you have on the drive, so make sure it is backed up if need be. Many times an error as simple as selecting the wrong drive for formatting can quickly erase years of data.
One main reason for creating a partition and formatting a drive is to prepare it for an operating system. If you are planning on creating a multi-boot setup, there are a couple of things to be aware of.
For one, you need to install the oldest operating system before installing the newer operating system. If, for example, you install Vista on a computer already running Windows 7, you can render your system inoperable; earlier versions of Windows don't recognize the startup files used in more recent versions of Windows and can overwrite them.
Another aspect to consider is making certain to use the NTFS file system of the partition or disk where you plan to install a new version of Windows. While you have the option within Disk Management to select FAT or FAT32 when formatting a drive, these older files systems cannot utilize all the features in Windows 7 and they are not as efficient as NTFS. Unless you have a special requirement, stick with the NTFS file system.
Changing the drive letter has become a simple task, thanks to Computer Management. Right-click your drive of choice and select Change Drive Letter or Path. A drop-down menu provides you with available options for your new drive letter (see Figure 12.5).
Computer Management also supports the Virtual Hard Disk (VHD) format. This style of file system can be used in conjunction with virtualization software such as the Hyper-V feature of Windows Server 2008 R2, Microsoft Virtual PC/Virtual Server or VmWare. From Disk Management you can create, attach, and detach virtual hard disks.
You will find that VHDs look just like physical disks in Disk Management. When a VHD has been attached, it appears blue. If the disk is detached, its icon reverts back to gray.
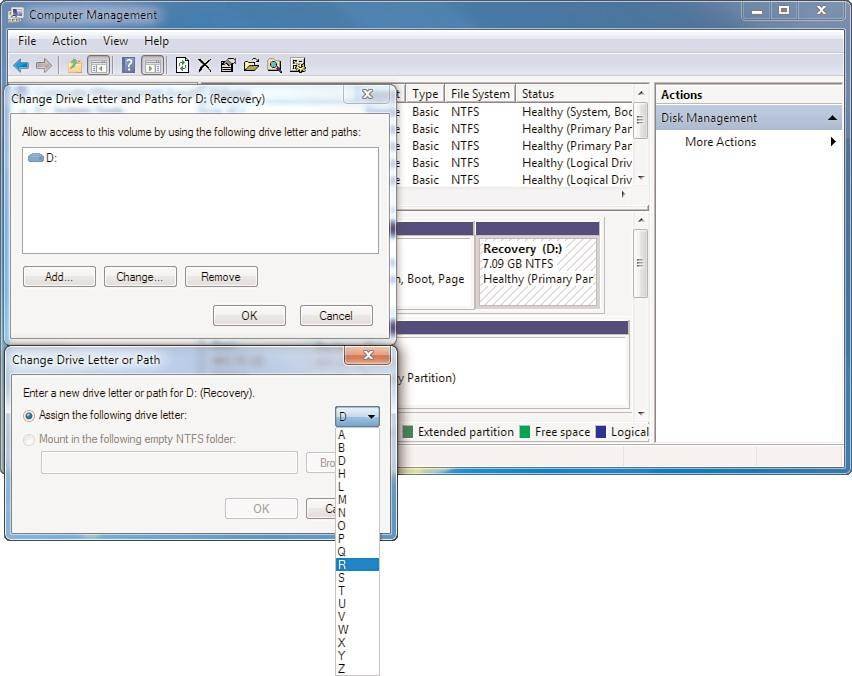
Figure 12.5 Choose your new drive letter from the drop-down menu.
Using Disk Management to Create a VHD
Sometimes you want to work with virtual drives rather than physical hard drives within your system. The following steps show you how to do this by creating a VHD through Disk Manager.
- Click the Start orb.
- In the search field, type manage.
- Select Computer Management.
- If a UAC window appears, click Yes.
- In the left pane, under Storage, click Disk Management.
- Click the Action menu and then click Create VHD. This opens the Create and Attach Virtual Hard Disk dialog box.
- In the Location text box, click Browse to choose the location where you want the VHD file to be stored.
- In the Virtual Hard Disk Size text box, select the size of the VHD.
- In the Virtual Hard Disk Format section, accept the default and click OK. You are returned to Computer Management, where your VHD is created. Follow its initializing progress in the lower right.
- On successful completion, click the VHD in the main pane.
- Click the Action menu and then click Attach VHD.
- In the Location text box, click Browse to choose the location.
- Click OK.
If you are having an issue creating a VHD, it might be due to the fact you're not meeting these requirements:
- The minimum size for a VHD is 3MB.
- The path specifying the location for the VHD needs to be fully qualified and can't be located in the Windows directory.
- A VHD can be only a basic disk.
- A VHD is initialized when it is created. If you are creating a large, fixed-size VHD, it's going to take a while to finish creation.
![]()
![]() Working with Administrative Tools
Working with Administrative Tools
![]() Windows 7 administrative tools: Creating shortcuts
Windows 7 administrative tools: Creating shortcuts
![]() Using Windows 7 event viewer and services console
Using Windows 7 event viewer and services console
![]() Windows 7 System Configuration: Troubleshooting issues
Windows 7 System Configuration: Troubleshooting issues
Printed with permission from Que Publishing. Copyright 2010. Using Microsoft Windows 7 by J. Peter Bruzzese. For more information about this title and other similar books, please visit http://www.quepublishing.com.