Ubuntu Linux installation and hard drive setup guide
Learn how to set up a client's hard drive for proper Ubuntu Linux installation with this chapter excerpt.
To install Ubuntu permanently on your PC, you'll need to have a hard disk area set up for it. There are three common options for this setup:
- Replace the existing operating system on your hard drive with Ubuntu.
- Install Ubuntu on a second hard drive.
- Partition an existing hard drive to include Ubuntu.
Obviously, the easiest solution for installing Ubuntu on a PC is to replace the existing operating system installed on the hard drive. The Ubuntu installation easily guides you through this process. Just remember that when you're done, you won't have the original files from your previous operating system. If you want to keep any files, you'll need to back them up yourself to media that you can read from Ubuntu.
|
||||
Laptops often pose a problem for Linux distributions. Many older laptops use proprietary hardware devices that aren't supported by Linux. On some of these laptops, Ubuntu may not even be able to run the LiveCD. Older laptops with proprietary video systems are especially prone to fail in the Linux environment. However, most newer laptops use more standard hardware that Ubuntu can detect and use without any problems. Pay special attention to the video, modem, and wireless network cards used in your laptop because these devices cause the most problems. A great resource for working with Linux and laptops is www.linux-laptop.net. It provides valuable guidance from users who've success-fully loaded specific Linux distributions on specific laptops. If you're purchasing a new laptop, you should check it for Ubuntu compatibility, either by booting it using the Ubuntu LiveCD or by verifying its hardware on the various Ubuntu and Linux hardware web sites. With the popularity of virtual server programs such as VMWare and Sun VirtualBox, many Linux enthusiasts load Ubuntu within a virtual environment running inside a Windows operating system. If you're trying to do that, just follow the Ubuntu installation method to replace the existing operating system on the hard drive. Just make sure that you're inside your virtual server environment before doing that!
The other two methods require a dual-boot scenario. In a dual-boot scenario, both Ubuntu and another operating system (often Windows) reside on hard drives in the computer. When you boot the computer, a menu appears, asking you which operating system you want to boot, as shown in Figure 3-1.
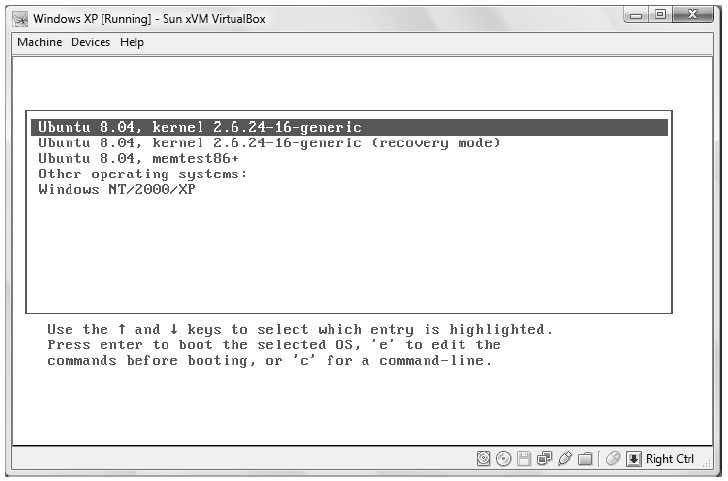
Figure 3-1: The Ubuntu and Windows dual-boot menu.
You'll need to take some special precautions when setting up your workstation in a dual-boot environment. This section walks through some of the things to watch for in each of these two scenarios.
|
||||
Installing a Second Hard Drive
Next to replacing the existing operating system, the second easiest way to get Ubuntu onto a workstation is to install a second hard drive. Many workstations support multiple hard drives by either chaining two hard drives together on the same disk controller or providing multiple disk controllers to handle hard drives.
The most common disk controller used in workstation PCs is the integrated device electronics (IDE) controller. The IDE controller allows up to two devices per channel. Workstations often will have more than one IDE channel installed on the motherboard.
The serial advanced technology attachment (SATA) controller is a technology that's becoming more popular in newer PCs. This technology emulates an IDE controller but with much faster response times. Ubuntu has full support for SATA devices, so you can easily use them for your Ubuntu installation.
Usually you can determine your disk controller configuration by looking at the BIOS setup screen for your PC. Figure 3-2 shows an example of the disk controller area on a BIOS screen.
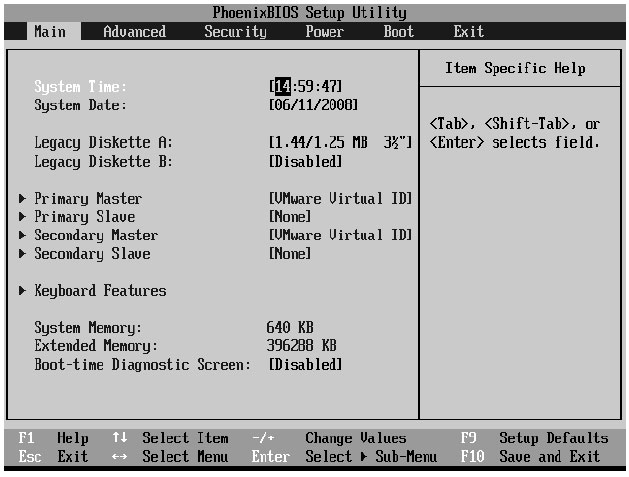
Figure 3-2: The BIOS hard drive configuration area.
This example shows two controllers (a primary and a secondary), with each supporting two devices (a master and a slave). This configuration allows you to connect a total of four separate devices to the workstation. Besides the hard drive, IDE controllers also support connecting CD/DVD devices, so you'll need to be careful when evaluating your disk controller situation.
If your motherboard contains only one disk controller and uses it for the hard drive and the CD/DVD device, you won't be able to add a second hard drive on that controller. Usually you can find plug-in disk controller cards to add a second controller to the workstation. You'll need to do that if you want to add another hard drive.
If your motherboard contains two disk controllers, you can purchase a second hard drive and easily connect it to one of the controllers to use for Ubuntu. The Ubuntu installation process detects the empty hard drive and will format it for Ubuntu.
If both of the disk controllers already contain one device, you'll need to use a master/slave configuration to add the second hard drive. This process requires a controller cable that has three plugs -- one for connecting to the motherboard and two connectors to plug devices into.
The devices themselves must also be specially configured for this setup. Each device uses a jumper setting to determine where in the chain it's located. One hard drive must be set as the master hard drive, and one must be set as the slave.
Partitioning an Existing Hard Drive
Partitioning an existing hard drive is the most complicated method for installing Ubuntu on an existing workstation. Normally, if you have an existing operating system on your workstation (such as Windows XP or Vista), it uses the entire hard drive installed on the PC. During installation, Ubuntu allows you to split the hard drive into multiple sections, called partitions. It will then install the operating system on the new partition. The original operating system still resides on the first partition, allowing you to run it, just as before, in a dual-boot configuration.
Before you run the Ubuntu installation, you'll want to know what your particular hard drive setup is, so you'll know how much space you can allocate for Ubuntu. Here are the steps in preparing your existing hard drive for the Ubuntu installation.
Many advanced server systems use a small computer system interface (SCSI) hard drive controller instead of an IDE controller. SCSI controllers typically allow up to seven devices per controller channel (although some newer ones allow 16 devices). These controllers are popular in servers that support multiple hard drives in a redundant array of inexpensive disk (RAID) configuration. RAID systems use multiple hard drives to emulate a single hard drive for fault-tolerance purposes.
There are several formats of RAID support:
RAID0: Divides data among multiple hard drives but without redundancy.
RAID1: Writes all data to two or more drives (called mirroring).
RAID2: Incorporates error detection codes within stored data.
RAID3: Stores data across several drives at the byte level, reserving one drive to store a parity bit. The parity bit is used to rebuild an individual drive if it fails.
RAID4: Stores data across several drives at the block level, reserving one drive to store a parity bit.
RAID5: Stores data across several drives at the block level; also writes a parity bit for each block on the drives.
RAID1 is common when only two hard drives are present. One hard drive is the primary, and the other is a hot backup. The disk controller performs all disk write requests from the operating system on both hard drives. RAID3 and RAID5 are the most popular methods of RAID disk support and usually require three or more hard drives. Both of these methods can recover data from a complete failure of any one disk in the system.
Despite the "inexpensive" part of its name, RAID technology can be expensive, and it is used primarily for high-availability server environments. The Ubuntu server installation can detect and use most SCSI controllers and RAID configurations.
However, don't confuse a hardware RAID environment with a software RAID. Many Windows servers allow you to emulate a RAID environment using standard disk hardware. This is called a software RAID because there aren't multiple disks, but the operating system acts as if there are. Ubuntu will work with standard disk drives, but it won't emulate a RAID environment using them.
Examining the Current Hard Drive Setup
Before diving into partitioning your existing hard drive, it's a good idea to know what you have to work with. If you already have Microsoft Windows running on the existing hard drive, you can use the utilities included in Windows to examine your system.
The Windows Computer Manager provides a graphical tool for looking at the hard drives installed on your workstation. This tool is available in Windows 2000 Workstation, XP, and Vista. You can get to it by following these steps:
1. Right-click on the My Computer desktop icon or the My Computer entry in the Start menu.
2. Select Manage from the resulting menu. This starts the Computer Management tool window.
3. From the Computer Management tool window, select the Disk Management entry.
The Disk Management tool, shown in Figure 3-3, appears, showing the current hard drives installed on the PC.

Figure 3-3: The Windows Vista Disk Management tool.
The Disk Management tool displays all of the hard drives recognized by Windows and shows whether they are formatted and used. Each hard drive appears as a separate line in the list and is shown with the partitions and format types identified.
Many newer workstations utilize a hidden partition to store important recovery information. A hidden partition is a section of the hard drive that's partitioned, but not assigned a drive letter, by the operating system. Even if you see only a C: drive on your Windows setup, your hard drive may still contain two partitions, as shown in the example in Figure 3-3. The hidden partition can't be used for Ubuntu, or you'll lose the ability to restore your Windows system if it crashes.
If you see an area on the hard drive marked unallocated, that means the hard drive has free space that's not part of the Windows partition. You can use this as part of the Ubuntu partition. If it's 4 GB or larger, then you don't have to do anything to your existing Windows partition. You can install Ubuntu directly into the unallocated hard drive areas without having to alter the existing Windows partition.
If you see only a single partition that's allocated for Windows on your hard drive, you'll need to continue with the partitioning process to free up space for Ubuntu.
Determining Free Space
The next step in the partition process is to determine how much free space you have on your existing hard drive. Remember, you'll need at least 4 GB of free space for Ubuntu, plus you'll probably want to keep some extra free space for the original operating system.
To find out how much free space is available on your Windows partition, you can turn again to the Windows Computer Management tool. The top portion of the Disk Management window shows detailed statistics for each hard drive partition.
The statistics shown include the total size of the partition and the amount of free space available. Make note of the free space available on the partition. That's the amount of space you'll have available to divvy up between the existing Windows partition and the new Ubuntu partition.
Once you've determined the amount of space you have available for Ubuntu, the next step is to ensure that the space on the disk is really empty.
Defragmenting Files
During the normal course of using your workstation, Windows tends to write files at random places on the hard drive. This can spread data over the entire disk space area. When you split the hard drive into partitions, you'll want to ensure that you don't lose any of the data used in the Windows system, including system and data files.
To make a clean partition of the hard drive, you'll need to make sure that all of the Windows data are moved toward one end of the hard drive. This process is commonly done with a defragmenting tool.
A common mistake is to assign all of the free space on a hard drive to the new Ubuntu partition. You'll want to keep some free space assigned to the Windows partition; otherwise, the Windows operating system installed might not boot properly. It's always a good idea to have at least 1 GB of free space available on the Windows partition, even if you're not planning on adding any new software or data.
Defragmenting is a common process in the Windows world. It's the process of realigning how files are stored on the hard drive. As Windows creates and removes files, file data get split into various blocks scattered around the hard drive. Defragmenting reassembles all of the blocks for each file into a contiguous area near the beginning of the hard drive.
All versions of Windows include a utility for defragmenting the hard drive. You can get to the defragment utility from the Computer Management window. Just select the Disk Defragmenter option.
In Windows Vista, disk defragmenting happens behind the scenes, without any indication of what's going on. Windows XP provides a handy defragmenter window that shows the progress as files are moved about. Figure 3-4 shows the Windows XP defragmenter window.
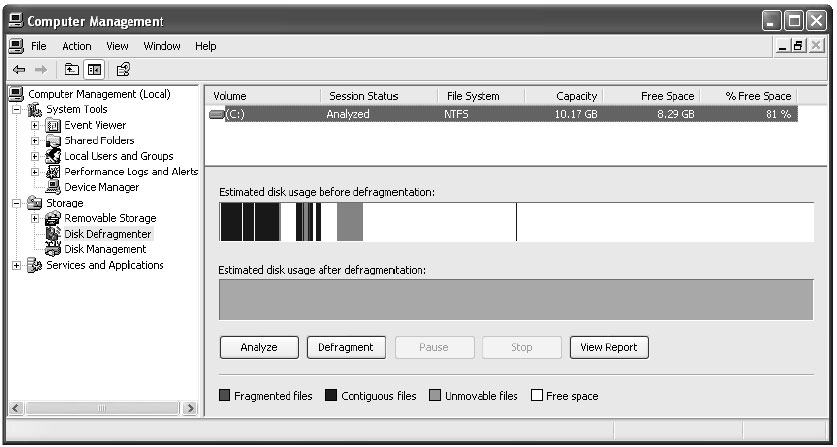
Figure 3-4: The Windows XP disk defragment utility.
Often it takes more than one pass to get all of the files into a common area. After defragmenting moves the files to a contiguous area at the beginning of the disk space, you're ready to partition the hard drive as part of the Ubuntu installation.
Read the rest of this chapter excerpt.
Printed with permission from Wiley Publishing Inc. Copyright 2009. "Ubuntu Linux Secrets" by Richard Blum. For more information about this title and other similar books, please visit http://www.wiley.com.